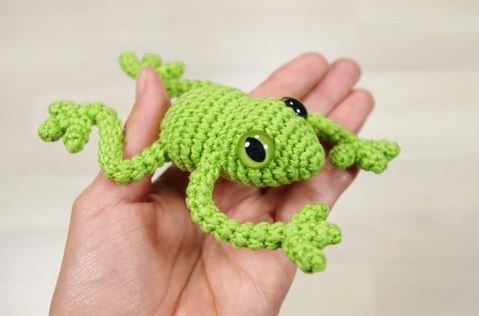
Tree Frog With Amigurumi Pattern
Hello amigurumi lovers and beautiful visitors, I wanted to share the free amigurumi patterns for you here. In my article I will share 1 pattern and how to make it for you. At the end of my article, I will share amigurumi patterns that can generate ideas for you.
Dimension
This tree frog , which you can make with the Amigurumi technique, will be approximately 12 cm
(4 3/4 “”) long, including the legs. It is made with weighted cotton and 2.00 mm crochet crochet.
You can use the same pattern to make larger or smaller toys using finer or bulkier yarns. At least you can choose a smaller crochet than recommended on the yarn label.
What You Will Need
- Yarn. You can use Titan Wool Egitto, which is a weighted cotton yarn. 50g = 120m (50g = 130yd) / 5 ply / 12 wpi / 2: fine. You will need approximately 20 g or 40 m (50 yards) of yarn.
- 2.00 – 2.75 mm hook.
- For stuffing, polyester fiber filling, wool, wadding etc.
- 12mm safety rings or buttons, beads, felt, etc.
- Thread needle, scissors, sewing pen.
- Wire and strong tape or “pipe cleaner”, wire cutters or pliers.
Abbreviations
- mr, sc n = magic ring – single crochet stitch into adjustable loop.
- sc = single crochet stitch (double crochet stitch in UK and Australia).
- sc n = crochet a single crochet stitch in the next n stitches.
- inc = increase – crochet two single crochet stitches in the same stitch.
- inc3 = double increase – crochet three single crochet stitches in the same stitch.
- dec = decrease – crochet two stitches together using the invisible decrease method.
- (sc 4, inc) xn = repeat the pattern between the brackets n times.
- [36] = number of stitches in one round after finishing round.
Notes
- Work in a continuous spiral, do not combine rounds or turn your work unless otherwise indicated on the model.
- Use a stitch marker or a piece of yarn to mark the end or start of a round. Move the pointer up after completing each round.
- Unless otherwise specified in the pattern, all stitches are worked into both loops.
Head and Trunk
1: mr, sc 6 = [6]
2: (sc, increment) x 3 = [9]
3: sc 2, increment3, sc 3, increment3, sc 2 = [13]
4: sc 3 , increase3, sc 5, increase3, sc 3 = [17]
5: sc 6, increase, sc, increase, sc, increase, sc 6 = [20]
- Place a stitch marker between the 12th and 13th stitches in the round and leave it there. This marks the center of the forehead. Use as a guide when placing the eyes.
6: sc 5, sc 3, sc 9, increase3, sc 4 = [24]
7-9: sc in each stitch = [24]
Attach the amigurumi tree frog’s safety loops on both sides of the seam mark, between rows 6 and 7, leaving 8 stitches (count 7 holes) between them.
10: sc 8, dec, (sc, dec) x 3, sc 5 = [20]
Start stuffing the head of the Amigurumi tree frog . Continue adding some fiberfill every few rounds, tightly stuffing the head and body.
11: sc 7, increase, (sc, increase) x 4, sc 4 = [25]
12: sc 7, increase, sc 12, increase, sc 4 = [27]
13-16: each sc in stitch = [27]
17: sc 6, decrease x 2, sc 5, decrease, sc 4, decrease x 2, sc 2 = [22] 18: sc 6, decrease x 2, sc
2 , dec, sc 2, dec x 2, sc 2 = [17]
19: sc 5, dec x 2, sc, dec, sc, dec x 2 = [12]
20: dec x 6 = [ 6]
Finish filling. Cut the thread leaving a long tail of thread and close the opening. Fasten and hide the thread tail.
Front legs (2 Pieces)
1: men, sc 5 = [5]
2-14: sc in each stitch = [5]
Cut and secure the thread, leaving a long tail of thread for sewing. Do not stuff the legs.
Hind legs (2 Pieces)
1: men, sc 5 = [5]
2-17: sc in each stitch = [5]
Cut and secure the thread, leaving a long tail of thread for sewing. Do not stuff the legs.
Cut two pieces of wire long enough to go inside the legs of the amigurumi tree frog and through the trunk, and cut about 5 cm of wire so you can bend the ends back. Push the wires into the torso and where you want the legs to be.
Bend the end back and then wrap some tape around the wire to make sure it doesn’t run through the fabric.
Push the wire into the tree frog’s leg and sew it to the body.
Grab the other leg and bend the wire to the correct length. Push into the second leg and sew the leg to the body. Do the same for the front legs.
Toes (8 Pieces)
1: men, sc 4 = [4]
2-3: sc in each stitch = [4]
Cut and secure the thread, leaving a long tail of thread for sewing. Do not stuff the toes of the Amigurumi tree frog .
Sew the toes to the legs. Fastenand hide all yarn tails.
Congratulations , the amigurumi tree frog model is now finished.
Feel free to tag me (@freeamigurumii) in your photos on Instagram or Facebook if you’d like!