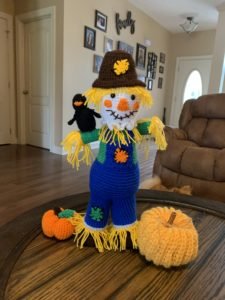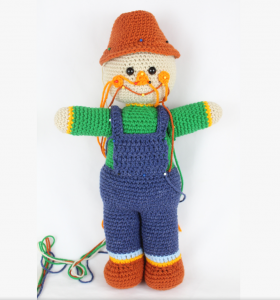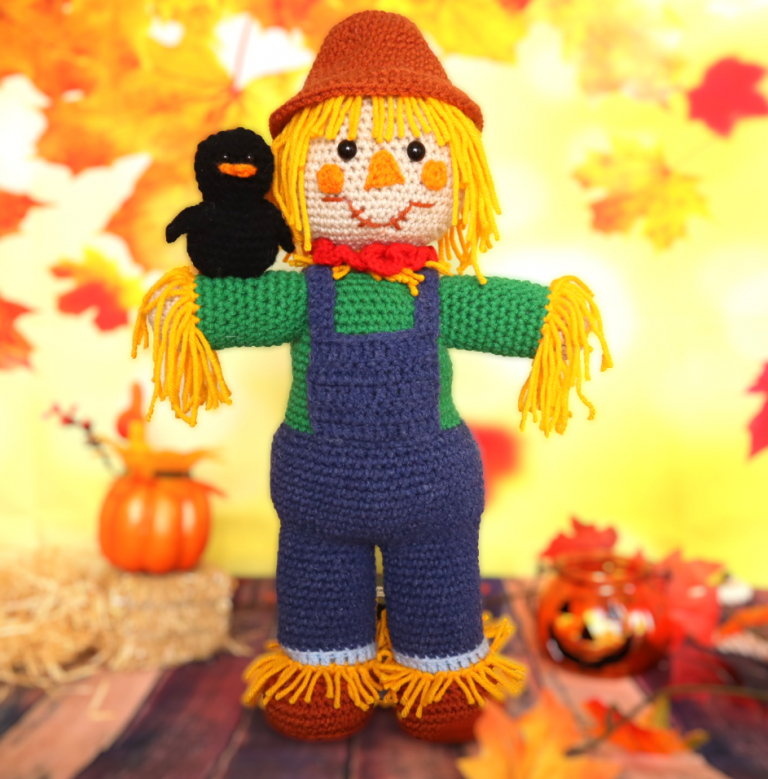
Scarecrow Amigurumi Doll Free Pattern
Hello amigurumi lovers and beautiful visitors, I wanted to share the free amigurumi patterns for you here. In my article I will share 1 pattern and how to make it for you. At the end of my article, I will share amigurumi patterns that can generate ideas for you.
Supplies:
• Yarn 4/Medium Weight Yarn in…
Brown, Yellow, Light Blue, Dark Blue, Green, Red, Cream, Black, and Orange
• 4mm Crochet Hook
•12mm safety eyes for Scarecrow
•6mm safety eyes for bird
•Tapestry needle
•Scissors
•Stuffing
•Foam roller or dowel (optional) This is recommended for the neck to strand firm
Additional Information:
Difficulty: Experienced
• Size
This scarecrow measures 17″ from the shoes to the tip of the hat. This pattern is pretty big and takes time, but it’s well worth it!
• Getting started
We start with the legs and crochet them together, which then forms the body and head. All are one piece. We then make the face, arms, overalls, hay, and a cute crow buddy!
Feet: (Make 2)
In Brown
To start the scarecrow we first create his feet. The foot then leads into the leg. We make one more foot that leads into the leg and crochet both legs together. This forms the bottom of the hips, then leads into the body, and the head. The legs to the head are all one continuous piece.
Make one leg first, then create the second leg
Round 1: 6 Sc in Magic Ring (6)
Round 2: *Inc* all around (12)
Round 3: *Inc, Sc* all around (18)
Round 4: *Inc, Sc 2* all around (24)
Round 5: *Inc, Sc 3* all around (30)
Round 6: *Inc, Sc 4* all around (36)
Round 7: In the BLO, *Sc* all around (36)
Round 8-10: In BOTH Loops, *Sc* all around (36)
Round 11: Sc in the next 6 st, *Dec* 6 times, Sc in the next 18 st (30)
Round 12: Sc in the next 4 st, *Dec* 5 times, Sc in the next 16 st (25)
Round 13: Change to Yellow. Stuff here. In the BLO, Sc in the next 25 st (25)
Round 14: Change to Light Blue color. In the BLO, *Dc* all around (25)
Round 15: In BOTH Loops, *Sc* all around (25)
Round 16: Change to Jeans color. In the BLO *Sc* all around (25)
Round 17-27: In BOTH Loops, *Sc* all around (25)
Round 28 will be different depending on if you’re making the first or second leg. I provide the first leg round 28 on this page and second leg round 28 on the next page.
Round 28, First leg: *Sc* all around (25)
Finish off first leg here, and don’t remove the stitch marker from this first leg.
If you’re making the second leg, continue on the next page for Round 28, Second leg.
Connecting the legs
In this next round we’re going to connect the legs together. Once the legs are connected, we will start working on the body! Note to add a stitch marker to the first stitch made in this “Round 28 , Second Leg” round.
Round 28, Second Leg: Sc in the next 3 st Take the first leg made and count 6 st BEFORE the st marker Line up that 6th st to the next st of the second leg. Insert hook under BOTH stitches and Sc in that st
Continuing under BOTH stitches, Sc in the next 3 st Continuing back on the second leg made , Sc in the next 18 st You can now remove the old stitch marker from the first leg.
(Stitch count: 4 st connecting the legs, 21 st on each leg) Stuff each leg here.
Round 29: Sc in the next 3 st Now we meet the other leg. Sc in the next 21 st of that leg Now we meet the other leg Sc in the next 18 st of that leg (42)
Round 30: *Sc* all around (42)
Round 31: *Inc, Sc 2* all around (56)
Round 32-40: *Sc* all around (56)
Round 41: Repeat *Dec, Sc 2* all around (42)
In the next round we will start making the shirt.
Round 42: Change to Green. In the BLO, *Sc* all around (42)
Round 43-56: In BOTH Loops, *Sc* all around (42)
Stuff here. Continue stuffing after each round.
Round 57: *Dec, Sc 5* all around (36)
Round 58: *Dec, Sc 4* all around (30)
Round 59: *Dec, Sc 3* all around (24)
Round 60: *Dec, Sc 2* all around (18)
Round 61: Change to Yellow. In the FLO, *Sc* all around (18)
Head
Now we’re making the head. If you’d like the head to be firm, place a foam roller or wooden dowel into the doll’s neck now to keep it stable. I would highly recommend this so it’s head won’t be floppy.
Round 62: Change to Cream. In the FLO, *Inc, Sc 2* all around (24)
Round 63: In BOTH Loops, *Inc, Sc 3* all around (30)
Round 64: *Inc, Sc 4* all around (36)
Round 65: *Inc, Sc 5* all around (42)
Round 66: *Inc, Sc 6* all around (48)
Round 67: *Inc, Sc 7* all around (54)
Round 68-80: *Sc* all around (54)13
Place 12mm safety eyes between rounds 74 and 75, 6 stitches apart.
Round 81: *Dec, Sc 7* all around (48)
Stuff head here. Continue stuffing after each round.
Round 82: *Dec, Sc 6* all around (42)
Round 83: *Dec, Sc 5* all around (36)
Round 84: *Dec, Sc 4* all around (30)
Round 85: *Dec, Sc 3* all around (24)
Round 86: *Dec, Sc 2* all around (18)
Round 87: *Dec, Sc* all around (12)
Round 88: *Dec* all around (6)
Finish off and sew closed.
Nose:
In Orange
Row 1: Ch 4. Hdc in the 2nd Ch from hook. Dc in the next st. Trc in the last st
Finish off, leaving a tail for sewing. Pin below and between the eyes as shown. Sew on.
Cheeks: (Make 2)
In Orange
Round 1: 6 Sc in Magic Ring (6)
Finish off. Pin each cheek on as shown and sew on. Weave in ends.
Smile:
In Brown
With your needle and yarn, insert needle into the middle of the mouth area as shown Pull needle out diagonal and to the left Reinsert needle into the original insertion area and pull needle out at the same left area Insert needle with thread a few stitches to the left
Pull needle out at the original insertion spot Insert needle diagonal and to the right Pull the needle out a few stitches to the right Reinsert needle back into the same stitch a few stitches to the left and pull needle out at the original insertion spot Done! You can also add little stitches if desired.
Hat:
In Brown
Round 1: 6 Sc in Magic Ring (6)
Round 2: *Inc* all around (12)
Round 3: *Inc, Sc* all around (18)
Round 4: *Inc, Sc 2* all around (24)
Round 5: *Inc, Sc 3* all around (30)
Round 6: In the BLO, *Sc* all around (30)
Round 7: In BOTH Loops, *Sc* all around (30)
Round 8: *Inc, Sc 4* all around (36)
Round 9-10: *Sc* all around (36)
Round 11: *Inc, Sc 5* all around (42)
Round 12-13: *Sc* all around (42)
Round 14: *Inc, Sc 6* all around (48)
Round 15: *Sc* all around (48)
Round 16: In the FLO, *2 Dc in the next st, Dc in the next 7 st* (54)
Round 17: In BOTH Loops, *2 Dc in the next st, Dc in the next 8 st* (60)
Finish off, leaving a very long tail for sewing. Pin the hat to the head as shown. Sew on, stuff the hat before fully sewing closed.
Assembly:
Pin the hat to the scarecrow as shown Sew on by sewing through the last sc round. Be sure to stuff the hat lightly before fully sewing closed
Arms: (Make 2)
In Cream
Round 1: 6 Sc in Magic Ring (6)
Round 2: *Inc* all around (12)
Round 3: *Inc, Sc* all around (18)
Round 4-6: *Sc* all around (18)
Round 7: Change to Yellow. *Sc* all around (18)
Stuff the arm gradually through each of the next rounds.
Round 8-18: Change to Green.*Sc* all around (18)
Finish off, leaving a long tail for sewing on. Pin to each side of the scarecrow and sew on.
Overalls:
In Blue
To make the overalls we first create a flat square. Next, we make a chain and crochet down the chain to make the straps.
Row 1: Ch 13. Dc in the 2nd Ch from the hook. Dc in the next 11 st (12)
Row 2-5: Turn, Dc in the next 12 st (12)
Row 6: Ch 30 Dc in the 2nd Ch from the hook. Dc in the next 28 st Now we meet the overall piece. SlSt in the next st SlSt in the next 9 st Ch 30. Dc in the 2nd Ch from the hook. Dc in the next 28 st Now we meet the overall piece. SlSt in the next st
Finish off leaving a long tail for sewing. Pin the square part to the front and pin the straps at the back as shown. Sew on.
Hay:
Now we will add hay straws to the yellow parts of the scarecrow. In rounds where we did a single yellow round is where we will add hay. Note that we will also add hay under the hat where we didn’t do a yellow round.
Cut lots of ~5″/13cm yellow strands Insert hook into a yellow round of the legs , arms, or neck (examples of how on the next page) Pull a yellow strand of yarn through
Yarn over with both strands of yellow yarn and pull the yarn through Now tug both ends of yarn at the same time to tighten Cut the strands as desired
Where to insert crochet hook for hay
In the rounds where we did one single round in yellow, insert your hook into that round to make the hay.
Arm
Here is how it should look when you insert your hook into the yellow round of the arm. To add hay simply refer to the process in the previous page. Note, I hardly trimmed the hay in the arms but you can trim the hay quite a bit if you prefer.
Neck
Here is how it should look when you insert your hook into the yellow round of the neck. I trimmed the neck hay.
Head Hay
Lift up the hat Right under the hat insert your hook Repeat the hay process. Cut the hair where it’s in front of the face
Neck Piece:
In Red
Row 1: Ch 28. Dc 3 times in the 2nd Ch from the hook. Dc 3 times in each of the next 26 st.
Finish off, leaving a long tail for sewing. Pin the neck piece around the neck and sew on, sewing the ends together.
Crow Body:
In Black
Round 1: 6 Sc in Magic Ring (6)
Round 2: *Inc* all around (12)
Round 3: *Inc, Sc* all around (18)
Round 4-8: *Sc* all around (18)
Insert eyes in Round 5, 2 st apart
Round 9: *Dec* all around (9)
Round 10: *Inc* all around (18)
Round 11: *Inc, Sc 2* all around (24)
Round 12-16: *Sc* all around (24)
Round 17: *Dec, Sc 2* all around (18)
Round 18: *Dec, Sc* all around (12)
Stuff here
Round 19: *Dec* all around (6)
Finish off, leaving a very long tail for sewing. Sew closed. Don’t cut this end of yarn because we will use it to sew to the arm of the scarecrow later.
Crow Beak:
In Orange
Row 1: Ch 3. Sc in the 2nd Ch from the hook. Dc in the next st.
Finish off and leave a tail for sewing. Pin between the eyes and sew on.
Crow Wings: (Make 2)
In Black
Row 1: Ch 8. Dc in the 2nd Ch from the hook. Dc in the next 4 st, Sc in the last 2 st (7)
Finish off, leaving a long tail for sewing. Pin the wings to each side of the bird, the sc part will be on the outside away from the body. Sew on.
Crow Assembly:
In Black
Pin the crow to the arm of the scarecrow. Sew on with the tail of yarn left from the crows body. Once securely attached, weave in the ends.
All Finished.
Feel free to tag me (@freeamigurumii) in your photos on Instagram or Facebook if you’d like!