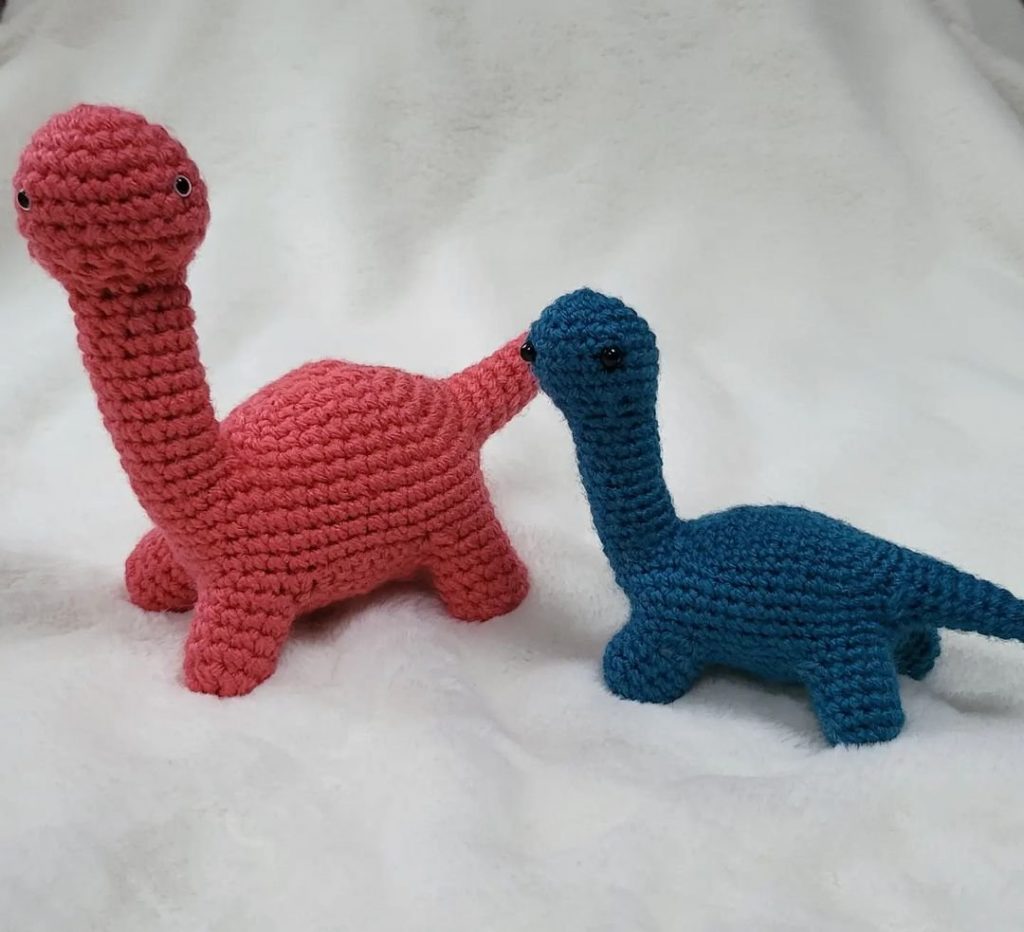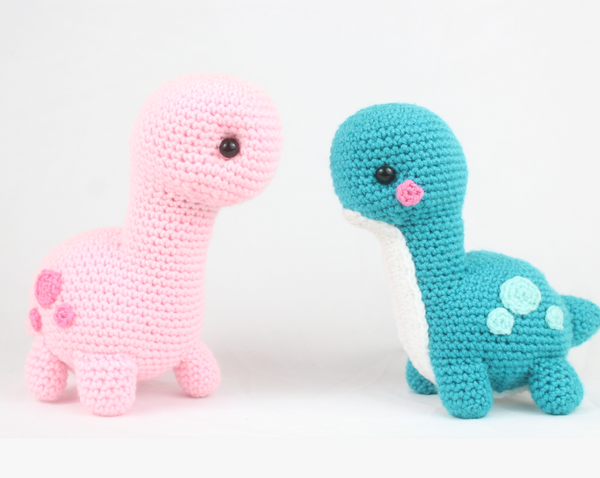
Brontosaurus Dinosaur Free Crochet Pattern
Hello amigurumi lovers and beautiful visitors, I wanted to share the free amigurumi patterns for you here. In my article I will share 1 pattern and how to make it for you. At the end of my article, I will share amigurumi patterns that can generate ideas for you.
Supplies:
• Yarn 4/Medium Weight Yarn in…
Main Color & Contrast Color, White for Chest
• 4mm Crochet Hook
•12mm safety eyes
•Tapestry needle
•Scissors
•Stuffing
•Plastic Pellets for Stuffing (Optional)
Additional Information:
Difficulty: Intermediate
• Getting started
This dinosaur’s body is worked into all one piece. However, we first start by making the back of the dinosaur. After this, we will make the head, which leads into the neck as one continuous piece. We then crochet the back and neck together to start to from the body!
We then make the limbs, spots, tail, do face shaping, and make the chest if desired.
• Also included
Included in this post is a guide on how to sew the limbs on so they don’t stick out!
Brontosaurus:
To start, we will first make the back of the dinosaur. After making the back, we will finish off and start making the head, which leads into the neck as one continuous piece.
Then we will crochet the neck and the back together to form the body. So let’s start making the back!
Back:
In Main Color
Round 1: 6 Sc into a Magic Ring (6)
Round 2: *Inc* in each stitch all around (12)
Round 3: Repeat *Inc in the next st, Sc in the next st* all around (18)
Round 4: Repeat *Inc in the next st, Sc in the next 2 stitches* all around (24)
Round 5: Repeat *Inc, Sc in the next 3 st* all around (30)
Round 6: *Inc, Sc 4* all around (36)
Finish off now. Set the back of the dinosaur aside for now. We will now continue on to making the head on the next page!
Head/Body:
Now we will start making the dinosaurs head. The head works down into the neck as one piece.
Head:
In Main Color
Round 1: 6 Sc into a Magic Ring (6)
Round 2: *Inc* in each stitch all around (12)
Round 3: Repeat *Inc in the next st, Sc in the next st* all around (18)
Round 4: Repeat *Inc in the next st, Sc in the next 2 stitches* all around (24)
Round 5: Repeat *Inc, Sc 3* all around (30)
Round 6: *Inc, Sc 4* all around (36)
Round 7: *Inc, Sc 5* all around (42)
Round 8-11: *Sc* all around (42)
In the next round we will add 2 stitch markers. These will mark where to place the safety eyes later.
Round 12: Sc in the next 14 stitches. Sc in the next st and add a different colored st marker to the Sc just made. Now Sc in the next 13 st. Sc in the next st and add a different colored st marker to the Sc just made. Sc in the next 13 stitches (42)
Round 13-15: *Sc* all around (42)
Round 16: Sc in the next 12 stitches. Repeat *Dec, Sc in the next 2 stitches* a total of 6 times. Sc in the next 6 st (36)
Round 17: Sc in the next 12 stitches. Repeat *Dec, Sc in the next st* 6 times. Sc in the next 6 st (30)
Round 18: Sc in the next 12 st. Repeat *Dec* 6 times. Sc in the next 6 st (24)
Add safety eyes in the marked areas from Round 12 now. Stuff head after.
Now we are forming the neck!
Round 19-25: *Sc* all around (24)
In the next round we will attach the back and neck together. This will form the body.
Now we will line up the neck to the back and crochet them together!
Round 26: Sc in the next 2 stitches Be sure to add your stitch marker to that first stitch made in this round. Now line up the back to the dinosaur’s next neck stitches. (The back part’s wrong side should be facing you, as shown in The right side will face right next to the neck.) Insert your crochet hook under BOTH the neck and body stitches
Sc in the next st
Round 26: Going through BOTH stitches, Sc in the next 5 st Now we have finished attaching the back to the neck. Continuing on only the neck, Sc in the next 16 st of the neck At this point we will meet the stitch marker, meaning we completed Round 26! Your dinosaur should look like
Stitch count: We will have 30 stitches on the back, 6 stitches connecting the neck and body, and 18 neck stitches
Round 27: Sc in the next 2 st Now we meet the back. Sc in the next 30 st of the back
Now we’re working on the neck, Sc in the next 16 st (48)
Round 28-29: *Sc* all around (48)
Stuff the neck now.
Round 30: Sc in the next 14 st, *Inc* in the next 6 st, Sc in the next 28 st (54)
Round 31-39: *Sc* in each stitch all around (54)
Round 40: Repeat *Dec, Sc in the next 7 st* all around (48)
Round 41: *Dec, Sc 6* all around (42)
Round 42: *Dec, Sc 5* all around (36)
Round 43: *Dec, Sc 4* all around (30)
Add stuffing now and after each round.
Note that the dinosaur is top heavy due to the long neck and large head. To make extra sure your dinosaur doesn’t fall forward, I would recommend placing pellets (like poly pellets, the same brand as poly fill stuffing!) into a secure bag like a pantyhose tied firmly shut. Place the bag into the dinosaur now and then add stuffing around the bag. I do not recommend doing this for a child’s toy since small plastic pieces can be harmful.
Round 44: *Dec, Sc 3* all around (24)
Round 45: *Dec, Sc 2* all around (18)
Round 46: *Dec, Sc* all around (12)
Round 47: *Dec* all around (6)
Finish off, leaving a long tail for sewing the body closed. Add any additional stuffing, then weave the end closed. Weave the tail end of yarn into the dinosaur and clip any excess yarn.
Limbs: (Make 4)
In Main Color
Round 1: 6 Sc into a Magic Ring (6)
Round 2: *Inc* in each stitch all around (12)
Round 3-8: *Sc* all around (12)
Finish off, leaving a long tail for sewing. Pin each limb to the dinosaur as shown.
(Specifically the top part of the limb on Round 39 and the bottom part of the limb on Round 40. Place the limbs about 5 stitches apart from the side, 6 stitches apart from the back, 7 stitches apart in the front, or wherever they hold the dinosaur the best.) Make sure the limbs are pinned evenly and align with the other limbs! If the limbs aren’t pinned and sewed on evenly, the dinosaur will not stand firmly.
Sewing on:
Tips to make the limbs better!
To have the limbs hold the dinosaur’s weight firmly so he can stand correctly, we can follow this easy trick! First, sew the limb on as normal, making sure to add stuffing when it’s almost closed Now your limb might look like the right one shown in Fold the limb down Find the corner of the limb. Insert your needle one stitch beside that corner into the dinosaur
Insert your needle into that corner of the limb and pull the yarn through Reinsert your needle into the dinosaur’s body, just one stitch down from where we previously put our needle Now, reinsert your needle into the limb, just one stitch down from where we previously put our needle and pull the yarn through Insert your needle into the next stitch of the dinosaurs body and pull needle out at the other side of the corner limb and repeat this process from steps
This will tie the limb to the dinosaur’s body, so now your limb will not stick out! Compare to see the difference. Some people may only sew the top and bottom stitches of the limbs to an amigurumi. This results in poking out limbs. To combat this, just always follow the guide above!
Spots:
Now we will make the spots for the dinosaur. These are optional, but make them look so cute.
Little Spots: (Make 4, 2 for each side)
In Contrast Color
Round 1: 6 Sc into a Magic Ring (6)
Finish off, leaving a long tail for sewing. Pin the spots where shown, 4 stitches apart. Specifically, Round 34-35. Sew on.
Note: You can also pin the small spots on as cheeks.
Big Spot: (Make 2, 1 for each side)
In Contrast Color
Round 1: 6 Sc into a Magic Ring (6)
Round 2: *Inc* all around (12)
Finish off, leaving a long tail for sewing. Pin the big spot up and between the little spots, specifically on Round 31-34. Sew on.
Tail:
In Main Color
Round 1: 6 Sc into a Magic Ring (6)
Round 2: *Sc* all around (6)
Round 3: *Inc, Sc* all around (9)
Round 4: *Sc* all around (9)
Round 5: *Inc, Sc 2* all around (12)
Round 6: *Sc* all around (12)
Round 7: *Inc, Sc 3* all around (15)
Round 8: *Sc* all around (15)
Finish off, leaving a long tail for sewing. Pin the tail to the dinosaur as shown and sew on. Be sure to stuff the tail before fully sewing on.
Face Shaping:
In Main Color
To make the dinosaur have some extra cute character, we can make indents where the eyes are. This is optional, but I like it!
Take a needle with yarn and insert it at the bottom right corner of the left eye as shown Pull the needle out at the bottom left corner of the right eye as shown Note that you may have to squish the head to have the needle fit through! Now, reinsert the needle 1-2 stitches to the right Pull the needle out at the bottom left area of the left eye
Insert needle 1-2 stitches to the right Pull needle out at the top right corner of the right eye
Insert needle 1-2 stitches to the left Pull needle out at the top right corner of the left eye Finally, insert needle 1-2 stitches to the left, and pull needle out where the tail end of yarn is coming out of Pull both ends of yarn firmly at the same time to tighten the head definition Be sure to not pull too tight or the yarn might break!
Tie both ends of yarn together to form a firm knot and weave the knot into the dinosaur to hide the excess yarn. Cut any extra yarn off.
Chest: (Optional)
In White or Contrast Color
To make the chest, we will be making a chain and working around the chain entirely to make a round. Most times when we make a chain, we turn our work and work over the stitches we just made. However, this time we will crochet down our chain and when we reach the end of it, we will turn to the opposite side where we haven’t crocheted any stitches! Remember, we aren’t turning out work and crocheting on top of the stitches we just made. Then you will be working in a round, and this will end up forming an oval.
Note: Try to not have a very tight tension when making this piece!
Chest:
Round 1: Ch 36 Sc 3 times in the 2nd Ch from the hook. Be sure to add your stitch marker to the first Sc you made. Sc in the next 33 st, Sc 3 times in the next st. Now we are at the end of the chain Turn your crochet work to the other side of the piece, where we haven’t crocheted any stitches yet These unworked stitches will only have 1 loop, and our already worked stitches will have 2 loops.
Sc next 33 st on that other side Now we meet out stitch marker Continue on the next round! (72)
Round 2: Repeat *Inc, Sc in the next 5 st* all around (84)
Round 3: Repeat *Inc, Sc in the next 6 st* all around (96)
Finish off, leaving a very long tail for sewing. Pin the chest piece on as shown and sew on. Now weave the ends into the dinosaur and clip off any excess yarn.
All Finished.
Feel free to tag me (@freeamigurumii) in your photos on Instagram or Facebook if you’d like!