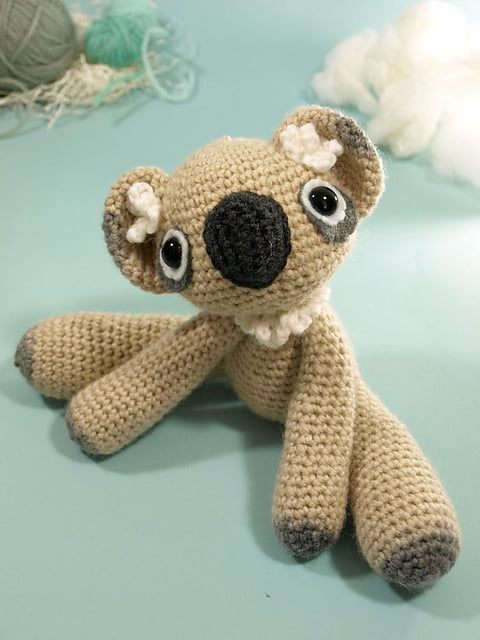
Koala Free Amigurumi Pattern
Hello amigurumi lovers and beautiful visitors, I wanted to share the free amigurumi patterns for you here. In my article I will share 1 pattern and how to make it for you. At the end of my article, I will share amigurumi patterns that can generate ideas for you.
Stitches:
ch (chain)
SC (single crochet)
INCR (increase)
DCR (decrease)
Materials:
felt
yarn (colorA:~100 yds,
colorB:~10 yds)
glass or safety eyes
stuffing
hook (size F)
Koala
Gauge is not crucial with this pattern, however it will impact the size of the eyes you choose. I find that worsted weight yarn (approx
100 yds, plus at least one additional color for facial features approx.10 yds), and a size F hook, gives consistent results for a 6 inch doll
that pairs well with 12mm glass or safety eyes. HINT: This doll is assembled from the top down in a continuous spiral, however I like
to start with the arms & legs… that way they’re ready to attach when the head is done.
ARM (make 2) Working in a continous spiral, color A
Row 1: The arms start with a magic circle, into which 6 SC are made. Pull tail to close loop on magic circle. (6 stitches)
Row 2: 2 SC in next stitch, repeat* 5 more times. (12 stitches)
Row 3: SC in next stitch, 2 SC in next stitch, repeat* 5 more times. (18 stitches)
Row 4-5: SC in next 18 stitches.
Even Rows 6-20: SC, DCR1 evenly over row (10 stitches after row 20)
Odd Rows 7-19: SC in every stitch
After the last row there should be 10 stitches. Bind off, stuff and set aside.
LEG (make 2) Working in a continous spiral, color A
Row 1: The legs also start with a magic circle, into which 6 SC are made. Pull tail to close loop on magic circle. (6 stitches)
Row 2: 2 SC in next stitch, repeat* 5 more times. (12 stitches)
Row 3: SC in next stitch, 2 SC in next stitch, repeat* 5 more times. (18 stitches)
Row 4: SC in next 2 stitches, 2 SC in next stitch, repeat* 5 more times. (24 stitches)
Row 5-7: SC in next 24 stitches.
Even Rows 8-26: SC, DCR1 evenly over row (14 stitches after row 26)
Odd Rows 9-25: SC in every stitch
After the last row there should be 14 stitches. Bind off, stuff and set aside.
EARS: (make 2) Working in a continous spiral, color A
Row 1: The ears also start with a magic circle into which 6 SC are made. Pull tail to close loop on magic circle. (6 stitches)
Row 2: 2 SC in next stitch, repeat* 5 more times. (12 stitches)
Row 3: 1 SC in next stitch, 2 SC in next stitch, repeat* 5 more times. (18 stitches)
Row 4: 1 SC each in next 2 stitches, 2 SC in next stitch, repeat* 5 more times. (24 stitches)
Row 5: 1 SC each in next 3 stitches, 2 SC in next stitch, repeat* 5 more times. (30 stitches)
Row 6-8: SC across.
Bind off.
NOSE: color B, chain 7 and work in continuous spiral
Row 1: SC in next 5 ch, 3 SC in end of chain. Working across the other side SC in next 4 ch, 2 SC in end of chain. (14 stitches)
Row 2: SC in next 4 stitches, 3 SC in next stitch, SC in next 3 stitches, 3 SC in next stitch. SC in next 4 stitches, INCR in next stitch.
(19 stiches)
Row 3: SC across.
Bind off.
HEAD: Working in a continous spiral, color A
Row 1: The head starts with a magic circle, into which 6 SC are made. Pull tail to close loop on magic circle. (6 stitches)
Row 2: 2 SC in next stitch, repeat* 5 more times. (12 stitches)
Row 3: SC in next stitch, 2 SC in next stitch, repeat* 5 more times. (18 stitches)
Row 4: SC in next 2 stitches, 2 SC in next stitch, repeat* 5 more times. (24 stitches)
Row 5-11: SC, INCR 4 stitches evenly over each of the next rows, trying not to place increases in the same place row over row.
Use a stitch marker to indicate the beginning/end of each row if you need to, I tend just to count my stitches as I go. (52 stitches)
Row 12-14: SC in next (52 stitches)
Row 15-18: SC, DCR 6 stitches evenly over each of the next 4 rows, trying not to place decreases in the same place row over row.
(28 stitches)
Row 19 to end: SC in next stitch, DCR 1, repeat* 12 more times until there are 15 stitches
It’s time to stuff the head and place the eyes. Eye size and placement is personal and can dramatically effect the look of your doll. For
the felt eye detail, trace eye details (figure C) onto your felt and cut out carefully. I prefer very small spring loaded snips for this job. If
using safety eyes with posts, make a small slit in your eye details just large enough to fit the post through. Now you can begin postioning your eyes. Once you have choosen the best position, attach firmly.
BODY: Working in a continous spiral, continue from center back (Row 19) of the head.
Row 1: SC in each SC. (15 stitches)
Row 2: SC, INCR 3 evenly over row. (18 stitches)
Row 3: Starting at the center back of the head, SC in next 2 SC, attach arm by aligning 5 stitches of arm with next 5 stitches of body, SC through both layers of those 5 stitches, SC in next 2 SC repeat* to attach second arm. (See figure A.)(18 stitches)
Row 4: SC in next 2 SC, SC in the next 5 stitches of arm skipped in the previous row, SC in next 2 SC repeat* to complete arm attachment (See figure B.)(18 stitches)
Row 5: SC, INCR 6 evenly over row. (24 stitches)

BODY continued
Row 6: SC in each SC. (24 stitches)
Row 7: SC, INCR 3 evenly over row. (27 stitches)
Row 8: SC in each SC. (27 stitches)
Row 9: SC, INCR 3 evenly over row. (30 stitches)
Row 10: SC in each SC. (30 stitches)
Row 11: SC, INCR 3 evenly over row. (33 stitches)
Row 12: SC in each SC. (33 stitches)
Row 13: SC, INCR 3 evenly over row. (36 stitches)
Row 14: SC in next 6 SC, attach leg by aligning 7 stitches of leg with next 7 stitches of body, SC through both layers of those 7 stitches, SC in next 5 SC, repeat* to attach second leg (36 stitches)
Row 15: Following the same technique as arm attachment, picking up 7 sts of legs skipped in previous row, SC in each SC. (36 stitches)
Row 16-17: SC, DCR 6 stitches evenly over each of the next 2 rows, trying not to place decreases in the same place row over row. (24 stitches)
Row 18: SC in next 2 SC, DCR repeat 5 more times. (18 stitches)
Row 19: SC in next SC, DCR repeat 5 more times. (12 stitches)
Row 20: DCR repeat 6 times. (6 stitches)
Bind off with a long tail, stuff body, thread tail through the remaining stitches and pull to close.
FINISHING:
Attach ears and nose using whip stitch or ladder stitch and a single strand of yarn. Optional whiskers can be made placing three long
stitches just to the outside of each eye using a single strand of contrasting yarn.
Add furry ear and collar details with surface crochet: SC 1 (by inserting hook under a stitch on the head), chain 4 and repeat around
entire neckline and in front of ear.
Enjoy!