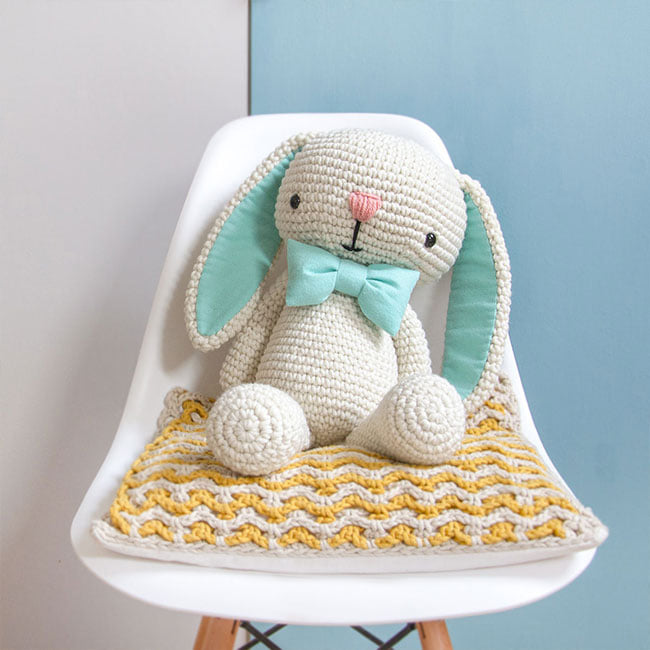
Cory The Giant Bunny Free Pattern
Hello amigurumi lovers and beautiful visitors, I wanted to share the free amigurumi patterns for you here. In my article I will share 1 pattern and how to make it for you. At the end of my article, I will share amigurumi patterns that can generate ideas for you.
MATERIALS
Women’s Institute Soft and Chunky yarn
(70% Acrylic, 30% Merino Wool, 100g / 110m) 4 balls in Cream
• 6 mm crochet hook
• cotton flannel fabric in mint green
• a pair of 15 mm safety eyes
• large pompom maker (9 cm diameter)
• black and pink tapestry wool
• toy stuffing
• stitch markers
• sewing thread
• sewing needle
• tapestry needle
SKILL LEVEL
beginner
SIZE
55 cm (22 ½ in) tall when using the indicated or similar yarn
PATTERN NOTES
It is not necessary to use the recommended yarn and crochet hook to make this amigurumi. Using a smaller crochet hook, and suitable yarn, the amigurumi will be smaller while preserving the same proportions.
The pattern is mainly worked using the “amigurumi” method: working in a continuous spiral without closing off the round with a slst. It may help to use a stitch marker in the last stitch of each round, moving it up as you work.
CONSTRUCTION
Cory the Giant Bunny is worked in pieces then sewn together.
ABBREVIATIONS (US crochet terms)
st: stitch/es
ch: chain
slst: slip stitch
sc: single crochet
Rnd: round/s
inc: single crochet increase
dec: single crochet decrease
[number]: number of stitches of the round or row.
HEAD
Rnd 1: start 6 sc in a magic ring [6]
Rnd 2: inc 6 times [12]
Rnd 3: (inc, sc in next st) repeat 6 times [18]
Rnd 4: (inc, sc in next 2 st) repeat 6 times [24]
Rnd 5: (inc, sc in next 3 st) repeat 6 times [30]
Rnd 6: (inc, sc in next 4 st) repeat 6 times [36]
Rnd 7: (inc, sc in next 5 st) repeat 6 times [42]
Rnd 8: (inc, sc in next 6 st) repeat 6 times [48]
Rnd 9: (inc, sc in next 7 st) repeat 6 times [54]
Rnd 10: (inc, sc in next 8 st) repeat 6 times [60]
Rnd 11 – 18 (8 rounds): sc in each st around [60]
Rnd 19: (dec, sc in next 8 st) repeat 6 times [54]
Rnd 20: (dec, sc in next 7 st) repeat 6 times [48]
Rnd 21: (dec, sc in next 6 st) repeat 6 times [42]
Insert the safety eyes between rounds 16 and 17 approx. 16 st apart.
Start stuffing the head and continue as you go.
Rnd 22: (dec, sc in next 5 st) repeat 6 times [36]
Rnd 23: (dec, sc in next 4 st) repeat 6 times [30]
Rnd 24: (dec, sc in next 3 st) repeat 6 times [24]
Fasten off and weave in the yarn end.
Use pink embroidery thread to embroider the nose between rounds 15 and 17 making long stitches to
create a pink triangle. Use black embroidery thread to embroider the mouth under the nose between
rounds 18 and 20 making long stitches using the sketch below as a guide.
EAR (MAKE 2)
Rnd 1: start 6 sc in a magic ring [6]
Rnd 2: (inc, sc in next 2 st) repeat twice [8]
Rnd 3: (inc, sc in next 3 st) repeat twice [10]
Rnd 4: (inc, sc in next 4 st) repeat twice [12]
Rnd 5: (inc, sc in next 5 st) repeat twice [14]
Rnd 6: (inc, sc in next 6 st) repeat twice [16]
Rnd 7 – 21 (15 rounds): sc in each st around [16]
Rnd 22: dec, sc in next 14 st [15]
Rnd 23: sc in each st around [15]
Rnd 24: dec, sc in next 13 st [14]
Rnd 25: sc in each st around [14]
Rnd 26: dec, sc in next 12 st [13]
Rnd 27: sc in each st around [13]
Rnd 28: dec, sc in next 11 st [12]
Rnd 29: sc in each st around [12]
Rnd 30: dec, sc in next 10 st [11]
Rnd 31: sc in each st around [11]
Rnd 32: dec, sc in next 9 st [10]
Rnd 33: sc in each st around [10]
Do not stuff.
Fasten off leaving a long tail for sewing the ears between rounds 6 and 8 of the head.
FOR THE INNER EARS: cut two pieces from the flannel fabric using the template at page 6.
Cut along the continuous line and fold the fabric along the dotted line. Use sewing pins to secure the
fabric onto the ears and sew the inner ear in place using sewing thread.
BODY
Rnd 1: start 6 sc in a magic ring [6]
Rnd 2: inc 6 times [12]
Rnd 3: (inc, sc in next st) repeat 6 times [18]
Rnd 4: (inc, sc in next 2 st) repeat 6 times [24]
Rnd 5: (inc, sc in next 3 st) repeat 6 times [30]
Rnd 6: (inc, sc in next 4 st) repeat 6 times [36]
Rnd 7: (inc, sc in next 5 st) repeat 6 times [42]
Rnd 8: (inc, sc in next 6 st) repeat 6 times [48]
Rnd 9 – 13 (5 rounds): sc in each st around [48]
Rnd 14: (dec, sc in next 6 st) repeat 6 times [42]
Rnd 15 – 17 (3 rounds): sc in each st around [42]
Rnd 18: (dec, sc in next 5 st) repeat 6 times [36]
Rnd 19 – 21 (3 rounds): sc in each st around [36]
Rnd 22: (dec, sc in next 4 st) repeat 6 times [30]
Rnd 23 – 25 (3 rounds): sc in each st around [30]
Rnd 26: (dec, sc in next 3 st) repeat 6 times [24]
Stuff the body using toy stuffing.
Fasten off leaving a long tail for sewing the body to the head.
LEG (MAKE 2)
Rnd 1: start 6 sc in a magic ring [6]
Rnd 2: inc 6 times [12]
Rnd 3: (inc, sc in next st) repeat 6 times [18]
Rnd 4: (inc, sc in next 2 st) repeat 6 times [24]
Rnd 5 – 9 (5 rounds): sc in each st around [24]
Rnd 10: (dec, sc in next 6 st) repeat 3 times [21]
Rnd 11: sc in each st around [21]
Rnd 12: (dec, sc in next 5 st) repeat 3 times [18]
Rnd 13 – 15 (3 rounds): sc in each st around [18]
Rnd 16: (dec, sc in next 4 st) repeat 3 times [15]
Rnd 17 – 19 (3 rounds): sc in each st around [15]
Rnd 20: (dec, sc in next 3 st) repeat 3 times [12]
Rnd 21 – 23 (3 rounds): sc in each st around [12]
Rnd 24: (dec, sc in next 2 st) repeat 3 times [9]
Rnd 25 – 27 (3 rounds): sc in each st around [9]
Stuff slightly using toy stuffing.
Fasten off leaving a long tail for sewing the legs to the body.
TAIL
Make a 9 cm (3 ½ in) diameter pompom using a pompom maker.
Cut a long tail of yarn to thread the pompom around the center, and use the same tail to sew the
pompom to the back of the body.
ARM (MAKE 2)
Rnd 1: start 6 sc in a magic ring [6]
Rnd 2: inc 6 times [12]
Rnd 3 – 9 (7 rounds): sc in each st around [12]
Rnd 10: dec, sc in next 10 st [11]
Rnd 11 – 12: sc in each st around [11]
Rnd 13: dec, sc in next 9 st [10]
Rnd 14 – 19 (6 rounds): sc in each st around [10]
Stuff slightly using toy stuffing.
Fasten off leaving a long tail for sewing the arms to the body.
BOW TIE
Cut a rectangle 17 x 14 cm from the flannel fabric.
With the wrong side of fabric facing down, fold along the long side (the sides that measure 17 cm)
and overlap by 2 cm (image A). Sew along the open sides using running stitch (image B).
Turn inside out and insert some toy stuffing.
Cut a rectangle 10 x 5 cm from the flannel fabric to tie the bow in the middle.
With the right side of the fabric facing down, fold 1 cm of the long sides to get a smooth edge. Wrap the
piece of fabric around the main part of the bow until you get a nice shaped bow, secure the piece with
few stitches.
Stitch the bow on to the body of the bunny or use a safety pin.
Enjoy!