Free Amigurumi Cat Pattern
Hello amigurumi lovers and beautiful visitors, I wanted to share the free amigurumi patterns for you here. In my article I will share 1 pattern and how to make it for you. At the end of my article, I will share amigurumi patterns that can generate ideas for you.
You Will Need
50g balls of any DK yarn (we’d recommend King Cole Big Value DK or Rico Design Essentials Cotton DK)
- light brown (Tom head colour)
- grey (Richard head colour)
- pink (Sally head colour)
- red
- yellow
- white
- blue
- mint
- lime
- pale blue
- bright pink
3.5mm crochet hook
12mm (½in) safety toy eyes
Black embroidery thread
Wool needle
Toy stuffing
Optional for Sally – Fabric glue
Optional for Sally – Flower motif, button or alternative small decorative item.
Optional for Richard – Jewellery wire
Measurements
20 x 10cm (8 x 4in)
Tension
Tension is not important for this project, but make sure your stitches are tight enough that the stuffing won’t poke through
Notes
If you’re making this amigurumi cat crochet pattern for young children, then we would advise against using the safety eyes and accessories like the glasses, instead try embroidering the features on. If you’re new to amigurumi, our guide on how to crochet amigurumi has lots of helpful tips and techniques to help you get your amigurumi cats looking purrrrfect!
Abbreviations
You can find a full list of all abbreviations we use in our abbreviations and conversions guide. This crochet flower bunting pattern is written in UK terminology but you can easily convert it to US terms using the guide.

Head and body
Starting with your chosen head colour yarn (brown for Tom, pink for Sally, grey for Richard), make a crochet magic loop.
Round 1: 6dc in magic loop. [6 sts]
Round 2: 2dc into each st to the end. [12sts]
Round 3: (Dc in the first st, 2dc in the next st) repeat to end. [18sts]
Round 4: (Dc in the first two sts, 2dc in the next st) repeat to end. [24sts]
Round 5: (Dc in the first three sts, 2dc in the next st) repeat to end. [30sts]
Round 6: (Dc in the first nine sts, 2dc in the next st) repeat to end. [33sts]
Round 7: (Dc in the first ten sts, 2dc in the next st) repeat to end. [36sts]
Round 8: (Dc in the first 11sts, 2dc in the next st) repeat to end. [39sts]
Round 9: (Dc in the first 12sts, 2dc in the next st) repeat to end. [42sts]
Round 10-12: Dc in each st to the end. [42sts]. Mark round 10 with a stitch marker.
Round 13: (Dc2tog, dc in next five sts) repeat to end. [36sts]
Round 14: (Dc2tog, dc in next four sts) repeat to end. [30sts]
Round 15: (Dc2tog, dc in next three sts) repeat to end. [24sts]
Round 16: (Dc2tog, dc in next two sts) repeat to end. [18sts]
Insert the toy eyes now. They go on the marked round, 8 stitches apart
Round 17: (Dc2tog, dc in next st) repeat to end. [12sts]
Stuff the head now.
Change to jumper yarn colour – red for Tom, yellow for Sally and white for Richard.
Round 18: Dc into each st to the end. 12sts. Work an uncounted round of slip stitches.
Round 19: (Dc in the first three sts, 2dc in the next st) repeat to end. [15sts].
Round 20: (Dc in the first four sts, 2dc in the next st) repeat to end. [18sts].
Round 21: (Dc in the first five sts, 2dc in the next st) repeat to end. [21sts].
Round 22: (Dc in the first six sts, 2dc in the next st) repeat to end. [24sts].
Round 23: (Dc in the first seven sts, 2dc in the next st) repeat to end. [27sts].
Round 24: (Dc in the first eight sts, 2dc in the next st) repeat to end. [30sts].
Round 25: (Dc in the first nine Sts, 2dc in the next st) repeat to end. [33sts].
Round 26: (Dc in the first ten Sts, 2dc in the next st) repeat to end. [36sts].
Round 27 & 28: Dc in each st to the end. 36sts. Work a round of uncounted slip stitches.
Change to trouser yarn colour – blue for Tom, mint for Sally and lime for Richard
Round 29: Dc in each st to the end. [36sts].
Round 30: (Dc2tog, dc in next seven sts) repeat to end. [32sts].
Round 31: (Dc2tog, dc in next six sts) repeat to end. [28sts].
Round 32: (Dc2tog, dc in next five sts) repeat to end. [24sts].
Stuff the body now.
Split to make the legs. Put a pin or stitch marker through the stitch on the last row that is at the centre front of your cat. The easiest way to do this is lay your cat on a hard surface facing forward and flatten slightly. Find the middle of the eyes with your pin and then run it straight down the body of the cat and attach it to the stitch on the last worked row.

First leg
Round 33: Dc in each skipping the marked st and the next 11sts. [12sts].
Round 34: Dc2tog, dc in each st to the end. [11sts].
Round 35 & 36: Dc in each st to the end. [11sts].
Round 37: Dc2tog, dc in each st to the end. [10sts].
Round 38: Dc in each st to the end. [10sts].
Change to boot colour Grey for Tom, yellow for Sally, blue for Richard.
Work an uncounted round of slip stitches. Mark the centre front of the boot with a pin.
Round 39: Dc in each st till one st before the pin, (dc, 2htr) in next st, htr in next (remove pin before working) (2htr, dc) in next, dc in each remaining sts to end. [14sts].
Round 40: Dc in each st to the end. [14sts]
Round 41: (Dc2tog, dc in next five sts) repeat to end. [12sts]. Stuff the leg now.
Round 42: (Dc2tog) repeat to end. [6sts].
Fasten off leaving a long tail.
Second leg
Rejoin yarn to any stitch at the back of the body on round 32.
Round 33: Dc in each st. [12sts].
Round 34-42: Work as for 1st leg.
Fasten off leaving a long tail. Using a wool needle, weave the yarn through the last 6 stitches and pull tight to close. Weave in yarn ends and cut off remaining yarn.

Face details
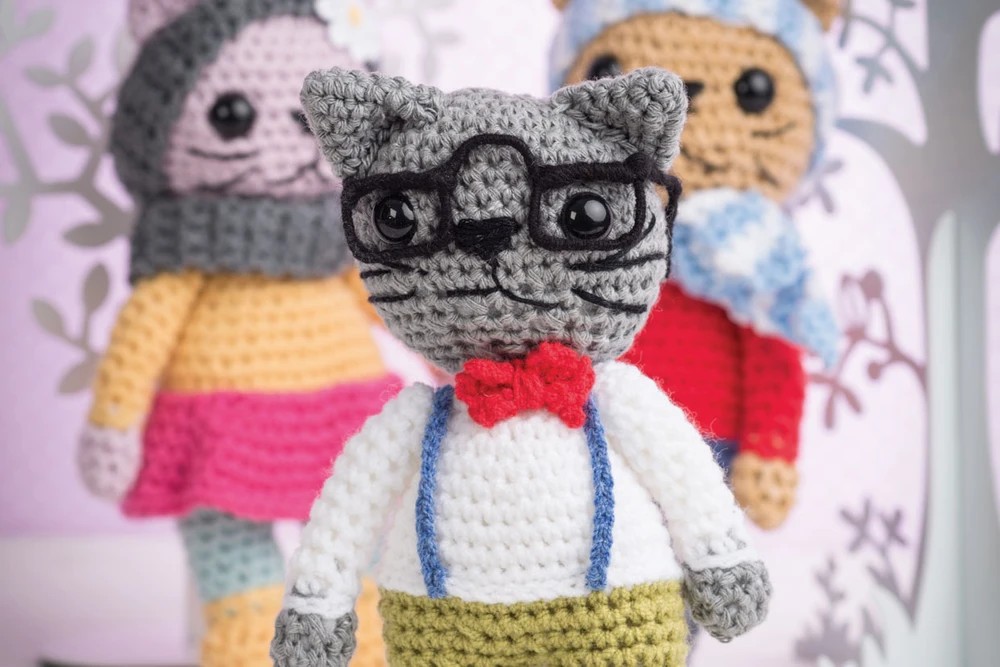
Use black embroidery thread and embroider the face using the photo as a guide. Use long stitches to form the mouth and whiskers and shorter ones to make the nose.
Arms (make 2)
Start in the same yarn used for the head: brown for Tom, pink for Sally and grey for Richard – make a crochet magic loop.
Round 1: 6dc in magic loop. [6 sts]
Round 2: (Dc in the first st, 2dc in the next st) repeat to end. [9sts].
Round 3: Dc into each st to the end. [9sts].
Round 4: (Dc2tog, dc in next st) repeat to end. [6sts].
Change to red yarn for Tom, yellow for Sally and white for Richard.
Round 5 – 14: Dc into each st to the end. [6sts].
Fasten off leaving a long tail..
Stuff and sew in place on the body.
Ears (make 2)
Start in the same yarn used for the head, yellow for Tom, pink for Sally and grey for Richard.
make a crochet magic loop.
Round 1: 4dc in magic loop. [4 sts]
Round 2: (Dc in the first st, 2dc in the next st) repeat to end. [6sts].
Round 3: (Dc in the first two sts, 2dc in the next st) repeat to end. [8sts].
Round 4: (Dc in the first three sts, 2dc in the next st) repeat to end. [10sts].
Round 5: (Dc in the first four sts, 2dc in the next st) repeat to end. [12sts].
Round 6: (Dc in the first five sts, 2dc in the next st) repeat to end. [14sts].
Fasten off leaving a long tail.
Sew in place on the head (don’t sew Tom’s on until you’ve made his hat).
Amigurumi Cat Accessories
Tom’s hat
Using pale blue yarn, make a crochet magic loop.
Round 1: 6dc in magic loop. [6 sts]
Round 2: 2dc into each st to the end. [12sts].
Round 3: (Dc in the first st, 2dc in the next st) repeat to end. [18sts].
Round 4: (Dc in the first two sts, 2dc in the next st) repeat to end. [24sts].
Round 5: (Dc in the first three sts, 2dc in the next st) repeat to end. [30sts].
Round 6: (Dc in the first nine sts, 2dc in the next st) repeat to end. [33sts].
Round 7: (Dc in the first ten sts, 2dc in the next st) repeat to end. [36sts].
Round 8: (Dc in the first eleven sts, 2dc in the next st) repeat to end. [39sts].
Round 9: (Dc in the first twelve sts, 2dc in the next st) repeat to end. [42sts].
Fasten off leaving a long tail.
Brim
Note this is not worked in the round, so ch1 and turn at the beginning of each row.
Using blue yarn, ch5.
Row 1: Dc in 2nd ch from hook, dc in each st to end. 4sts.
Row 2: Ch1, turn, dc in each stitch. 4st. Change to white yarn.
Repeat row two, 38 times. Work two rows white then two rows blue to form stripe.
Fasten off leaving a long tail.
Use the photo as a guide and sew in place to the bottom edge of the hat.
Tom’s scarf
Note this is not worked in the round, so ch1 and turn at the beginning of each row.
Using blue yarn, Ch5.
Row 1: Dc in 2nd ch from hook, dc in each st to end. [4sts].
Row 2: Ch1, turn, dc in each stitch. [4sts]. Change to white yarn.
Repeat row two until scarf measures 25cm (10in), working two rows white, then two rows blue to form stripe.
Fasten off. Weave in any loose ends and tie round neck.
Sally’s skirt
Using bright pink yarn, ch36.
Ss to form a loop (careful not to twist). [36sts].
Round 1: (Dc in the first 11ch sts, 2dc in the next) repeat to end. [39sts].
Round 2: (Dc in the first 12 sts, 2dc in the next st) repeat to end. [42sts].
Round 3: (Dc in the first 13 sts, 2dc in the next st) repeat to end. [45sts].
Round 4: (Dc in the first 14 sts, 2dc in the next st) repeat to end. [48sts].
Round 5: (Dc in the first 15 sts, 2dc in the next st) repeat to end. [51sts].
Round 6: (Dc in the first 16 sts, 2dc in the next st) repeat to end. [54sts].
Fasten off leaving a long tail. Weave in any loose ends and sew in place at the bottom edge of the jumper.
Sally’s head band
Note this is not worked in the round, so ch1 and turn at the beginning of each row.
Using grey yarn, ch7.
Row 1: Dc in 2nd ch from hook, dc in each st to end. [6sts].
Row 2: Ch1, turn, dc in each stitch. [6sts].
Repeat row 2 until headband measures round the head.
Fasten off leaving a long tail.. Place round the head and sew the ends together weave in any loose and cut off.
Glue flower motif in place for decoration.
Sally’s neck cowl
Note this is not worked in the round, so ch1 and turn at the beginning of each row.
Using grey yarn, Ch5.
Row 1: Dc in 2nd ch from hook, dc in each st to end. [4sts].
Row 2: Ch1, turn, dc in each stitch. [4sts].
Repeat row 2 until headband measures 35cm (14in).
Fasten off leaving a long tail.. Sew the ends together, weave in any loose ends and cut off. Wrap around the neck.
Richard’s bow tie
Note this is not worked in the round, so ch1 and turn at the beginning of each row.
Using red yarn, ch5.
Row 1: Dc in 2nd ch from hook, dc in each st to end. [4sts].
Row 2-4: Ch1, turn, dc in each stitch. [4sts].
Fasten off leaving a long tail.. Wrap the yarn round the centre of the square a few times and pull tight. Sew in place on the neck.
Richard’s braces (make 2)
Using blue yarn, Ch 22.
Fasten off leaving a long tail. Sew in place on either side of the body.
Richard’s glasses
Use bendable jewellery wire and twist together to form the glasses shape.
Use glue to secure black yarn to the one end of the wire and wrap around till all the wire is covered. Glue yarn end in lace and cut off.

We hope you’ve enjoyed this free amigurumi cat pattern!