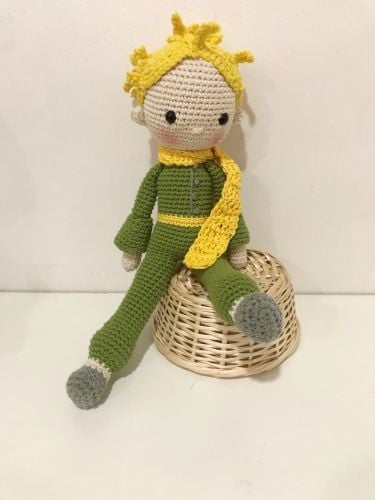
The Little Prince in Tavel Suit Free Pattern
Hello amigurumi lovers and beautiful visitors, I wanted to share the free amigurumi patterns for you here. In my article I will share 1 pattern and how to make it for you. At the end of my article, I will share amigurumi patterns that can generate ideas for you.
Size
This doll is about 20cm height.
Materials:
2mm crochet hook
2,5mm crochet hook
Cotton thread:
Balloon (Pingouin)
Anne (Círculo)
Lisa (Círculo)
Synthetic Fiber
6mm security eyes
Tapestry needle
Abreviations:
MR = Magic ring
ch = chain
st = stitch
slst = slip stitch
slstbl = slip stitch back loop
sc = single crochet
scbl = single crochet back loop
scfl = single crochet front loop
pop corn stitch = make 4dc in the same stitch and close them all together
inc = increase
dec = decrease
R# = round or row #
( ) = repeat what is between ( )

FEET AND LEGS (make 2)
Black thread
R1 7 ch
R2 5sc, 3sc same st, 4sc, 1inc 14
R3 1inc, 3sc, 5inc, 3sc, 2inc 22
R4 (1sc, 1inc), 3sc, 5x (1sc, 1inc), 3sc, 2x (1sc, 1inc) 30
R5 30scbl 30
R6 30sc 30
R7 9sc, 5dec, 11sc 25
R8 9sc, 3dec, 10sc 22
R9 6sc, 4dec, 8sc 18
R10 3x (4sc, 1dec) 1 5
R11 – R16 15sc (6 rounds)
Cut the thread and change the color.
White thread
R17 15slst 1 5
R18 15inc bl 30
R19 = R20 30sc (2 rounds)
R21 10x (1sc, 1dec) 20
R22 2x (8sc, 1dec) 1 8
R23 – R25 18sc (3 rounds)
Bind off the first leg and make the second leg the same as the first. The second leg must
NOT be binded off.
Fill both legs well with fiber so that they are firm. Be careful not to overfill your feet so
that the sole is not bulged.
Keep the legs in reserve and do the arms before proceeding with the body
HANDS AND ARMS (make 2)
Skin color thread
R1 MR, 6sc 6
R2 6inc 12
R3 12sc 12
R4 10sc, 1 pop corn st, 1sc 12
R5 12sc 12
Bind off and change the color.
White thread
R6 12slstbl 12
R7 12scbl 12
R8 – R20 12sc (13 ounds)
Bind off and can hide the threads that will not be needed, as the arms will be attached to
the body to follow during the execution of the same. Fill with fiber so that it has a defined
shape but can have some mobility. Do the second arm in the same way.
In this doll I inserted a bundle of thin wires wrapped in masking tape to be able to make the
arms firmer and allow him to keep his arms open or closed.
First I measured the wires and put masking tape on the ends and with it inside the arm I
gradually put fiber around the wire so that it is in the center. It’s a little bit of work but it
looks really cool. You can leave the arms without wire at all. It looks great too.

BODY
White thread
OBS.01: I will start counting the rounds again for the simple reason of separating the
numbering of the legs from the numbering of the body, but it will be done in circular rows in
the same way as the legs, with the difference that in the first round the legs will be joined.
Place the two legs side by side so that the toes are facing the same side and, from the leg
that was not finished, continue to work in a spiral, joining the legs and forming the body as
follows:
R1 7sc, 1ch, take the other leg and align it with the first leg and, starting from the
center point of the second leg, continue at a low point circling that second leg, that is, do
18sc, then, arriving at the central chain, do 1sc in this chain, back to the first leg, do the
11sc left to get to the start of the round.
R2 7sc, 1sc on the other side of the chain you made the previous round, 30sc until
you are back at the beginning.
R3 = R4 38sc (2 rounds)
Rounds 5 and 6 are done in Gold thread. Do not finish the white. Just do these rounds in
gold.
R5 38sc 38
R6 8sc, 1dec, 17sc, 1dec, 9sc 36
Cut the god thread and work with White thread
R7 36sc 36
R8 6x (4sc, 1dec) 30
R9 = R10 30sc (2 rounds)
R11 6x (3sc, 1dec) 24
R12 – R14 24sc (3 rounds)
R15 6x (2sc, 1dec) 1 8
R16 17sc — DON’T MAKE THE LAST STITCH OF THIS ROUND
On the next round the arms will be attached to the body. Take care that the thumbs are
inward, that is, turned towards the body and not outward. If you don’t take this care, it will
look like your palms are facing up and it looks weird.
Watch out for the wire !! These next rounds should be done very carefully so that the
wire in the arms does not move. It’s “tricky”, but it’s worth it !!
R17 using one arm stitch and one body stitch, do 6sc, 3sc only on the doll’s back,
6sc joining the second arm, 3sc in front of the body
R18 6sc using only the points on the outside of the first arm, 3sc, 6sc using only the
points on the outside of the second arm, 3sc
R19 6x (1sc, 1dec) 12
Bind off and change the color.
Gold thread
R20 12sc 1 2
Finish by leaving a long gold thread that will be used to embroider the front of the blouse
and change color.
Skin color thread.
R21 = R22 12sc (2 rounds)
Fill the body well and, if you want, you can make a “bundle” with wires to give firmness to
the neck, which is very thin.
HEAD
Skin color thread
The count will be reset only to separate the stitches on the head, but the work continues
where it left off at the end of the body.
R1 12scfl 12
R2 6x (3sc, 1inc) 30
R3 6x (4sc, 1inc) 36
R4 6x (5sc, 1inc) 42
R5 6x (6sc, 1inc) 48
R6 – R12 48sc (7rounds)
Place the safety eyes on round 9, centering them on the face and leaving 9 stitches between
them.
R13 6x (6sc, 1dec) 42
R14 6x (5sc, 1dec) 36
R15 6x (4sc, 1dec) 30
R16 6x (3sc, 1dec) 24
R17 6x (2sc, 1dec) 18
R18 6x (1sc, 1dec) 12
R19 12dec 6
Bind off and hide the thread.
Before closing the head opening too much, fill it well with fiber and, as it closes, keep the
head very firm, as well as the neck.
After finishing the head, embroider the nose with the same thread as the head.
Make the ears on the sides of the head 4 stitches away from the eyes as follows:
Attach the thread and make 1ch, 1sc, 1hdc, 1ch and bind off and make the same one.
After finishing embroidering the face, using the golden thread that was around the neck,
embroider from the neckline to the golden belt.
HAIR
Yellow thread
2,5mm Crochet hook
OBS.: all single crochet stitches from round 2 to round 10 are done in backloop, that is,
scbl, including increases.
R1 MR, 6sc 6
R2 6inc 12
R3 6x (1scbl, 1inc) 18
R4 6x (2scbl, 1inc) 24
R5 6x (3scbl, 1inc) 30
R6 6x (4scbl, 1inc) 36
R7 6x (5scbl, 1inc) 42
R8 – R10 42scbl (3 rounds)
R11 13x (11ch, 10sc, 1slst); (5ch, 1sc) until you get to the end of the round.
TheI curls were made as follows:
From the last slip stitch made on the edge, make another slip stitch on the loop of the
previous round and, following the spiral in reverse, that is, in the direction from the outside
to the center, do 5ch, 1slst, until you reach the center of the hair . Bind off and leave a long
thread to sew on the head.
If you want to have less curls, do it the same way, but always skipping a round.
TRAVEL JACKET
SLEEVES (make 2)
Red thread
R1 17ch close making a circle, 16sc 1 6
R2 – R5 16sc (4 rounds)
R6 16scbl 1 6
R7 – R11 16sc (5 rounds)
Bind off and hide the thread. Make the second base of the sleeve the same.
Blue thread
Fold the sleeve with the bottom inward. Note that the loop that was made only in the back
loop will be where the sleeve should be folded, this edge will be close to the hand.
R1 16sc made on the bottom of the chain made on the first round 1 6
R2 – R10 16sc (9 rounds)
Make both sleeves, finish both and leave on hold.
BODY
Blue thread
The jacket body is not made in a spiral, but whenever you finish the row, make 1ch, turn and
continue the pattern. In this case, I didn’t make a chain, I just finish my career, turn
around and start the next career. Both ways work.
R1 61ch, 60sc 60
R2 1dec, 56sc, 1dec 58
R3 1dec, 54sc, 1dec 56
R4 1dec, 52sc, 1dec 54
R5 1dec, 50sc, 1dec 52
R6 1dec, 48sc, 1dec 50
R7 1dec, 46sc, 1dec 48
R8 1dec, 44sc, 1dec 46
R9 1dec, 42sc, 1dec 44
R10 1dec, 40sc, 1dec 42
R11 – R15 42sc (5 rows)
R16 1dec, 38sc, 1dec 40
R17 – R25 40sc (9 rows)
R26 1dec, 6sc, 1dec, 5sc, 1dec 34
R27 = R28 34sc (2 rows)
From the next row, the rows will be made using 2 colors, separated into 3 parts: red, blue,
red.
CAUTION so that the color transition is always done on the same side, this way it will be
the wrong side.
WRONG SIDE = PAIR
RIGHT SIDE = ODD
R29 1sc (red), 32sc (blue), 1sc (red) 34
R30 2sc (red), 30sc (blue), 2sc (red) 34
R31 3sc (red), 3sc, 1dec, 5x (2sc, 1dec), 3sc, 3sc (red) 28
R32 – R34 4sc (red), 20sc (blue), 4sc (red) (3 rows)
Next row attach the sleeves.
R35 4sc (red), [1sc, 6sc with the first sleeve, 6sc, 6sc with second sleeve, 1sc]
(blue), 4sc (red) 28
R36 4sc (red), 1sc, 10sc only by the outer stitches of the first sleeve, 6sc, 10sc only by the outer stitches of the second sleeve, 1sc, 4sc (red) 36
R37 4sc (red), 28sc (blue), 4sc (red) 36
R38 4sc (red), 1sc, 1dec, 2x (3sc, 1dec), 2sc, 1dec, 2x (3sc, 1dec), 1sc, 4sc
(red) 30
R39 4sc (red), 2x (1sc, 1dec), 3x (2sc, 1dec), 1sc, 1dec, 1sc, 4sc (red) 24
Bind off the blue color and continue only in red.
R40 4sc, 16scbl, 4sc 24
R41 – R43 24sc (3 rows)
Make single cochet in red the entire back of the jacket taking care to make 3sc at all ends.
Kisses and…
Have fun!!