Horse, Donkey, Zebra Amigurumi Crochet Pattern
Hello amigurumi lovers and beautiful visitors, I wanted to share the free amigurumi patterns for you here. In my article I will share 1 pattern and how to make it for you. At the end of my article, I will share amigurumi patterns that can generate ideas for you.
Supplies:
• Yarn colors in size 4/Medium Yarn…
See below this pattern information for colors needed for your specific horse!
•4mm Crochet Hook
•12mm safety eyes
•Tapestry needle
•Scissors
•Stuffing
Additional Information:
• Getting started…
Each horse uses the same pattern, but some techniques will be slightly different depending on which one you choose to make. We first start making the nose, which leads into the head. While doing this we leave an opening so we can form the neck from that opening. After forming the neck, it will lead into the body. Essentially the nose, head, neck, and body are one connected piece! After this we will make all of the other parts
• Recommended Yarns:
JoAnn Fabric’s “Big Twist” Yarn
Red Heart Super Saver Yarn
Hobby Lobby’s “I Love This Yarn!”
Color Guide:
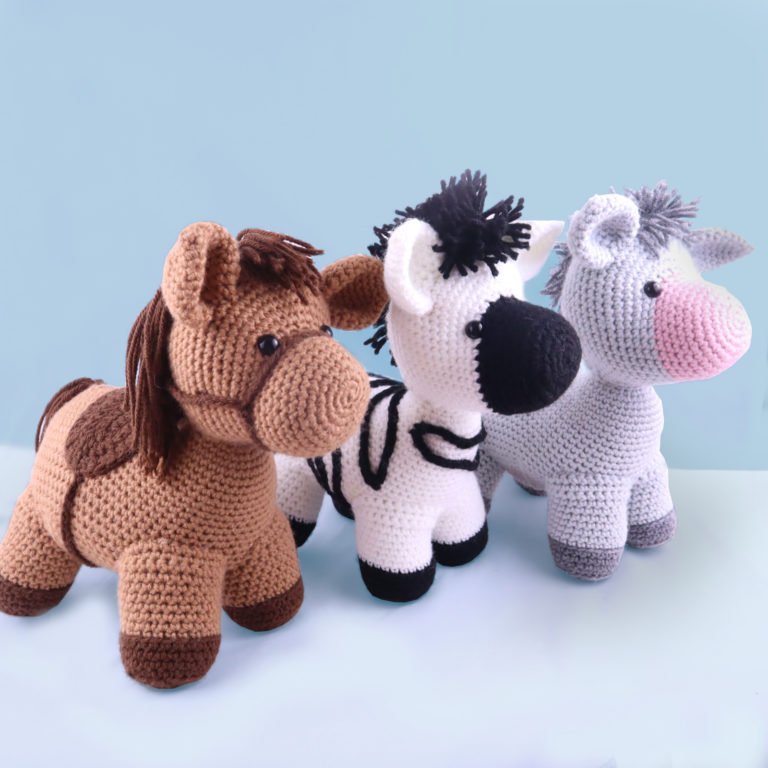
We have a few equines to choose from! Find which horse you’d like to make and follow it’s color guide. The color guide tells you what colors to use for each part of the pattern.
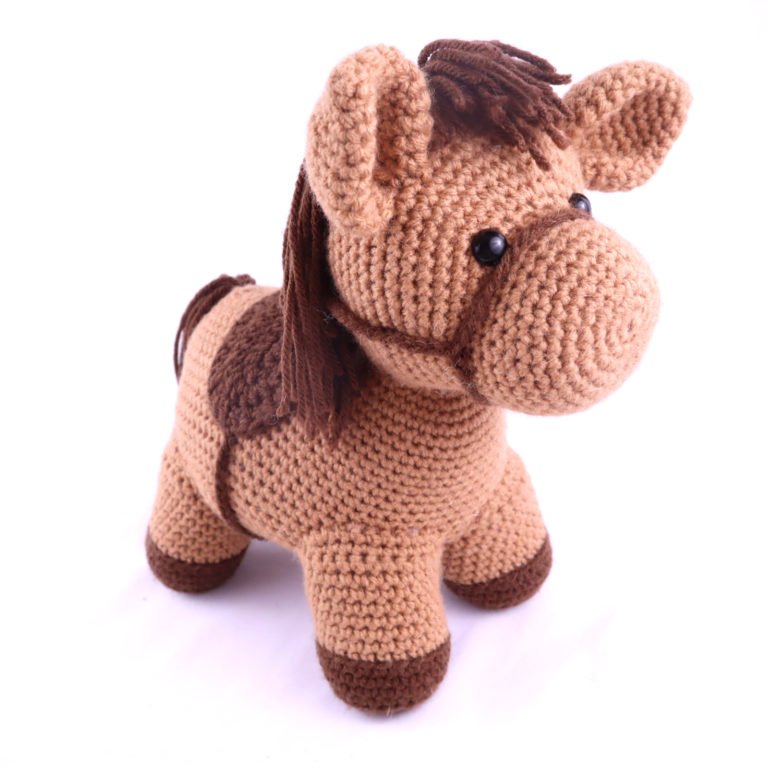
Horse:
Light Brown for Main Color (nose, head, neck, body, ears, and legs).
Dark Brown for hooves, hair, bridle, and saddle.
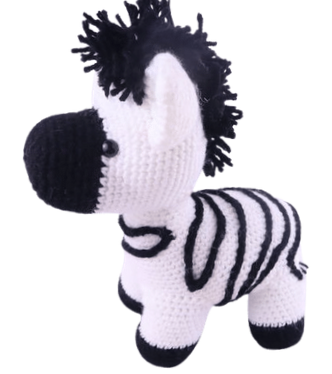
Zebra:
White for Main Color (head, neck, body, ears, tail, and legs).
Black for nose, hooves, hair, tail hair, and stripes.
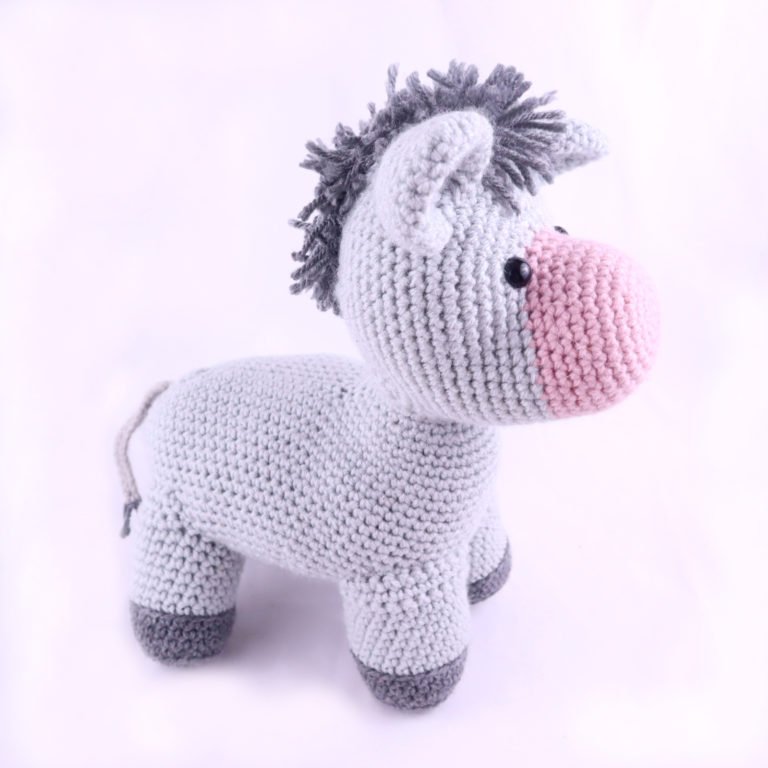
Donkey:
Light Grey for Main Color (head, neck, body, ears, tail, and legs).
Dark Grey for hooves, hair, and tail hair.
Nose/Head:
Start in brown for horse. Start in light pink for donkey. Start in black for zebra
Round 1: 6 Sc into a Magic Ring (6)
Round 2: *Inc* all around (12)
Round 3: *Inc, Sc* all around (18)
Round 4: *Inc, Sc 2* all around (24)
Round 5: *Inc, Sc 3* all around (30)
Round 6-11: *Sc* all around (30)
Round 12: Sc in the next 12 st. In the FLO (Front Loop Only), *Inc* in the next 6 st. In BOTH loops, Sc in the next 12 st (36)
We will now add 2 different colored eye stitch markers into Round 12. Add one eye stitch marker into 13th stitch and one in the 25th stitch.
Round 12 eye markers will look like photo above
Round 13: Change to grey for donkey. Change to white for zebra. Continue in brown for horse. Sc in the next 12 st. Repeat *Inc in the next st, Sc in the next st* 6 times. Sc in the next 12 st (42)
Round 14: Sc in the next 12 st. Repeat *Inc, Sc 2* 6 times. Sc in the next 12 st (48)
Round 15: Sc in the next 12 st. Repeat *Inc, Sc 3* 6 times. Sc in the next 12 st (54)
Round 16-21: *Sc* all around (54)
Add eyes into the marked areas from Round 12 now.
Round 22: Sc in the next st. Leave the stitch marker in first st made and don’t move it! This will mark where we insert our hook to make the neck later. Sc next 53 st. Now we meet the old stitch marker Ch 12 Skip the next 9 st.
Sc in the next stç Continuing on the head, Sc next 44 st (57)
Round 23: Now we meet the chains we made Sc in the next Ch. Add st marker into the Sc just made This will mark our rounds to continue making the head. Sc in the next 11 Ch Continuing on the head, *Dec* in the next st. Sc in the next 39 st. *Dec* 2 times (54)
Round 24: *Dec, Sc 7* all around (48)
Round 25: *Dec, Sc 6* all around (42)
Round 26: *Dec, Sc 5* all around (36)
Round 27: *Dec, Sc 4* all around (30)
Stuff the head firmly here. Continue stuffing after each round.
Round 28: *Dec, Sc 3* all around (24)
Round 29: *Dec, Sc 2* all around (18)
Round 30: *Dec, Sc* all around (12)
Round 31: *Dec* all around (6)
Finish off, leaving a tail end of yarn for sewing. Sew the remaining stitches closed and weave in ends.
Now that the head is done, we will start forming the neck and body! Notice the hole that’s in the bottom of the head? That’s where we’ll attach our crochet hook and new yarn to start forming the neck.
Neck/Body:
Round 1: Place hook into the neck, where the stitch marker is. Pull main color yarn through. (Use brown for horse, white for zebra, and grey for donkey , Ch 1, Sc in the next st. Move stitch marker into the Ch 1 stitch you just made This will now mark the rounds for the neck. Sc in the next 8 st.
Now we will work on the other side of the neck. Turn to the opposite side , Sc in the next 11 st on the other side of the neck (20)
Now the neck is a full round! We will work around it for the following rounds, just like we did in Round 1 of the neck
Round 2-3: *Sc* all around (20)
Round 4: *Inc, Sc* all around (30)
Round 5: *Inc, Sc 4* all around (36)
This completes the neck! Now we will form the body, we’ll do this by making a chain at the back of the neck to form the length of the body. Let’s get started on the next page!
Round 6: Sc in the next 28 st. Ch 15. Sc 4 times into the 2nd Ch from the hook. Sc in the next 13 Ch. Working back onto the neck, Sc in the next 8 st. (53)
Round 7: Sc in the next 28 st. Now we meet the chain, Sc in the next 13 Ch. Repeat *Inc, Sc in the next st* 2 times. Continuing on the other side of the neck, Sc in the next 13 st. Sc in the next 8 st along the body (68)
Round 8: Sc in the next 41 st. Repeat *Inc, Sc next 2 st* 2 times. Sc in the next 21 st. (70)
Round 9: Sc in the next 41 st. Repeat *Inc, Sc next 3 st* 2 times. Sc in the next 21 st. (72)
Round 10: Sc in the next 41 st. Repeat *Inc, Sc next 4 st* 2 times. Sc in the next 21 st. (74)
Round 11: Sc in the next 41 st. Repeat *Inc, Sc next 5 st* 2 times. Sc in the next 21 st. (76)
Round 12-21: *Sc* all around (76)
Round 22: Repeat *Dec, Sc 17* 4 times (72)
Round 23: *Dec, Sc 10* all around (66)
Round 24: *Dec, Sc 9* all around (60)
Round 25: *Dec, Sc 8* all around (54)
Round 26: *Dec, Sc 7* all around (48)
Round 27: *Dec, Sc 6* all around (42)
Round 28: *Dec, Sc 5* all around (36)
Stuff the body and neck area very firmly now. Continue stuffing after each round.
Round 29: *Dec, Sc 4* all around (30)
Round 30: *Dec, Sc 3* all around (24)
Round 31: *Dec, Sc 2* all around (18)
Round 32: *Dec, Sc 1* all around (12)
Round 33: *Dec* all around (6)
Finish off, leaving a tail end of yarn for sewing. Sew the remaining stitches closed and weave in ends.
Legs: (Make 4)
Start in brown for horse
Start in Dark Grey for donkey
Start in black for zebra
Round 1: 6 Sc into a Magic Ring (6)
Round 2: *Inc* all around (12)
Round 3: *Inc, Sc* all around (18)
Round 4: *Inc, Sc 2* all around (24)
Round 5: In the BLO (Back Loop Only), *Sc* all around (24)
Round 6-8: In BOTH Loops, *Sc* all around (24)
Round 9: Change to body color. In the BLO *Sc* all around (24)
Round 10-15: In BOTH Loops, *Sc* all around (24)
In the following rounds we will start to work back and forth in rows. This will build up one side of the leg so it fits to the body better.
Row 16: Turn. Sc in the next 14 st (14)
Row 17: Turn. *Dec* 1 time, Sc in the next 10 st, *Dec* 1 time (12)
Row 18: Turn. Sc in the next 12 st (12)
Finish off, leaving a long tail end of yarn for sewing on.
Leg Assembly:
Pin the legs as shown now. The short side of the leg will go towards the inside of the body. The long side of the leg will go towards the outside of the body. Pin on all 4 legs before sewing on, this will help you see if all of the legs look correct. If not, unpin whichever legs look wrong and repin them! Then, sew on. Stuff the leg very firmly before fully sewing on. Once finished sewing, tie the tail end of yarn into a firm knot. Bring the knot into the toy’s body to hide. Weave in ends and cut excess yarn.
Ears: (Make 2)
Start in Main Color
Round 1: 6 Sc into a Magic Ring (6)
Round 2: *Sc* all around (6)
Round 3: *Inc* all around (12)
Round 4: *Sc* all around (12)
Round 5: *Inc, Sc* all around (18)
Round 6: *Sc* all around (18)
Round 7: *Inc, Sc 2* all around (24)
Round 8-10: *Sc* all around (24)
Round 11: *Dec, Sc 2* all around (18)
Round 12: *Dec, Sc 1* all around (12)
Finish off, leaving a long tail for sewing. Fold the ears slightly inward and pin onto the head as shown. (Ears should be about 13 stitches apart, pinned on Rounds 16-17) Sew on. Weave in ends.
Front Head Hair:
Use dark brown for horse. use dark grey for donkey. use black for zebra.
To make the hair we will cut a lot of pieces of yarn and tie them to the head. How long we do the strands will be different from the horse compared to the zebra and donkey.
For the front of the head hair, cut many pieces of roughly ~4″ yarn. Insert hook into a stitch between the two ears as show Fold a piece of the cut yarn in half Place this yarn on the hook , and pull only half of the yarn through
Tie the two pieces into a firm knot 2 times Repeat this for a total of 8 stitches across one row! The hairs will be long. For the zebra/donkey, trim them shorter and straight across For a horse, keep the front head hairs longer, but trim the sides to be a little shorter. Swipe the horse’s head hairs to the front of his face
Neck Hair:
Use dark brown for horse. use dark grey for donkey. use black for zebra.
For the donkey and zebra, continue to cut 4″ pieces of yarn and attach them to the back of the head/neck area for 8 stitches across per row. Trim the yarn so it matches the front head of the hair length.
For the horse, cut pieces of yarn that’s about 10″ long. Attach this hair behind the shorter hairs. This will form the long mane! Attach the long hairs to the back of the head/neck area for 8 stitches across per row.
Add hair for about 8 rows total
Horse Tail:
In Dark Brown
Cut many pieces of 12″ yarn. Place hook into the upper back of the toy horse Yarn over and pull through half of the yarn Tie the ends of yarn into a firm knot twice. Repeat this going a few times through the same stitch and a few times through nearby stitches to make a thick tail!
Zebra & Donkey Tail:
Start in Main Color
Row 1: Ch 17. Sc in the 2nd Ch from the hook. Sc in the next 15 st (16)
Row 2-3: Ch 1 & Turn. Sc in the next 16 st (16)
Finish off, leaving a long tail for sewing on. Pin the tail to the upper back area of the toy as shown. Sew on and weave in ends.
Tail Hairs:
use dark grey for donkey
use black for zebra
Cut 4 pieces of yarn about 4″ in length. Just like we’ve done the previous hairs, attach the yarn to the end of the tail. Trim so the hair all matches the same length.
Saddle:
In Dark Brown
To make the saddle we will first make a chain. We will work entirely around the chain to form an oval!
Round 1: Ch 17. Skip the next 2 st, Dc in the 3rd stitch. Dc 2 more times into that same st. Dc in the next 13 st. Dc 3 times into the last ch. Now we meet the end of the chains Turn to OTHER side, where we haven’t worked any stitches yet Dc in the next 13 st (32)
Round 2: Dc 2 times into the next 3 stitch. Dc in the next 13 st. Dc 2 times into the next 3 st. Turn to other side. Dc into the next 13 st (38)
Round 3: Repeat *Dc 2 times in next st, Dc next st* 3 times. Dc in the next 13 st. Repeat *Dc 2 times in next st, Dc next st* 3 times. Dc in the next 13 st (44)
Round 4: Slst in the next 6 st. Ch 43. Skip the next 22 st. Sc in the next st.
Finish off, leave a tail for sewing. Place the saddle onto the horse as shown and sew on. Weave in ends.
Bridle:
in Dark Brown
Row 1: Ch 41. Connect the circle by making 1 Sc into the very first chain Ch 41.Skip the next 20 st on the circle. Sc in the 21st st. This completed the bridal!
You will have a smaller hole and a larger hole. Place the horse’s nose through the smaller one , the the larger one goes behind it’s head! You can sew this on if desired.
Zebra Stripes:
In Black
Insert hook into any stitch of the leg or body. This is where your stripes will start, so I recommend inserting your hook towards the back of the body! Yarn over with black yarn and pull it through the stitch.
Repeat *Insert your hook into any nearby stitch . Yarn over and pull the yarn through Yarn over again , and pull through both loops to complete one single crochet!
Do the steps mentioned in between the *stars* to form the stripes. To change direction of the stripe simply insert your hook into a stitch in the other direction!
All Finished.
Feel free to tag me (@freeamigurumii) in your photos on Instagram or Facebook if you’d like!