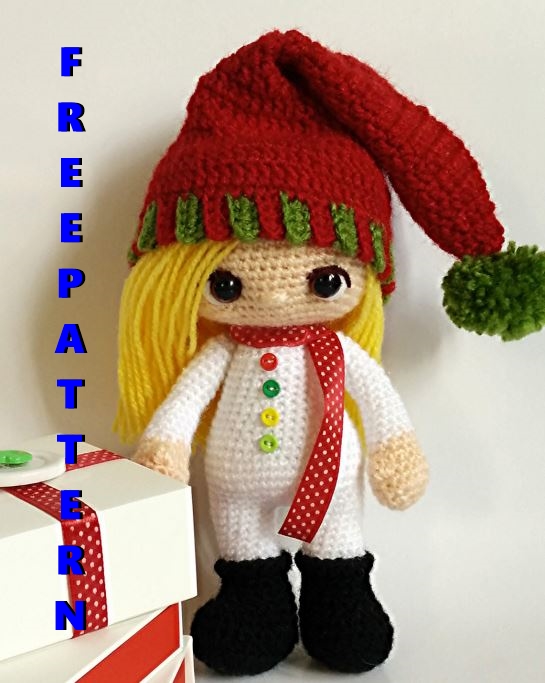
HOLIDAY SPECIAL PUCCI DOLL FREE AMIGURUMI PATTERN
Hello amigurumi lovers and beautiful visitors, I wanted to share the free amigurumi patterns for you here. In my article I will share 1 pattern and how to make it for you. At the end of my article, I will share amigurumi patterns that can generate ideas for you.
Desinger : https://talesoftwistedfibers.wordpress.com/
This is an original pattern by Tales of Twisted Fibers
Materials
• Sock weight yarn in black, white, light
peach, yellow, red, green
• Lace yarn or embroidery floss in brown
• 2.5mm crochet hook
• Fiberfill
• Stitch markers
• Yarn needle
• 10mm safety eyes
• White felt
• A pair of scissors
• 3.5cm pom pom maker
• 6mm buttons in red, green, yellow, light
green
• Sewing needle
• White sewing thread
Finished size: 8 inch
Skill level: Intermediate
Terminology (US)
magic ring
ch (chain)
st (stitch)
sc (single crochet)
hdc (half double crochet)
dc (double crochet)
inc (increase)
dec (decrease)
BLO (back loop only)
FLO (front loop only)
4-dc bobble st
Loop stitch
sl st (slip stitch)
YO (yarn over)
4-dc bobble st
BOOT (make 2)
Round 1: With black yarn, ch 6. Starting from second
ch from the hook, sc 4, 3 sc in the last ch. Continuing
on the opposite side of the foundation chain, sc 3, 3 sc
in the last ch. (13)
Round 2: sc 4, inc in the next 3 st, sc 3, inc in the last
3 st. (19)
Round 3: sc 6, inc in the next 3 st, sc 7, inc in the last
3 st. (25)
Round 4: Working in BLO, hdc around. (25)
Round 5-6: sc around. (25)
Round 7: sc 4, dec X 6, sc 9. (19)
Round 8: sc 3, dec X 4, sc 8. (15)
Round 9-10: sc around. (15)
Round 11: Mark the back loop of the next st. sl st
in the front loop of the same st and ch 1. FLO hdc
around. sl st in the next st to join. (15)
Fasten off. Weave in yarn end.
LEG (make 2)
Fold the boot cuff outwards to reveal the unworked
back loops of Round 11. Join white yarn.
Round 1-7: sc around. (15)
Fasten off, leaving a long tail (this will be used later to
sew the gap between the doll’s legs). Count back from
the end of the round and mark the fourth st. Stuff.
Make the second leg and stuff but do not fasten off. sl
st in the next 2 st. Mark the last worked st as the end
of the round
BODY
We will continue working on the second leg and join
the legs in the next round.
Round 1: ch 2, sc in the marked st of the first leg, sc in
the next 14 st. ch 3, sc in all 15 st of the second leg. (35)
Round 2: sc in each of the next 2 ch, sc 15, inc in each
of the next 3 ch, sc 15. (38)
Round 3: sc 17, (sc 2, inc) X 2, sc 15. (40)
Round 4: (sc 4, inc) X 8. (48)
Using a yarn needle and the yarn tail you had left at
the last round of the first leg, sew the gap between
the doll’s legs.
Round 5-7: sc around. (48)
Round 8: (sc 6, dec) X 6. (42)
Round 9: sc around. (42)
Round 10: (sc 5, dec) X 6. (36)
Round 11: sc around. (36)
Round 12: (sc 4, dec) X 6. (30)
Round 13: sc around. (30)
Round 14: (sc 3, dec) X 6. (24)
Stuff.
Round 15-20: sc around. (24)
Round 21: (sc 2, dec) X 6. (18)
Stuff.
Round 22: (sc 1, dec) X 6. (12)
Round 23-30: sc around. (12)
It is very important to stuff the neck as firmly as possible at this point so it can support the weight of the
head.
Round 31: dec X 6. (6)
Fasten off, leaving a long tail. Using your yarn needle,
weave the yarn tail through the front loop of each
remaining stitch and pull it tight, closing off the neck.
Weave in the yarn end.
ARM (make 2)
Round 1: With light peach, 6 sc in a magic ring. (6)
Round 2: Inc in all 6 st. (12)
Round 3: (sc 1, inc) X 6. (18)
Round 4-5: sc around. (18)
Round 6: 4-dc bobble st1
, dec, (sc 1, dec) X 5. (12)
If you are unfamiliar with this stitch, this pattern
includes a section on how to make a 4-dc bobble stitch.
Round 7: sc around. (12)
Round 8-12: With white, sc around. (12)
Round 13: (sc 2, dec) X 3. (9)
Round 14-21: sc around. (9)
Round 22: dec X 4, sc 1. (5)
Fasten off, leaving a long tail. Using your yarn needle,
weave the yarn tail through the front loop of each
remaining stitch and pull it tight, closing off the gap.
Weave in yarn end.
HEAD
Before we start working on the head, we will cut out
two round pieces from white felt. These pieces should
be slightly bigger than the safety eyes you are using.
Make a hole slightly off center and insert eye through
the hole. Keep these aside.
Round 1: With light peach yarn, 8 sc in a magic ring. (8)
Round 2: inc in all 8 st. (16)
Round 3: (sc 1, inc) X 8. (24)
Round 4: (sc 2, inc) X 8. (32)
Round 5: (sc 3, inc) X 8. (40)
Round 6: (sc 4, inc) X 8. (48)
Round 7: (sc 5, inc) X 8. (56)
Round 8-17: sc around. (56)
Round 18: (sc 5, dec) X 8. (48)
Round 19: (sc 4, dec) X 8. (40)
Round 20: (sc 3, dec) X 8. (32)
Round 21: (sc 2, dec) X 8. (24)
Insert eyes between Round 15 and 16, 9 stitches apart.
Round 22: dec X 12. (12)
Fasten off, leaving a long tail. Stuff head, leaving
some space in the center for the neck that will be
inserted later.
EYELINER
Thread a yarn needle with brown lace yarn or
embroidery floss, insert needle from the neck opening
and embroider the embellishment around the eyes as
seen in the picture.
NOSE
Sew 3 straight lines, 3 stitches long between Round 16
and 17 of the head.
HAIR
To make the doll’s hair, we will work a 6 inch loop
stitch in each stitch every alternate row.
Round 1: With yellow, 8 sc in a magic ring. (8)
Round 2: Making a 6 inch loop st in each stitch, inc in
all 8 st. (16)
Round 3: (sc 1, inc) X 8. (24)
Round 4: Making a 6 inch loop st in each stitch, (sc 2,
inc) X 4. (32)
Round 5: (sc 3, inc) X 8. (40)
Round 6: Making a 6 inch loop st in each stitch,(sc 4,
inc) X 8, ch 1, turn. (48)
Round 7: (sc 5, inc) X 8. (56)
Round 8: Making a 6 inch loop st in each stitch, sc
around. (56)
Fasten off, leaving a long tail to sew. Position wig on
the head using pearl headed pins and sew in place.
Cut open the loops and trim hair.
JOIN HEAD TO BODY
To make the head of your amigurumi movable, thread
yellow yarn and insert the needle from the center of the
magic ring on the wig and out from the neck opening
(see figure 1). Count down 8 rounds from the top of
the neck. Now insert your needle through the neck at
this point, back through the neck opening on the head,
bringing it out again from the magic ring on the wig.
Slide the head down the two strands of yarn until it sits
perfectly on the neck. Knot the yarn ends together a few
times to secure. Clip off excess yarn.
CAP
To make ribbed edge:
Row 1: With red, ch 5. Starting from second ch from
the hook, sc across, ch 1, turn. (4)
Row 2: sc across, ch 1, turn. (4)
Row 3: With green, BLO sc across, ch 1, turn. (4)
Row 4: sc across, ch 1, turn. (4)
Row 5: With red, BLO sc across, ch 1, turn. (4)
Row 6: sc across, ch 1, turn. (4)
Repeat rows 3-6 until there are a total of 30 stripes
(each stripe = 2 rows).
To join the ribbed band, bring both ends of the band
together and join with a sl st. We will now continue
working in rounds.
Round 1: With red, ch 1. Pick up 1 st for each row and
sc 60 st, sl st to join. (60)
Round 2: ch 3, dc around, sl st to join. (60)
Round 3: ch 3, (dc 8, dec) X 6, sl st to join. (54)
Round 4: ch 3, dc around, sl st to join. (54)
Round 5: ch 3, (dc 7, dec) X 6, sl st to join. (48)
Round 6: ch 3, dc around, sl st to join. (48)
Round 7: ch 3, (dc 6, dec) X 6, sl st to join. (42)
Round 8: ch 3, dc around, sl st to join. (42)
Round 9: ch 3, (dc 5, dec) X 6, sl st to join. (36)
Round 10-12: ch 3, dc around, sl st to join. (36)
Round 13: ch 3, (dc 4, dec) X 6, sl st to join. (30)
Round 14-16: ch 3, dc around, sl st to join. (30)
Round 17: ch 3, (dc 3, dec) X 6, sl st to join. (24)
Round 18-20: ch 3, dc around, sl st to join. (24)
Round 21: ch 3, (dc 2, dec) X 6, sl st to join. (18)
Round 22: ch 3, dc around, sl st to join. (18)
Round 23: ch 3, (dc 1, dec) X 6, sl st to join. (12)
Round 24: ch 3, dc around, sl st to join. (12)
Round 25: ch 3, dec X 6. (6)
Fasten off, leaving a long tail. Using your yarn needle,
weave the yarn tail through the front loop of each
remaining stitch and pull it tight, closing off the gap.
Weave in yarn end.
Pom pom: Make a pom pom using a 3.5 cm pom
pom maker and green yarn, and sew it to the top of
the hat. Slip hat carefully over the head.
Evenly space red, green, yellow and light green 6mm
buttons on the front of the body and sew them in
place using a white sewing thread and sewing needle.
Tie a red ribbon around the amigurumi’s neck.