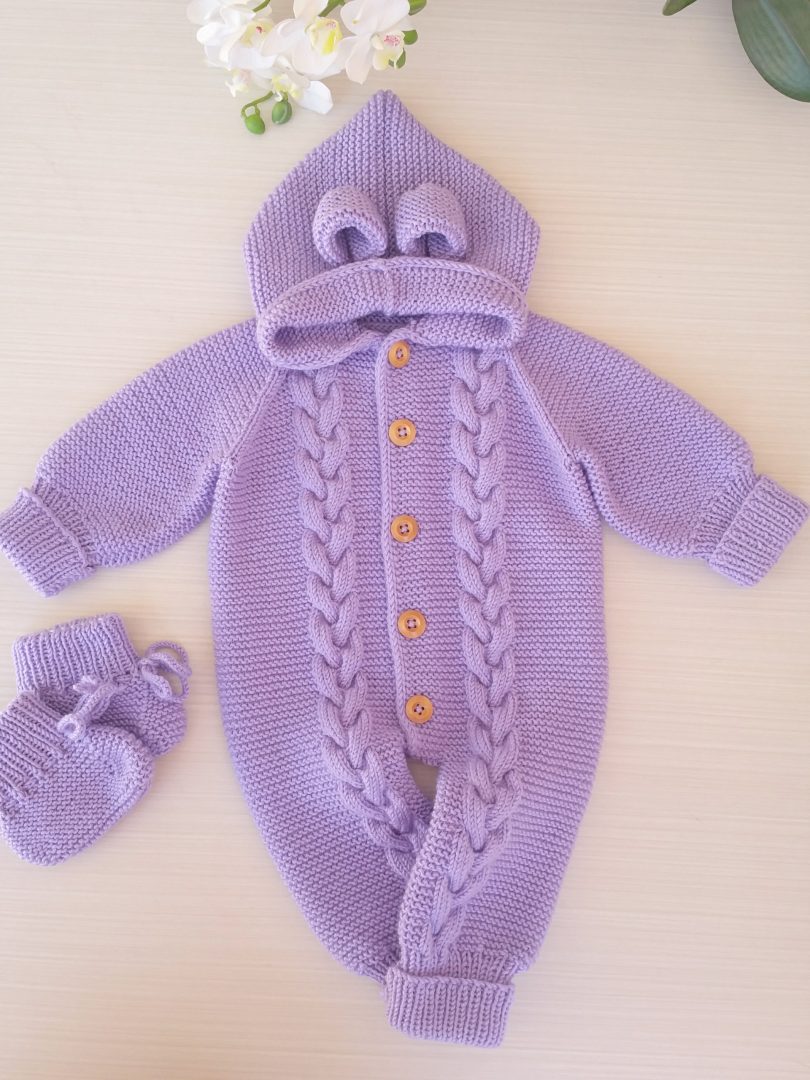
Hair Braided Overalls Crochet Pattern
Hello amigurumi lovers and beautiful visitors, I wanted to share the free amigurumi patterns for you here. In my article I will share 1 pattern and how to make it for you. At the end of my article, I will share amigurumi patterns that can generate ideas for you.
Materials
4 La Mia Baby Boom Lilac (259) color hand knitting yarn
4 mm line skewer
5 buttons
Fabrication
1) Let’s start with 84 loops. Let’s knit as the first waiting and 7 stitch harosha at the end, the dominant knitting of the middle loops.
2) Front 16 loops (let’s continue to increase until the next 12 loops from the 14-loop button band are straight), let’s set the yoke so that the sleeves are 10 loops, the rear 24 loops, 2 loops. Let’s make increments from the right and left of 2 loops on each straight.
3) For braiding the first 8 loops are twisted in 4 loops, waiting for 12 loops for the other twist, and 3 teeth are twisted in harosha.
The point to be considered in the twist is to twist the long edge in the middle. Our braid is formed this way. If the long edge is on the right, it is twisted from right to left, if the long edge is on the left, it is twisted from left to right. The braid can continue like this.
4) Increases are made 19 times in total. After the first buttonhole is opened in the fifth tooth, the buttonholes are opened at intervals of 12 teeth.
5) After 19 increases, the arms are knitted in harsh until they are 16-18 cm. Let’s cut 8 stitches before switching to 1 reverse, 1 flat tire. Let’s make a total of 28 rows of rubber knitting.
6) After completing 1 arm like this, let’s sew the arm and knit a row from the back body and move on to the other arm. Let’s knit and sew the other arm in the same way and continue knitting the bodies.
7) When it comes to the length of the body, let’s cut 7 loops from the 14 loops in the net part. There are only 7 loops left, let’s separate the legs equal. Let’s continue to knit the legs through 9 twists.
8) Then let’s complete the legs by doing it on the ankle with rubber skilled on the arm.
9) Let’s sew the last legs from the side and after the net part is joined, sewn and come to the hood part.
10) Let’s remove the number of loops from the collar part and make 12 hidden increases from time to time in the other conversation.
11) For the ear part, let’s knit 18 stitches and knit 24 teeth, fold it in half and sew in 3 places. Let’s pull the rope well and shrink it after sewing it from the long edge. Let’s sew the ears according to the top and mount them.
Feel free to tag me (@freeamigurumii) in your photos on Instagram or Facebook if you’d like!
All Finished.