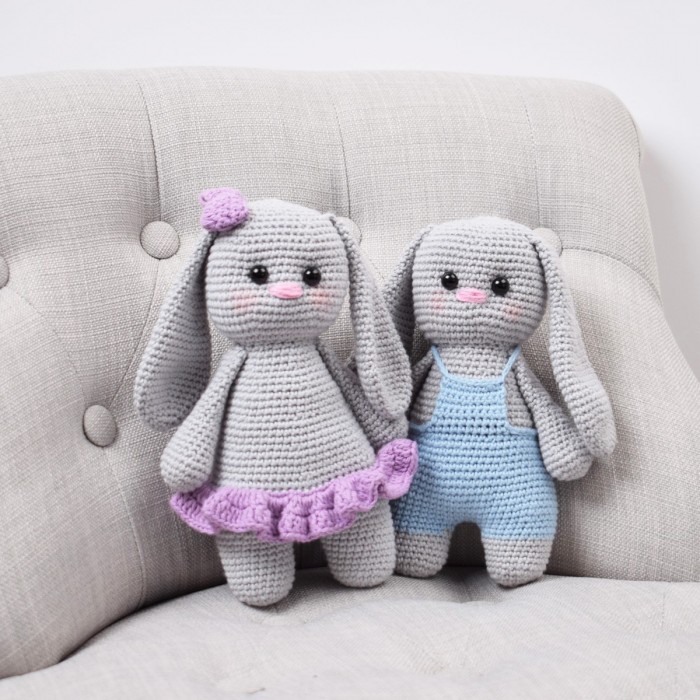
Amigurumi Baby Bunny Free Pattern
Hello amigurumi lovers and beautiful visitors, I wanted to share the free amigurumi patterns for you here. In my article I will share 1 pattern and how to make it for you. At the end of my article, I will share amigurumi patterns that can generate ideas for you.
Abbreviations:
s: stitch
sc: single crochet
mr: magic ring
ch: chain stitch
tog: together
blo: back loop only
ss: slip stitch
Materials:
Rainbow 8/4 cotton yarn
Recommended crochet hook US size B/1-C/2 (2,5 mm) 1 pair of safety eyes 0.4 inches (9 mm)
Fiber fill
Buy yarn and supplies here:
http://shop.hobbii.com/baby-bunny-arthur
Measurements: approx. 7.5 inches (19 cm) high
Yarn usage: approx.
Color A: 1.8 oz. (50g)
Color B: 0.5 oz. (15g)
A bit of baby pink for the nose
Leg: make 2
1.Start in color A. Make a mr, and work 6 sc in the ring. (6)
2.Work 2 sc in each stitch around. (12)
3.Work”1 sc in the first s, 2 sc in the next s”. Repeat from ”to” around. (18)
4.Work ”1 sc in the first 2 s, 2 sc in the next s”. Repeat from “to” around. (24)
5.-9. Work sc around. (24)
10.Switch to color B. Work sc around. (24)
11.Work sc around. (24) Cut the yarn and weave in the ends. Make one more leg, but don’t finish itsince we’re going to continue from here.
Body:
1.Ch 3 and work 1 sc over to the other leg and work sc around in each s (24). Work 1 sc in the 3 chstitches, and then sc around on the first leg (24). Work 1 sc at the other side of the 3 ch stitches.(54)
2.Work ”1 sc in the first 8 sts, 2 sc in the next”. Repeat from ”to” around. (60)
3.-10. Work sc around. (60)
11.Work ”1 sc in the first 8 sts, 2 sc tog”. Repeat from ”to” around. (54)
12.-14. Work sc around. (54)
15.Work ”1 sc in the first 7 sts, 2 sc tog”. Gentag ”til” omgangen rundt. (48)
16.Switch to color A. Work sc in the blo around. (48)
17. Work sc around. (48)
18. Work ”1 sc in the first 6 sts, 2 sc tog”. Repeat from ”to” around. (42)
19. -20. Work sc around. (42)
21. Work ”1 sc in the first 5 sts, 2 sc tog”. Repeat from”to” around. (36)
22. -23. Work sc around. (36)
24. Work ”1 sc in the first 4 sts, 2 sc tog”. Repeat from ”to” around. (30)
25. -26. Work sc around. (30)
27. Work ”1 sc in the first 3 sts, 2 sc tog”. Repeat from ”to” around. (24)
28. Work sc around. (24) Stuff the legs and body with fiber filling.
Now crochet the head.
Head:
29. Work 2 sc in each s around. (48)
30. Work ”1 sc in the first 7 sts, 2 sc in the next s”. Repeat from ”to” around. (54)
31. Work ”1 sc in the first 8 sts, 2 sc in the next s”. Repeat from ”to” around. (60)
32. -41. Work sc around. (60)
42. Work ”1 sc in the first 8 sts, 2 sc tog”. Repeat from ”to” around. (54)
43. Work sc around. (54)
44. Work ”1 sc in the first 7 sts, 2 sc tog”. Repeat from ”to” around. (48)
45. Work ”1 sc in the first 6 sts, 2 sc tog”. Repeat from ”to” around. (42) Insert the eyes between round 37 and 38 with an interspace of 6-7stitches.
46. Work ”1 sc in the first 5 sts, 2 sc tog”. Repeat from ”to” around. (36)
47. Work ”1 sc in the first 4 sts, 2 sc tog”. Repeat from ”to” around. (30)
48. Work ”1 sc in the first 3 sts, 2 sc tog”. Repeat from ”to” around. (24) Stuff the head with fiber filling, and stuff it firmly before the hole is completely shut.
49. Work ”1 sc in the first 2 s, 2 sc tog”. Repeat from ”to” around. (18)
50. Work ”1 sc in the first s, 2 sc tog”. Repeat from ”to” around. (12)
51. Work 2 sc tog around. (6) Sew the hole completely shut and and weave in the end.
Indentations and nose
1.In the same color as the head pull a thread upand out on the right side of one of the eyes.
2.Insert the needle on the left side of the eye andtighten slightly.
3.Pull a bit, so you end up making anindentation underneath the eye.
4.Now, pull the thread up on the right side of theeye of the other eye.
5.And down again on the left side of the eye.
6.Tighten the thread a bit, so the eyes are pulledback a little bit, so the bunny gets a cuteexpression.
Overalls: in color B
Insert the yarn in front where you wish to place the bib. Insert the yarn in a front loop where you have only worked in the back loop. Work 10 sc.
Ch 1 and work ss around the rest of the loops.
Ch 1 and finish with 1 ss in the first sc.
Ch 1. Work sc in the 10 stitches.
Turn by chaining 1. Work sc in the 10 stitches. Repeat until you have a bib consisting of 6 rows in total. Cut the yarn and weave in the ends.
Turn the bunny around. Insert the yarn in a ss so the dispensers will make a cross. Ch 22, and then 1 ss in the corner of the bib. Work ss along the edge of the bib. Ch 22 and finish with 1 ss in a loop on the back.
Cut the yarn and weave in ends.
Arms: make 2 in color A
1. Make a mr and work 6 sc into the ring. (6)
2. Work 2 sc in each stitch around. (12)
3. Work ”1 sc in the first s, 2 sc in the next s”. Repeat from ”to” around. (18)
4. Work ”1 sc in the first 2 sts, 2 sc in the next s”. Repeat from ”to” around. (24)
5. Work sc around. (24)
6. Work sc around. (24)
7. Work ”1 sc in the first 2 sts, 2 sc tog”. Repeat from ”to” around. (18)
8. Work sc aroundt. (18)
9. Work sc around. (18)
10. Work ”1 sc in the first 4 sts, 2 sc tog”. Repeat from ”to” around. (15)
11. Work sc around. (15)
12. Work sc around. (15)
13. Work ”1 sc in the first 3 sts, 2 sc tog”. Repeat from ”to” around (12)
14. – 24. Work sc around. (12)
Stuff the hand and arm slightly. Fold the arm flat, and join it using sc stitches. Leave a long tail for assembly.
Sew the arms onto the body right under the head. Cut the yarn and weave in the ends.
Ears: make 2 in color A
1.Make mr and work 6 sc into the ring. (6)
2.Work 2 sc in each stitch around. (12)
3.Work ”1 sc in the first s, 2 sc in the next s”. Repeat from ”to”around. (18)
4.Work 1 sc in each stitch around. (18)
5.Work ”1 sc in the first 2 sts, 2 sc in the next s”. Repeat from ”to”around. (24)
6.Work sc around (24)
7.Work ”1 sc in the first 3 sts, 2 sc in the next s”. Repeat from ”to”around. (30)
8.Work sc around. (30)
9.Work sc around. (30)
10.Work sc around. (30)
11.Work ”1 sc in the next 8 sts, 2 sc tog”. Repeat from ”to”around. (27)
12.Work sc around. (27)
13.Work sc around. (27)
14.Work ”1 sc in the first 7 sts, 2 sc tog”. Repeat from ”to”around .(24)
15.Work sc around. (24)
16.Work sc around. (24)
17.Work ”1 sc in the first 6 sts, 2 sc tog”. Repeat from ”to”around. (21)
18.Work sc around. (21)
19.Work sc around (21)
20.Work ”1 sc in the first 5 sts, 2 sc tog”. Repeat from ”to”around. (18)
21.Work sc around. (18)
22.Work ”1 sc in the first 4 sts, 2 sc tog”. Repeat from ”to”around. (15)
23.Work sc around. (15)
24.Work ”1 sc in the first 3 sts, 2 sc tog”. Repeat from ”to”around. (12)
25.-33. Work sc around. (12)
Fold the ear flat and join it using sc stitches. Leave a long tail for assembly. Sew the ears onto each side of the head.
Feel free to tag me (@freeamigurumii) in your photos on Instagram or Facebook if you’d like!
All Finished.