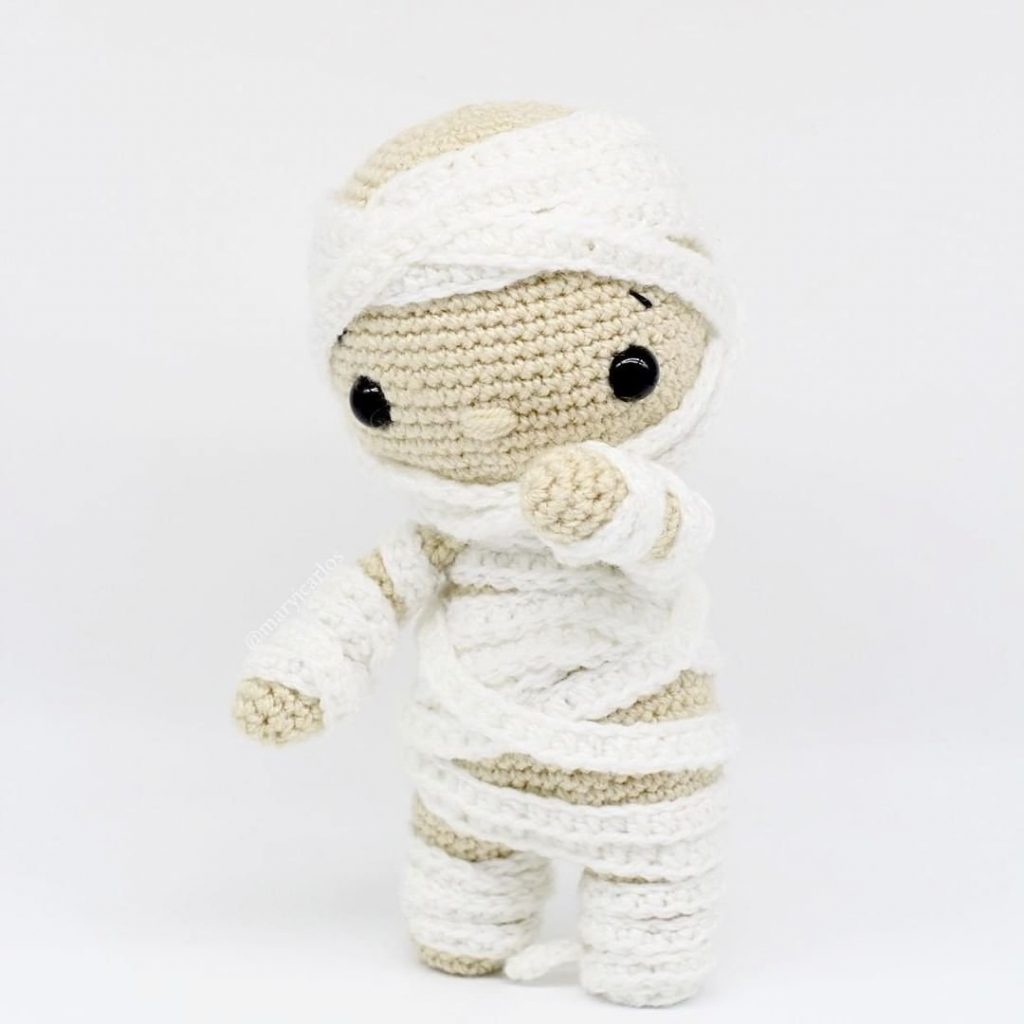
Freaky Mummy Amigurumi Doll Free Pattern
Hello amigurumi lovers and beautiful visitors, I wanted to share the free amigurumi patterns for you here. In my article I will share 1 pattern and how to make it for you. At the end of my article, I will share amigurumi patterns that can generate ideas for you.
Supplies:
• Yarn 2 Weight Yarn in…
White and skin color
•2mm Crochet Hook
•Tapestry needle
•Scissors
•Stuffing
•Sewing Pins
•8mm safety eyes
Additional Information:
Difficulty: Intermediate
• Before we get started…
This mummy is made with Yarnart Jeans, which isn’t available in the US but can be purchased from Etsy sellers for an affordable cost. The yarn I used is small (2 weight) and paired with a small hook (2mm) to give the amigurumi a clean look. I also used the “yarn under” method to get “x” stitches.
You can make this pattern in regular 4/Medium weight yarn with a 4mm hook, however, your amigurumi will come out much larger.
• Let’s Get Started!
We will start by making the legs. After they are both made, we will connect them together. The legs will then lead into the body and head. So the legs, body, and head are all made in one continuous piece.
After this, we will make his arms, then his clothing wrap! Let’s get started!
Let’s get started!
We will start by making the legs, then we will connect them together. The legs will then form up into the body, then the head. Let’s get started! Note: The pictures use green yarn, as using black yarn was too dark to see. Please use black yarn for this section!
Legs: (Make 2)
In Skin Color
Round 1: 6 Sc into a Magic Ring (6)
Round 2: *Inc* all around (12)
Round 3-4: *Sc* all around (12)
Round 5: *Inc, Sc in the next st* all around (18)
Round 6-7: *Sc* all around (18)
Round 8: *Inc, Sc in the next 2 st* all around (24)
Round 9: *Sc* all around (24)
What we will do from here will be different depending on which leg you’re making. If you’re making the first leg, continue on the next 2 rounds below:
First leg, Round 10: *Inc, Sc in the next 3 st* all around (30)
First leg, Round 11: *Sc* all around (30)
Finish off the first leg now.
If you’re making the second leg, continue on the next round:
Second leg, Round 10: *Inc, Sc in the next 3 st* all around (30)
Second leg, Round 11: Sc in the next 6 st. Line the second and first leg’s stitches together and going through BOTH legs, Sc in the next 6 st . Working back on the second leg Sc in the remaining 18 st , Stitch count: 6 stitches connecting the legs, 24 stitches on each leg)
TIP: Now that we have the legs connected, they will start leading up to the body, then the head.
Round 12: Sc in the next 6 st. Now we meet the other leg, Sc in the next 24 st. Now we meet the other leg, Sc in the next 18 st. (48)
Round 13-16: *Sc* all around (48)
Round 17-25: *Sc* all around (48)
Round 26: *Dec, Sc in the next 6 st* all around (42)
Round 27: *Sc* all around (42)
Round 28: *Dec, Sc in the next 5 st* all around (36)
Round 29: *Sc* all around (36)
Round 30: *Dec, Sc in the next 4 st* all around (30)
Round 31: *Sc* all around (30)
Round 32: *Dec, Sc in the next 3 st* all around (24)
Round 33: *Sc* all around (24)
Stuff the legs and body firmly now.
Round 34: In the FLO, *Inc, Sc in the next 3 st* all around (30)
Round 35: *Inc, Sc in the next 4 st* all around (36)
Round 36: *Inc, Sc in the next 5 st* all around (42)
Round 37: *Inc, Sc in the next 6 st* all around (48)
Round 38: *Inc, Sc in the next 7 st* all around (54)
Round 39-48: *Sc* all around (54)
Insert safety eyes in between Round 40 and 41, 6 stitches apart. Keep this safety eyes centered to his body.
Round 49: *Dec, Sc in the next 7 st* all around (48)
Round 50: *Dec, Sc in the next 6 st* all around (42)
Round 51: *Dec, Sc in the next 5 st* all around (36)
Round 52: *Dec, Sc in the next 4 st* all around (30)
Round 53: *Dec, Sc in the next 3 st* all around (24)
Round 54: *Dec, Sc in the next 2 st* all around (18)
Round 55: *Dec, Sc in the next st* all around (12)
Round 56: *Dec* all around (6)
Finish off and sew the remaining stitches closed. Weave in ends.
Arms: (Make 2)
In Skin Color
Round 1: 6 Sc into a Magic Ring (6)
Round 2: *Inc* all around (12)
Round 3-5: *Sc* all around (12)
Round 6-19: Change to white. *Sc* all around (12)
Finish off, leaving a long tail for sewing. I added a little bit of stuffing at the hand area, but left no stuffing at the top of the arm. Set the arms aside for now. We will pin them on later.
Next we will make the mummy’s clothing wrap. This will be made by creating a veeeeery long chain, then wrapping it around the mummy. We’ll be making 2 separate wrappings, one for the body and one for the head. Let’s get started!
Wrapping: (Make 2)
In White
Row 1: Ch 750. Hdc in the 2nd Ch from the hook. Hdc in the remaining 748 chains.
Finish off now, leaving a very long tail for sewing.
Starting at the toy’s neck and working down, wrap the piece as shown. Once you reach the leg area, wrap the cloth once around the leg. Now, bring the wrap over to the other leg as shown. Wrap over the left leg. Continuing diagonally, wrap the piece over the body again as shown. Once done, secure with a sewing pin. Don’t sew the piece on yet.
Head Wrapping Assembly:
Wrap the second piece of cloth around the mummy’s head, following a similar pattern to the steps we did previously. Be sure to leave his face area open as shown. Once done, place a pin into the mummy’s head. Sew the mummy’s wrapping on. Tie the remaining yarn into a firm knot, then bring into the toy’s head to hide. Cut any excess yarn. Now place the arms onto the body of the mummy , you may have to slightly move the body wrapping to fit the arm in. Once the arm is pinned on, sew them on. Now, sew the body wrapping on. Tie the remaining ends of yarn into a firm knot, then bring the knot into the toy’s body to hide. Cut excess yarn.
Smile
in black embroidery thread
Insert needle with thread where shown, and pull out one stitch over from the left eye. Reinsert needle into the original insertion area and pull needle out one stitch over from the right eye. Insert needle into the original insertion spot. Now you’re done! Just tie the ends of thread into firm knots, then bring the knots inside the toy to hide, cutting off any excess yarn.
How to do the “x” single crochet stitch:
Insert hook into the next stitch. Yarn under by having your hook above the yarn. Pull the yarn through. You will have 2 loops on your hook, make sure these loops are the same height as shown.
Now yarn over as you usually do Pull the yarn through both loops Done!
Important note: You must have tight tension when yarning under and bringing that yarn under through the stitch. Your yarn over should also have tight tension, but not AS tight as your yarn under tension. This is what I’ve found works for me to get the perfect “x” shape.
Feel free to tag me (@freeamigurumii) in your photos on Instagram or Facebook if you’d like!
All Finished.