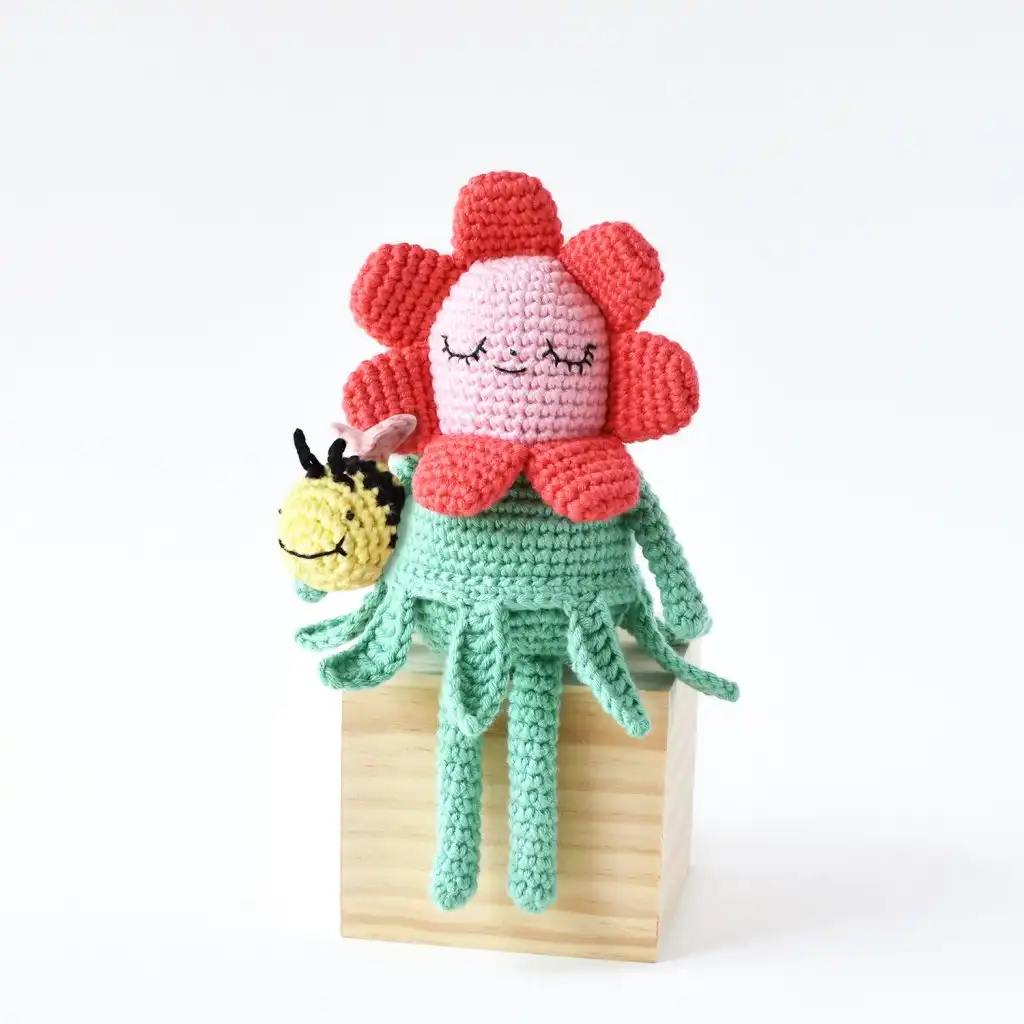
Flower Gal Free Crochet Pattern
Hello amigurumi lovers and beautiful visitors, I wanted to share the free amigurumi patterns for you here. In my article I will share 1 pattern and how to make it for you. At the end of my article, I will share amigurumi patterns that can generate ideas for you.
Materials
Light weight yarn (DK or light worsted) in 5 colors:
Color A – Head & bee wing color ( Paintbox Yarns Cotton DK in Blush Pink)
Color B – Body & skirt color (Paintbox Yarns Cotton DK in Grass Green)
Color C – Petal color (Paintbox Yarns Cotton DK in Rose Red)
Color D – Bee main color (Paintbox Yarns Cotton DK in Daffodil Yellow)
Color E – Bee stripe color (Paintbox Yarns Cotton DK in Pure Black)
2.75mm (C) hook (Clover Amour)
Toy stuffing (Fairfield Poly-Fil)
Stitch marker (Tulip Heart Stitch Markers)
Embroidery Floss (DMC six-strand embroidery floss in black)
Embroidery/sewing needle (DMC Embroidery Needle)
Tapestry needle (DMC Tapestry Needle Size 16)
Scissors (Gingher Stork Scissors)
Sewing pin
Gauge
Gauge isn’t important for this pattern. Just make sure your stitches are tight to avoid stuffing show through. My finished Flower Gal measures approximately 7.5 inches tall.
Crochet Stıtches & Abbrevıatıons (Us Termınology)
ch – chain
rnd(s) – round(s)
mr – magic ring
st(s) – stitch(es)
sl st – slip stitch
sc – single crochet
inc – single crochet increase
inv dec – invisible decrease
hdc – half double crochet
dc – double crochet
tr – treble crochet
sm – stitch marker
x – times (indicates number of times to repeat)
[ ] – repeat steps between brackets for the specified number of times
( ) – the number of stitches you should have at the end of each round
Notes
All sections are worked in a continuous round, unless otherwise specified.
Mark the beginning of each round with a stitch marker.
Demonstration photos are shown right handed.
Make pieces in the order presented
Not all yarns are created equal! Yarns listed as the same weight (e.g. worsted) frequently differ in size and stretch. Knitcraft Cotton Blend DK is on the thicker end of DK weight yarns.
To change color, take the last yarn over of st with new color. Continue working with new color.
My favorite method of attaching pieces is the Amigurumi Seamless Join Method by June Gilbank of Planet June.
Flower Gal Pattern
Head & Body
rnd 1: With color A, make a mr, sc 6 (6 sts)
rnd 2: Inc 6 (12 sts)
rnd 3: [sc 1, inc 1] 6x (18 sts)
rnd 4: [sc 2, inc 1] 6x (24 sts)
rnd 5: Sc around (24 sts)
rnd 6: [sc 3, inc 1] 6x (30 sts)
rnd 7: [sc 4, inc 1] 6x (36 sts)
rnds 8-16: Sc around (36 sts for 9 rnds)
rnd 17: [sc 4, inv dec 1] 6x (30 sts)
rnd 18: sc 1, change to color B, sc 3, inc 1, [sc 4, inc 1] 5x (36 sts)
rnd 19: Sc around (36 sts
Embroıder Face Now
Using the photo as a guide, embroider the face using 4 strands of embroidery floss and an embroidery needle. Embroider the face on the side opposite color changes. Make a french knot for the nose and backstitch for the eyes and mouth. The nose is at the center of rnd 10, the mouth is at rnd 11, and the eyes are 4 sts wide and are placed on rnds 9-11. After you finish the face, take your needle and gently pull on the mouth to create slack for the smile.
rnd 20: [sc 5, inc 1] 6x (42 sts)
rnd 21: [sc 6, inc 1] 6x (48 sts)
rnds 22-28: Sc around (48 sts for 7 rnds)
rnd 29: [sc 6, inv dec 1] 6x (42 sts)
rnd 30: [sc 5, inv dec 1] 6x (36 sts)
rnd 31: sc around (36 sts)
rnd 32: [sc 4, inv dec] 6x (30 sts)
Begın Stuffıng Now And Contınue Stuffıng Untıl Closıng
rnd 33: [sc 3, inv dec 1] 6x (24 sts)
rnd 34: [sc 2, inv dec 1] 6x (18 sts)
rnd 35: [sc 1, inv dec 1] 6x (12 sts)
rnd 36: inv dec 6 (6 sts)
Fasten off, leaving a 12-inch tail. Finish off and weave in ends.
Leg (Make 2)
rnd 1: With color B, make a mr, sc 7 (7 sts)
rnds 2-16: Sc around (7 sts for 15 rnds)
Fasten off, leaving a 12-inch tail for attaching. Don’t stuff.
Arm (Make 2)
rnd 1: With color B, make a mr, sc 6 (6 sts)
rnds 2-13: Sc around (6 sts for 12 rnds)
Fasten off, leaving a 12-inch tail for attaching. Don’t stuff.
Petal (Make 7)
rnd 1: Ch 4, sc 1 in 2nd ch from hook, sc 1, sc 3 in next st, turn to work down other side of ch, sc 1, inc 1 (8 sts)
rnd 2: Inc 1, sc 1, inc 3, sc 1, inc 2 (14 sts)
rnds 3-5: Sc around (14 sts for 3 rnds)
rnd 6: Ch 1, fold petal in half, sc 7 through front and back sts. See photos below. (7 sts)
Fasten off, leaving a 10-inch tail for attaching.
Skırt
rnd 1: Ch 48, sl st into 1st ch to make a loop (48 sts)
rnd 2: Ch 1, sc 47, sl st into 1st ch (48 sts)
rnd 3: [ch 10, sc 1 in 2nd ch from hook, dc 1, tr 5, dc 1, hdc 1, skip 1 st, sl st into next st, sl st 4] 8x
Fasten off, leaving a 16-inch tail for attaching.
Rnd 3 Guıde
Step 1: Ch 10
Step 2: Sc 1 in 2nd ch from hook, dc 1, tr 5, dc 1, hdc 1
Step 3: Skip 1 st, sl st into next st, sl st 4
Attachıng Lımbs
Using your tapestry needle and yarn tail, see photo 1 for leg placement and photo 2 for arm placement. For the legs – place a pin in rnd 31, centered with the face. You’ll be attaching the legs to rnds 32 & 31 at either side of pin. For the arms – attach under rnds 18 & 19.
Attachıng Skırt
1. Insert needle under st between rnds 25 & 26
2. Insert needle into skirt
3. Insert needle back through same hold from step 1 and out through next hole. Repeat steps 2 & 3 until you’ve gone all the way around
Attachıng Petals
1. Position petal under rnd 16 with one end centered with face
2. Insert needle under st between rnds 16 & 17
3. Insert needle through next st of petal from front to back
4. Insert needle in same hole you came out of in step 2 and up through next hole. Repeat steps 3 & 4 five more times. Weave in end and cut.
Bee Pattern
Body
rnd 1: With Color D, make a mr, sc 6 (6 sts)
rnd 2: Inc 6 (12 sts)
rnd 3: [sc 1, inc 1] 6x (18 sts)
rnds 4-6: Sc around (18 sts for 3 rnds)
rnd 7: Change to Color E, sc around (18 sts)
rnd 8: Sc around (18 sts)
Embroıder Face Now
Using 4 strands of embroidery floss, make french knots for eyes at rnd 4, a long stitch for mouth across center of bee, and 2 small stitches for cheeks at corners of mouth.
rnd 9: Change to Color D, sc around (18 sts)
rnds 10-11: Sc around (18 sts for 2 rnds)
rnd 12: Change to Color E, sc around (18 sts)
Begın Stuffıng Now And Contınue Stuffıng Untıl Closıng
rnd 13: [sc 1, inv dec 1] 6x (12 sts)
rnd 14: Inv dec 6 (6 sts)
Fasten off and finish off.
Wing (Make 2)
rnd 1: With Color A, make a mr, sc 6 (6 sts)
rnd 2: Inc 3, sl st 1, fasten off. You won’t be making it around to the sm (9 sts)
Make 2nd wing and sew flat edges together. Then sew on to Bee Body along center of rnds 9-11.
Antenna (Make 2)
Start with a slipknot on your hook. Insert hook into st between rnds 5 and 6 of Bee Body. Ch 4 and fasten off. Weave in tails. Repeat for second antenna.
I hope you enjoyed the Flower Gal and Bee amigurumi pattern!