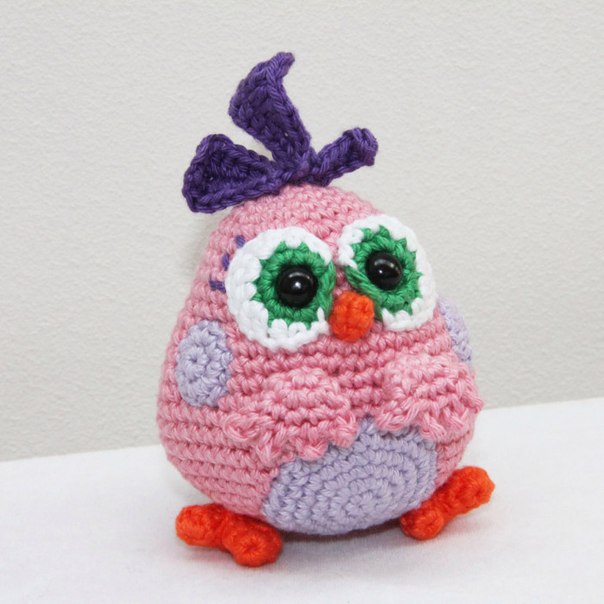
Bird Amigurumi Crochet Pattern
Hello amigurumi lovers and beautiful visitors, I wanted to share the free amigurumi patterns for you here. In my article I will share 1 pattern and how to make it for you. At the end of my article, I will share amigurumi patterns that can generate ideas for you.
You will need:
- Hook 2.5 mm
- Safety eyes 8 mm
- 1 skein pink
- 1 skein of lilac yarn
- 1 skein orange
- A small amount of green, white and purple yarn
- Stuffing
Abbreviations
p – loop
vp – air loop
conn. Art. – connecting column
RLS – single crochet
PSN – half double crochet
CH – double crochet
C2H – double crochet
Add. – an increase of 2 sc in the next. loop – decrease
Use an invisible decrease, insert your hook into the front walls of the next two loops, yarn over, knit through the first two loops, yarn over, knit the remaining two loops.
Amigurumi ring – wind the thread around two fingers, use the hook to pull the thread through the resulting circle. Knit 1 sc in a circle, then knit further according to the scheme, tighten the thread to close the hole.
Security Notes
- Stuffing: Always use stuffing that is approved for use in children’s toys.
- Safety eyes: if the toy is intended for a baby, then safety eyes are not suitable for use in this case, as there is a risk of swallowing them. Always follow the manufacturer’s safety instructions. If in doubt, it is better to embroider eyes.
Eyes (2 pcs.)
With green yarn
KR 1: 6 sc in the amigurumi ring (6)
Do not tighten the ring tightly, because the eyes should pass through it.
KR 2: [1 sc, 1 increase] x 5 times, 1 conn. Art. (do not close the row) (11)
Close the last loop of the conn. Art. and hide the end of the thread.
With white yarn
KP 3: Knit everything indicated in brackets [ ] in 1 sc. Attach the yarn with RLS and knit 1 RLS in the next. PSN, 1 PSN, [1 PSN, 1 CH], [2 CH], 1 CH, [1 CH, 1 PSN], 1 PSN, 1 RLS, 2 conn. Art. (do not close the row) (14)
Close the last loop of the conn. Art. and leave a tail.
Body
In Red
CR 1: 6 sc in amigurumi ring (6)
CR 2: 1 inc in each st (12)
CR 3: [1 sc, 1 inc] x 6 times (18)
CR 4: [2 sc, 1 inc ] x 6 times (24)
CR 5: [3 sc, 1 increase] x 6 times (30)
CR 6: [4 sc, 1 increase] x 6 times (36)
CR 7-11: 36 sc (36)
CR 12: [2 SC, 1 increase] x 12 times (48)
CR 13-15: 48 SC (48)
Attach eyes so that they occupy from CR7 to CR12 of the head. Insert safety eyes at the level of 9-10 CR at a distance of 4 sc between them.
CR 16: [7 sc, 1 increase] x 6 times (54)
CR 17-10: 54 sc (54)
Stuff the body tightly.
CR 21: [7 sc, 1 decrease] x 6 times (48)
CR 22: [6 sc, 1 decrease] x 6 times (42)
CR 23: [5 sc, 1 decrease] x 6 times (36)
CR 24 : [4 sc, 1 decrease] x 6 times (30)
CR 25: [3 sc, 1 decrease] x 6 times (24)
CR 26: [2 sc, 1 decrease] x 6 times (18)
CR 27: [ 1 sc, 1 decrease] x 6 times (12)
KR 28: [1 decrease] x 6 times (6)
Close the last loop of the connection. Art. and stuff the body tightly. Close the remaining hole by passing the end of the thread through the front loops and tighten. Hide the end of the thread.
Optionally, you can embroider brows over the eyes and eyelashes with purple yarn.
Beak
In orange
CR 1: 4 sc in amigurumi ring (4)
CR 2: [1 sc, 1 increase] x 2 times (6)
Cast off last st in conn. Art. and leave a tail. Attach the beak with a pin at the level of 11-12 CR of the body. Sew the beak to the body, hide the end of the thread.
A large speck
of Lilac yarn.
CR 1: 6 sc in amigurumi ring (6)
CR 2: 1 inc in each st (12)
CR 3: [1 sc, 1 inc] x 6 times (18)
CR 4: [2 sc, 1 inc] x 6 times (24)
KR 5: [3 sc, 1 increase] x 6 times (30)
Bind off last st conn. Art. and leave a tail. Attach at the level of 18-27 CR of the body.
Sew to the body, hide the end of the thread.
Small speck (2 pcs)
Lilac yarn.
CR 1: 6 sc in amigurumi ring (6)
CR 2: 1 inc in each st (12)
Cast off last st in conn. Art. and leave a tail. Attach at the level of 12-16 CR of the body.
Sew to the body, hide the end of the thread.
Legs (2 pcs.)
In orange
KR 1: 6 RLS in the amigurumi ring (6)
KR 2: 6 RLS (6)
Close the last loop of the connection. Art. and hide the end of the thread. Tie the second finger.
Kr 1: 6 sc in amigurumi ring (6)
Kr 2: 6 sc (6)
Kr 3: Pick up the first finger and start knitting from where you left off.
[2 sc, 1 decrease] x 3 times over both fingers (9)
Stuff both fingers tightly.
CR 4: 9 sc (9)
CR 5: [1 sc, 1 decrease] x 3 times (6)
CR 6: 6 sc (6)
Close the last loop conn. Art. and leave a tail. Stuff and attach a leg tightly on each side of the body at the level of 23-24 CR of the body. Sew to the body, hide the end of the thread.
Wings (2 pieces)
With purple yarn
KR 1: 6 sc in the amigurumi ring (6)
Kp 2: 1 increase in each loop (12)
Kr 3: Knit all in [ ] in 1 sc
[1 decrease] x 3 times, [ 1 sc, 3 ch, 1 conn. Art. in
the second loop from the hook, 1 sc in the next. vp] x 4 times, 1 connection. Art. (do not close the row) (8)
Close the last loop of the conn. Art. and leave a tail. Loosely stuff and attach a leg on each side of the body at the level of 15-16 CR of the body. Sew to the body, hide the end of the thread.
Feathers
Purple
First feather 7 ch, 2 dc in the second loop from the hook, 2 sc, 1 connection. Art. (12)
The second feather ch 12, 3 ch in the third ch from the hook, 3 dc, 3 sc,
1 conn. Art. (expand and continue to knit on the reverse side of the chain), 1 connection. st, 2 RLS, 3 PSN,
3 CH, 2 ch, which must be connected to the chain of the first row using the connection. Art. (23)
Close the last loop of the conn. Art. and hide the end of the thread.
Third pen: Attach to the first connection. Art. second pen. 10 ch, 2 ch in the third ch from the hook, 2 dc, 3 sc, 1 connection. Art. (expand and continue to knit on the reverse side of the chain), 1 connection. Art., 2 RLS, 2 PSN, 2 CH, 2 ch, which must be attached to the chain of the first row using the connection. Art. (19)
Close the last loop conn. Art. and hide the end of the thread.
Attach the feathers at the level of 1-2 CR of the body. Sew the feathers to the body and hide the end of the thread.
Feel free to tag me (@freeamigurumii) in your photos on Instagram or Facebook if you’d like!
All Finished.