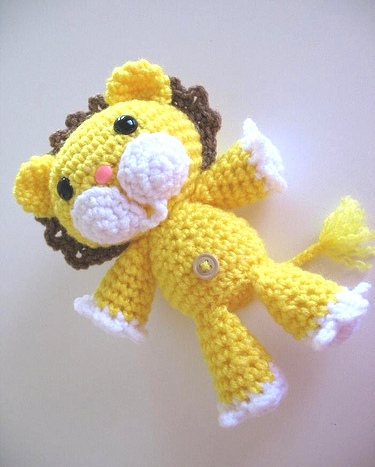
Amigurumi Lion Crochet Pattern
Hello amigurumi lovers and beautiful visitors, I wanted to share the free amigurumi patterns for you here. In my article I will share 1 pattern and how to make it for you. At the end of my article, I will share amigurumi patterns that can generate ideas for you.
Materials
- yellow, brown and white Caron Simply Soft yarn, 3.75 mm hook or
medium Red Heart yarn and 4 mm hook; - a pair of safety eyes 12 mm;
- 1 pink nose on a secure mount or bead;
- 1 brown button with 4 holes;
- holofiber.
Head
Row 1. With yellow yarn, 2 ch, 6 sbn in the 2nd ch from the hook.
Row 2. (2 sc in each sc) to the end of the row (12 sc)
Row 3. (sc in the 1st sc, 2 sc in the next sc) to the end of the row (18 sc)
Row 4. (sc in the next 2 sc, 2 sc in the next sc) to the end of the row (24 sc)
Row 5. (sc in the next 3 sc, 2 sc in the next sc) to the end of the row (30 sc)
Row 6. (sc in the next 4 sbn, 2 sbn in the next sbn) to the end of the row (36 sbn)
Row 7-12. (sc in each sc) to the end of the row (36 sc)
Row 13. (sc in the next 4 sc, decrease) to the end of the row (30 sc)
Row 14 . (sc in the next 3 sc, decrease) to the end of the row (24 sc)
Row 15. (sc in the next 2 sc, decrease) to the end of the row (18 sc)
Row 16. (sc in the next sc, decrease) to the end of the row (12 sc)
Row 17. connection. Art. in a trace. Art., finish, leaving a long end for sewing.
Body
Row 1 . With yellow yarn, ch 2, 6 sc in the 2nd ch from the hook
Row 2. (2 sc in each sc) to the end of the row (12 sc)
Row 3. (sc in the 1st sc, 2 sc in the next sc ) to the end of the row (18 sc)
Row 4. (sc in the next 2 sc, 2 sc in the next sc) to the end of the row (24 sc)
Row 5. behind the back wall of the loop, (sc in each sc) to the end row (24 sc)
Row 6-8. for both walls of the loop, (sc in each sc) to the end of the row (24 sc)
Row 9. (sc in the next 2 sc, decrease) to the end of the row (18 sc)
Row 10-11. (sc in each sc) to the end of the row (18 sc)
Row 12. (sc in the next sc, decrease) to the end of the row (12 sc)
Row 13. connection. Art. in a trace. st., complete.
Hands / Feet (4 pcs.)
Row 1. With white yarn, 2 ch, 6 sbn in the 2nd ch from the hook.
Row 2. (2 sbn in each. sbn) to the end of the row (12 sbn)
Row 3. sbn in the next. 3 sc, 3 ch, conn. Art. in the same article, sbn in the next. 2 sc, 3 ch, conn. Art. in the same article, sbn in the next. 2 sc, 3 ch, conn. Art. in the same st., sbn in the remaining sbn.
Row 4. We knit behind the back walls of the loops, sc in each. sbn to the end of the row (where there were arches from the ch we knit 1 sbn just to the place where the connecting columns were) (12 sbn)
Row 5-6. Change the color of the yarn to yellow, (sc in each sc) to the end of the row (12 sc)
Row 7. (sc in the next 2 sc, decrease) to the end of the row (9 sc)
Row 8-9. (sc in each sc) to the end of the row (9 sc)
Row 10. (sc in the next sc, decrease) to the end of the row (6 sc)
Row 11. connection. Art. in a trace. st., complete. Leave a long end for sewing.
Ears (2 pcs.)
Row 1 . With yellow yarn, ch 2, 6 sc in the 2nd ch from the hook.
Row 2. (2 sbn in each. sbn) to the end of the row (12 sbn)
Row 3-4. (sc in each sc) to the end of the row (12 sc)
Row 5. connection. Art. in a trace. Art., finish, leaving a long end for sewing.
Row 6. Fold in half to make a semicircle.
Mane
Brown yarn, ch 33, conn. Art. in the 2nd ch from the hook and in the next. 3 st, * 3 ch, sb in the next. 2 st *, repeat between * to the end. Finish leaving a long tail for sewing.
Cheeks (2 pcs.)
Row 1. With white yarn, ch 2, 6 sc in the 2nd ch from the hook.
Row 2. (2 sbn in each sbn) to the end of the row (12 sbn)
Row 3. (sbn in each sbn) to the end of the row (12 sbn)
Row 4. connection. Art. in a trace. Art., finish, leaving a long end for sewing.
Assembly
- Before stuffing the head, pin the cheeks with sewing pins where you like, then attach the safety eyes and nose. Remove cheeks. They will be sewn on after the head is stuffed and sewn to the body.
- Stuff the body and sew to the head.
- Place the mane on the head, folding it in half to define the center, and pin it in the center of the head. Pin the sides of the mane before sewing.
- For the hands: Fold the opening of the hand in half so that the middle claw is facing forward. Sew over the edge, then sew to the body at the neck. Pull the remaining ends of the thread from both hands to the place where the tail will be.
- For the feet: Fold the opening of the foot in half so that all three claws are facing forward. Sew over the edge, then sew the legs to the body, focusing on the row in which you knitted behind the back wall of the loop. Pull the remaining thread from one of the legs to where the tail will be.
- Weave three threads to make a tail. Leave the tip about 2.5 cm and tie in a knot. Tie a piece of brown yarn and trim all the threads with scissors. Fluff all ends.
- Sew the ears in front of the mane.
- Sew cheeks. You can fill them a little with scraps of yarn of the same color.
- There are 2 options for the mouth:
- the first – 4 ch and attach in the right place;
- the second – attach the thread under the left cheek, ch 4, attach the connection. Art. on the other hand, now knit from the back of the chain, going back (about 10 sbn) and sew on from below.
Feel free to tag me (@freeamigurumii) in your photos on Instagram or Facebook if you’d like!
All Finished.