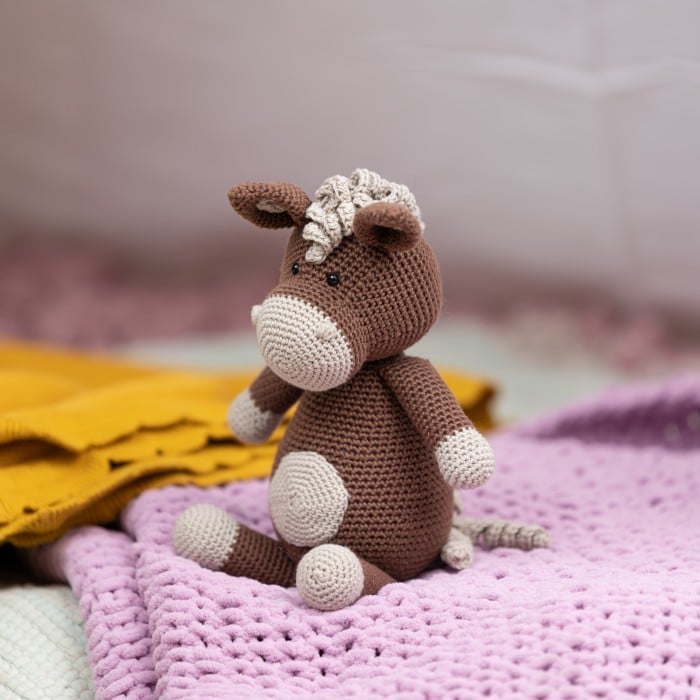
Amigurumi Horse Free Pattern
Hello amigurumi lovers and beautiful visitors, I wanted to share the free amigurumi patterns for you here. In my article I will share 1 pattern and how to make it for you. At the end of my article, I will share amigurumi patterns that can generate ideas for you.
Skill level: Intermediate
Crochet hook: 2.5 mm
Materials: 1 pair of safety eyes 6 mm, fiberfill, pins, tapestry needle
Yarn: Rainbow Cotton 8/4
Dark Brown (#008) – 1 skein
Beige (#004) – 1 skein
Abbreviations:
sc – single crochet
hdc – half double crochet
dc – double crochet
sl st – slip stitch
bo – bobble stitch (4 half dc together in the same stitch, yarn over and pull the yarn through all stitches on the hook)
inc – increase: 2 sc in the same st
dec – decrease: 2 sc together
(xx) – the number of stitches after ended round
[ ] – repeat instructions within bracke
Head
Color: 004 Beige
Rnd 1: Start with a magic ring. 6 sc in the magic ring (6)
Rnd 2: 2 sc in each st (12)
Rnd 3: [1 sc, inc] x6 (18)
Rnd 4: [2 sc, inc] x6 (24)
Rnd 5: [3 sc, inc] x6 (30)
Rnd 6: [4 sc, inc] x6 (36)
Rnd 7: [5 sc, inc] x6 (42)
Rnds 8-9: 1 sc in each st (42)
Rnd 10: 10 sc, 1 bo, 12 sc, 1 bo, 18 sc (42)
Rnd 11: 1 sc in each st (42)
Change color to 008 Dark Brown
Rnds 12-14: 1 sc in each st (42)
Rnd 15: [5 sc, dec] x6 (36)
Rnd 16: [4 sc, dec] x6 (30)
Rnd 17: [4 sc, inc] x6 (36)
Rnd 18: [5 sc, inc] x6 (42)
Rnd 19: 1 sc in each st (42)
Rnd 20: [6 sc, inc] x6 (48)
Rnd 21: 1 sc in each st (48)
Rnd 22: [7 sc, inc] x6 (54)
Rnd 23: 1 sc in each st (54)
Rnd 24: [8 sc, inc] x6 (60)
Rnd 25: 1 sc in each st (60)
Rnd 26: [9 sc, inc] x6 (66)
Rnds 27-30: 1 sc in each st (66)
Now, attach the safety eyes between rounds 17 and 18 with 17 sts in between.
Rnd 31: [9 sc, dec] x6 (60)
Rnd 32: [8 sc, dec] x6 (54)
Rnd 33: [7 sc, dec] x6 (48)
Rnd 34: [6 sc, dec] x6 (42)
Rnd 35: [5 sc, dec] x6 (36)
Rnd 36: [4 sc, dec] x6 (30)
Rnd 37: [3 sc, dec] x6 (24)
Now, stuff the head.
Rnd 38: [2 sc, dec] x6 (18)
Rnd 39: [1 sc, dec] x6 (12)
And stuff the head one last time.
Rnd 40: dec x6 (6)
Now, sew together the last 6 sts. Sew through one of the loops of each of the 6 sts. Pull the
thread to close the hole and weave in the end.
Ear (make 2)
Color: 008 Dark Brown
Rnd 1: Start with a magic ring. 6 sc in the magic ring (6)
Rnd 2: 2 sc in each st (12)
Rnds 3-4: 1 sc in each st (12)
Rnd 5: [1 sc, inc] x6 (18)
Rnds 6-7: 1 sc in each st (18)
Rnd 8: [2 sc, inc] x6 (24)
Rnds 9-12: 1 sc in each st (24)
Rnd 13: [2 sc, dec] x6 (18)
Rnd 14: 1 sc in each st (18)
Rnd 15: [1 sc, dec] x6 (12)
Fold the ear flat and sl st together. Cut off the yarn but be careful to leave a long tail for sewing the ear onto the head.
Inside ear (make 2)
Color: 004 Beige
Ch 7, turn, 6 sc, 2 sc in the last st.
Now, rotate and continue on the opposite side to make an oval shape.
5 sc, 1 inc, 5 sc, 1 inc, 6 sc, 1 sl st.
Cut off the yarn but be careful to leave a long tail for sewing the inside ear onto the outside ear.
Body
Color: 004 Dark Brown
Rnd 1: Start with a magic ring. 6 sc in the magic ring (6)
Rnd 2: 2 sc in each st (12)
Rnd 3: [1 sc, inc] x6 (18)
Rnd 4: [2 sc, inc] x6 (24)
Rnd 5: [3 sc, inc] x6 (30)
Rnd 6: [4 sc, inc] x6 (36)
Rnd 7: [5 sc, inc] x6 (42)
Rnd 8: [6 sc, inc] x6 (48)
Rnd 9: [7 sc, inc] x6 (54)
Rnd 10: [8 sc, inc] x6 (60)
Rnd 11: [9 sc, inc] x6 (66)
Rnds 12-19: 1 sc in each st (66)
Rnd 20: [9 sc, dec] x6 (60)
Rnds 21-23: 1 sc in each st (60)
Rnd 24: [8 sc, dec] x6 (54)
Rnds 25-27: 1 sc in each st (54)
Rnd 28: [7 sc, dec] x6 (48)
Rnds 29-31: 1 sc in each st (48)
Rnd 32: [6 sc, dec] x6 (42)
Rnds 33-35: 1 sc in each st (42)
Begin stuffing the body.
Rnd 36: [5 sc, dec] x6 (36)
Rnds 37-39: 1 sc in each st (36)
Rnd 40: [4 sc, dec] x6 (30)
Rnds 41-42: 1 sc in each st (30)
Rnd 43: [3 sc, dec] x6 (24)
Rnd 44: 1 sc in each st (24)
Stuff the body well.
Cut off the yarn but be careful to leave a long tail for sewing the head onto the body.
Tummy
Color: 004 Beige
Rnd 1: Start with a magic ring. 6 sc in the magic ring (6)
Rnd 2: 2 sc in each st (12)
Rnd 3: [1 sc, inc] x6 (18)
Rnd 4: [2 sc, inc] x6 (24)
Rnd 5: [3 sc, inc] x6 (30)
Rnd 6: [4 sc, inc] x6 (36)
Rnd 7: [5 sc, inc] x6 (42)
Rnd 8: 1 sc in each st (42)
1 sl st in the first st. Cut off the yarn but be careful to leave a long tail for sewing the tummy on to the body.
Arms (make 2)
Color: 004 Beige
Rnd 1: Start with a magic ring. 6 sc in the magic ring (6)
Rnd 2: inc x6 (12)
Rnd 3: [1 sc, inc] x6 (18)
Rnd 4: [2 sc, inc] x6 (24)
Rnds 5-6: 1 sc in each st (24)
Rnd 7: [2 sc, dec] x6 (18)
Rnd 8: 1 sc in each st (18)
Rnd 9: [4 sc, dec] x3 (15)
Rnd 10: 1 sc in each st (15)
Change color to 008 Dark Brown
Rnds 11-27: 1 sc in each st (15)
Stuff the arms with fiberfill. Stuff the bottom of the arm well and a little less in the actual arm.
Leave a small space at the top without stuffing. And finally, sl st the opening closed. Cut off the yarn but be careful to leave a long tail for sewing the arm onto the body.
Legs (make 2)
Color: 004 Beige
Rnd 1: Start with a magic ring. 6 sc in the magic ring (6)
Rnd 2: inc x6 (12)
Rnd 3: [1 sc, inc] x6 (18)
Rnd 4: [2 sc, inc] x6 (24)
Rnd 5: [3 sc, inc] x6 (30)
Rnds 6-7: 1 sc in each st (30)
Rnd 8: [3 sc, dec] x6 (24)
Rnd 9: 1 sc in each st (24)
Rnd 10: [2 sc, dec] x6 (18)
Rnd 11: 1 sc in each st (18)
Change to Dark Brown.
Rnds 12-25: 1 sc in each st (18)
Rnd 26: [4 sc, dec] x3 (15)
Stuff fiberfill into the legs. Stuff the bottom of the leg well and a little less in the actual leg.
Leave a small space at the top without stuffing. And finally, sl st the opening closed. Cut off the yarn but be careful to leave a long tail for sewing the leg onto the body.
Mane
Color: 004 Beige
The mane consists of three pieces:
A long piece: Ch 60, 2 hdc in each st all the way back.
A center piece: Ch 50, 2 hdc in each st all the way back.
A short piece: Ch 40, 2 hdc in each st all the way back.
Tail (make 2)
Color: 004 Beige
Ch 50, 2 hdc in each st all the way back.
Assembling
Head:
The head must point downwards a little. It can be helpful to pin the head to the body first.
Sew through the stitches of the body and then through the head. And finally, stuff some extra
fiberfill into the neck before closing it completely to avoid a wobbly head. Weave in ends
thoroughly.
Ears:
Sew on the ears about 10 rows behind the eyes with about 8-10 stitches in between. Weave
in ends thoroughly.
Legs:
Place the legs under the tummy. They should point outward a bit. Sew the legs on about 3
rounds from the beginning of the body. Weave in ends thoroughly.
Arms:
Sew the arms on about 1 round from the top of the neck. Weave in ends thoroughly.
Tummy:
Sew the tummy on at the center of the body. Sew through the front loop only. Be careful to keep the tummy flat while sewing it on to avoid that it bulges out. Weave in ends thoroughly.
Tip: Sew on the arms and legs before sewing on the tummy, this will make it easier to place the tummy nicely.
Mane:
Pin the three pieces to the head. Attach the pieces sewing a few stitches at each end and in the middle. If Hilda is made for a small child, you may want to add some extra stitches in between as well. Weave in ends thoroughly.
Tail:
Sew the two pieces onto the center of the back side. Weave in ends thoroughly.
Enjoy!