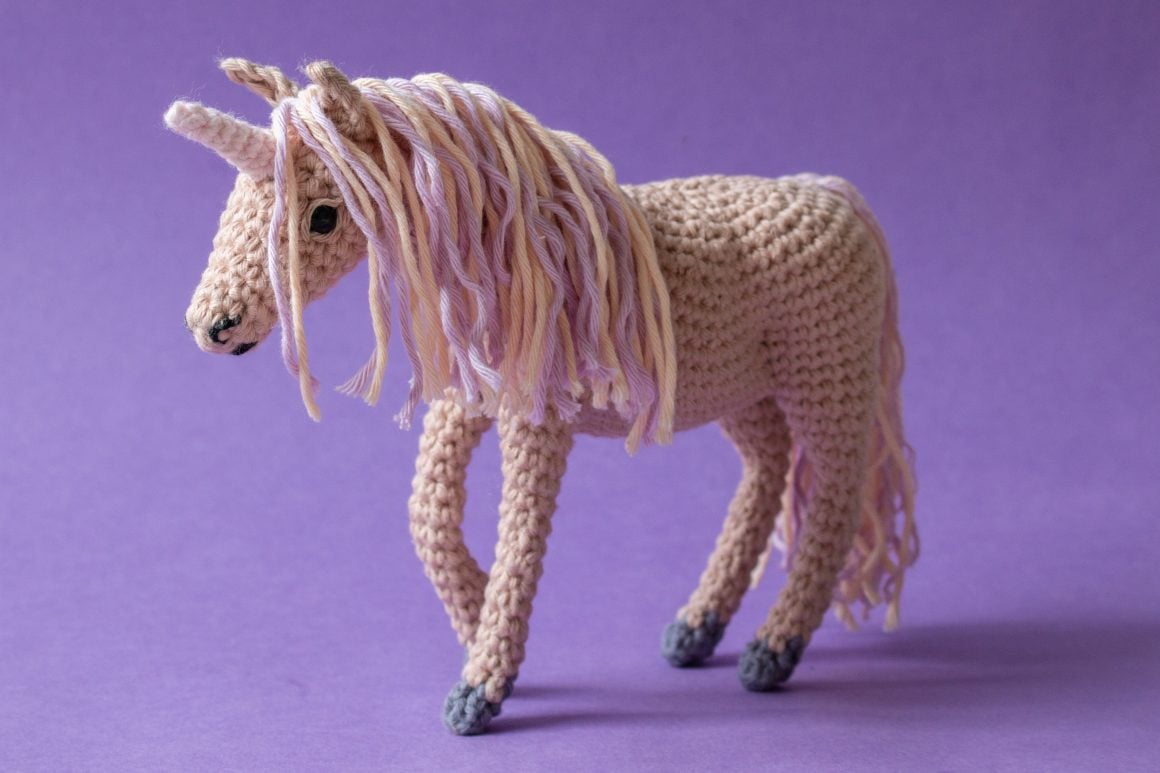
Amigurumi Horse Free Crochet Pattern
Hello amigurumi lovers and beautiful visitors, I wanted to share the free amigurumi patterns for you here. In my article I will share 1 pattern and how to make it for you. At the end of my article, I will share amigurumi patterns that can generate ideas for you.
Materials
Aran/worsted weight yarn in 2 to 4 colors (for the body, hooves and mane)
Small amount of DK/light worsted weight yarn (only for the unicorn’s horn)
3.5mm/E-4 hook
2.5mm/B-1 or C-2 hook (only for the unicorn’s horn)
Yarn needle (preferably with a bent tip)
Black embroidery floss
Large eyed sewing needle
7mm safety eyes
Fiberfill
Stitch marker
Sewing pins
4 pipe cleaners OR craft wire and PVC tape
Small flat pliers (optional)
Scissors
Abbreviations
St = stitch
Sl st = slip stitch
Ch = chain
Sc = single crochet (double crochet in British terms)
Hdc = Half double crochet
Inc = sc increase: single crochet 2 in same st
Dec = invisible sc decrease: Insert hook in front loops of next 2 sts, yarn over, pull through both front loops, yarn over, pull through 2 remaining loops
BLO = back loops
(…) = stitches that are repeated in the rnd
*… = number of repetitions
Instructions for the unicorn amigurumi
Crochet the forelegs (make 2)
The legs are not stuffed.
Rnd 1: Sc 8 in magic ring in color of the hooves (8)
Rnd 2: In BLO only: Dec 2 times, sc in next 3 st, change to color of the body in next st (6)
Rnd 3: Sc in all 6 st (6)
Rnd 4: Sc in next 4 st, inc in next 2 st (8)
Rnd 5: Sc in next 4 st, dec 2 times (6)
Rnd 6 to 8: Sc in all 6 st (6)
Rnd 9: [sc in next 2 st, inc in next st]*2 (8)
Rnd 10: [sc in next 2 st, dec] *2 (6)
Rnd 11: Sc in all 6 st (6)
Rnd 12: Sc in next 5 st, inc in next st (7)
Rnd 13: Sc in next 6 st, inc in next st (8)
Rnd 14: Sc in next 7 st, inc in next st (9)
Rnd 15: Sc in next 8 st, inc in next st (10)
Sl st in the next st and fasten off. You don’t need a particularly long yarn end here.
Crochet the hind legs (make 2)
Rnd 1: Sc 8 in magic ring in color of the hooves (8)
Rnd 2: In BLO only: Dec 2 times, sc in next 3 st, change to color of the body in next st (6)
Rnd 3: Sc in all 6 st (6)
Rnd 4: Sc in next 4 st, inc in next 2 st (8)
Rnd 5: Sc in next 4 st, dec 2 times (6)
Rnd 6 to 8: Sc in all 6 st (6)
Rnd 9: [sc in next 2 st, inc in next st]*2 (8)
Rnd 10: [sc in next 2 st, dec] *2 (6)
Rnd 11: Sc in all 6 st (6)
Rnd 12: [sc in next 2 st, inc in next st]*2 (8)
Rnd 13: [sc in next 3 st, inc in next st]*2 (10)
Rnd 14: [sc in next 4 st, inc in next st]*2 (12)
Rnd 15: [sc in next 5 st, inc in next st]*2 (14)
Rnd 16: Sc in all 14 st (14)
Sl st in the next st and fasten off, leaving a slightly long yarn end.
Crochet the belly in the same color as the legs
Ch 10
Rnd 1: Sc in next 8 ch (starting in 2nd), sc 4 in next ch, sc in other side of next 7 ch, sc 3 in other side of next ch (22)
Rnd 2: [sc in next 9 st, inc in next 2 st]*2 (26)
I recommend watching the video tutorial for this next round.
Rnd 3: Sc in next 10 st, sc in all 10 st of first foreleg, sc in next 2 st, sc in all 10 st of second foreleg, sc in next 11 st, sc in all 14 st of first hind leg, sc in next 2 st, sc in all 14 st of second hind leg, sc in next st (74)
Rnd 4: Sc in next 9 st, sc 3 tog, sc in next 7 st, dec 2 times, sc in next 7 st, sc 3 tog, sc in next 9 st, sc 3 tog, sc in next 11 st, dec 2 times, sc in next 11 st, sc 3 tog (62)
Rnd 5: Sc in next 13 st, inc in next st, sc in next 8 st, inc in next st, sc in next 19 st, inc in next st, sc in next 2 st, inc in next st, sc in next 6 st, inc in next st, sc in next 2 st, inc in next st, sc in next 6 st (68)
Rnd 6: Sc in next 13 st, inc in next st, sc in next10 st, inc in next st, sc in next 19 st, inc in next st, sc in next 4 st, inc in next st, sc in next 6 st, inc in next st, sc in next 4 st, inc in next st, sc in next 6 st (74)
Rnd 7: Sc in next 14 st, inc in next st, sc in next 10 st, inc in next st, sc in next 21 st, inc in next st, sc in next 4 st, inc in next st, sc in next 8 st, inc in next st, sc in next 4 st, inc in next st, sc in next 7 st (80)
Secure your stitch and use the yarn ends of the legs to close the little gaps between the legs and belly with 1 or 2 stitches. Then weave in the yarn ends on the inside of the body.
Reinforce the legs with pipe cleaner or craft wire
I recommend watching this part of the video tutorial.
Now is a good time to insert pipe cleaner or craft wire in the legs. This is necessary in order for the legs to support the body.
If you are using pipe cleaner, I recommend taking it double and slightly twisting 2 pieces around each other for extra sturdiness.
Measure how long the pipe cleaner or craft wire needs to be by holding it against the horse’s/unicorn’s legs. You’ll need one double piece of pipe cleaner or one piece of craft wire for the forelegs and one for the hind legs. Add an extra inch on each side to shape a loop for each hoof.
If you are using craft wire, wrap the sharp wire ends and the loops with PVC tape.
Insert the pipe cleaner or craft wire in the legs. You may need to pull any yarn ends out of the way first, using your hook.
Continue crocheting the body
Rnd 8: Sc in next 19 st, dec 2 times, sc in next 36 st, dec 2 times, sc in next 17 st (76)
Rnd 9: Sc in next 15 st, ch 14, sk 10, sc in next 31 st, dec 2 times, sc in next 16 st (78)
Rnd 10: Sc in next 4 st, dec, sc in next 8 st, dec, sc in next 12 ch, dec, [sc in next 8 st, dec]*3, sc in next 2 st, dec, sc in next 8 st, dec, sc in next 4 st (70)
Rnd 11: Sc in next 11 st, [dec, sc in next 2 st]*4, dec, sc in next 25 st, dec, sc in next 14 st (64)
Rnd 12: Sc in next 3 st, dec, [sc in next 6 st, dec]*7, sc in next 3 st (56)
Rnd 13: [sc in next 5 st, dec]*8 (48)
Rnd 14: Sc in next 2 st, dec, [sc in next 4 st, dec]*7, sc in next 2 st (40)
Rnd 15: [sc in next 3 st, dec]*8 (32)
Fill the body with fiberfill, making sure the top of the hind legs are filled first. Don’t worry about properly filling the front side of the body yet.
Rnd 16: Sc in next st, dec, [sc in next 2 st, dec]*7, sc in next st (24)
Rnd 17: [sc in next st, dec]*8 (16)
Rnd 18: Dec 8 times (8)
Fasten off, leaving an extra long yarn end for sewing. Don’t close the round yet. We will do this in the end when we give the body some extra definition.
Crochet the neck in the color of the body out of the opening
Rnd 1 and 2: Sc in all 24 st (10 sc st and 14 ch (24)
Rnd 3: Sc 5, dec, sc 17 (23)
Fill the front of the body properly, making sure the tops of the forelegs are slightly filled too.
Rnd 4 and 5: Sc 23 (23)
Rnd 6: Sc 5, dec, sc 16 (22)
Rnd 7: Sc 4, dec, sc 16 (21)
Rnd 8: [sc in next 5 st, dec]*3 (18)
Fasten off, leaving a long yarn end for sewing.
Crochet the head in the color of the body
Before crocheting the head, set 2 x 20cm/8″ pieces of yarn in the same color aside for the eyelids.
Rnd 1: Sc 6 into magic ring (6)
Rnd 2: Inc in next 6 st (12)
Rnd 3: Sc in next 6 st, dec 3 times (9)
Rnd 4: Sc in next 6 st, inc in next 3 st (12)
Rnd 5: [sc in next 3 st, inc in next st]*3 (15)
Rnd 6 and 7: Sc in all 15 st (15)
Rnd 8: [sc in next 4 st, inc in next st]*3 (18)
Rnd 9: Sc in all 18 st (18)
Rnd 10: [sc in next 5 st, inc in next st]*3 (21)
Rnd 11 and 12: Sc in all 21 st (21)
Rnd 13: [sc in next 5 st, dec]*3 (18)
Insert the safety eyes and embroider the eyelids
For this part I also recommend watching the video tutorial.
Insert the safety eyes in between rnd 9 and 10 with about 5 stitches space in between. Don’t secure them just yet. If the safety caps are too large, embroidering the eyelids may be difficult after securing the safety eyes. If the safety caps are small, it may make sense to secure the eyes first.
Thread a piece of yarn on a yarn needle and stitch from the inside of the head out, at the outer corner of the eye. Stitch back inside the head at the inner corner of the eye. Move this stitch below the eye. This forms the lower eyelid. Stitch out of the head from the outer corner of the eye again and stitch back inside at the inner corner. Move this stitch above the eye. It shapes the upper eyelid.
Tie the yarn ends together inside the head and cut them short. Repeat on the other side.
Carefully secure the safety eyes, without the eyes covering the eyelids.
Fill the head with fiberfill. Continue crocheting the head.
Rnd 14: [sc in next 4 st, dec]*3 (15)
Rnd 15: [sc in next 3 st, dec]*3 (12)
Rnd 16: Dec 6 times (6)
Fasten off, close the round and weave in the yarn end.
Crochet the ears in color of the body (make 2)
Ch 5
Sl st in 2nd ch, sc in next st, hdc in next 2 st (4)
Fasten off, leaving a long yarn end for sewing.
Crochet the horn, using DK/light worsted weight yarn and a 2.5mm/C-2 hook
Rnd 1: Sc 4 in magic ring (4)
Rnd 2: Sc in all 4 st (4)
Rnd 3: Inc in next st, sc in next 3 st (5)
Rnd 4: Sc in all 5 st (5)
Rnd 5: Inc in next st, sc in next 4 st (6)
Rnd 6: Sc in all 6 st (6)
Rnd 7: Inc in next st, sc in next 5 st (7)
Fasten off, leaving a long yarn end for sewing.
Assembly
Sew the ears on between rnd 12 and 13 of the head with about 2 stitches space in between. Weave in the yarn ends.
Sew the horn on rnd 9 to 11, centered. Stitch the yarn end through to the back of the head and weave it in where it will be covered by the neck.
Fill the neck with fiberfill and sew the head on. The angle between head and neck is slightly wider than 90 degrees.
Now close the opening on the back and use the long yarn end to shape the body.
Attach the mane and tail
Cut 16 pieces of yarn for the tail, just over twice the length you would like it to be.
You can see how I attached the tail here.
Attach the tail in 4 groups of 4 strands, close to each other, just above the butt. Pull 4 yarn strands through a stitch, picking them up at the center, using your hook. Then pull the ends through the loops and pull them tight.
Cut about 30 pieces of yarn for the mane, just over twice the length you would like it to be.
Attach the main in 15 groups of 2 strands, close to each other, along the top of the neck. Pull 2 yarn strands through a stitch, picking them up at the center, using your hook. Then pull the ends through the loops and pull them tight.
Trim the tail and mane to the desired length. You could also split the yarn for a different effect.
Your unicorn amigurumi is complete!
And that’s it! Your unicorn or horse is complete!
Thank you so much for visiting! And thank you for using my pattern! I hope you enjoyed it!