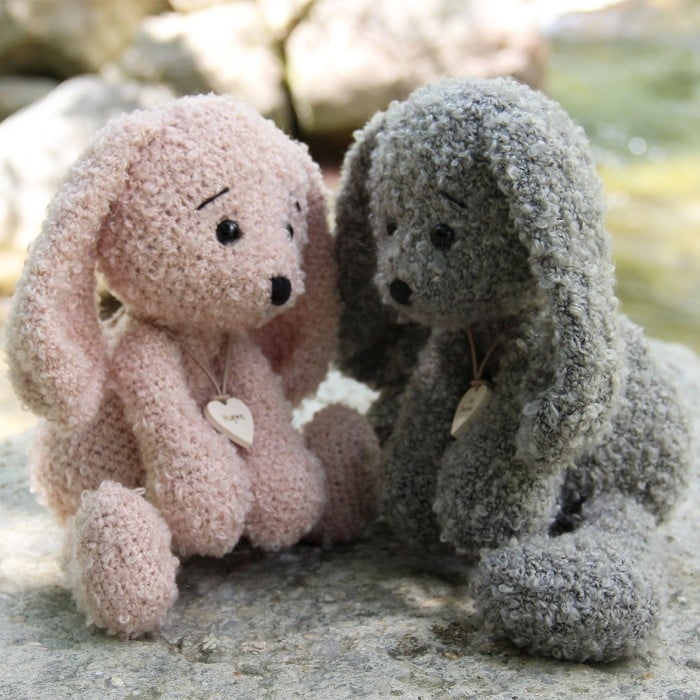
Amigurumi Curly Bunnies Free Pattern
Hello amigurumi lovers and beautiful visitors, I wanted to share the free amigurumi patterns for you here. In my article I will share 1 pattern and how to make it for you. At the end of my article, I will share amigurumi patterns that can generate ideas for you.
YARN USAGE:
Curly Bunnies H 32 cm: 150 g
A few meters of black yarn
for nose and eyebrows.
Gauge: Tight
MATERIALS:
Rattle cellophane
Rattleboxes
Squeakers
Filling
Eyes: 12 mm
Crochet hook: 3,5 – 4,0 mm
The given amounts of yarn are for guidance only.
Many colours
ABBREVIATIONS AND DEFINITIONS
st(s) Stitch(es)
cr Magic ring
ch Chain stitch
t-ch Turn chain stitch, 1 ch then turn the work
sl st Slip stitch
dc Double crochet
2 dc inc Increase (2 dc in one st)
dc 2 tog Decrease (2 dc worked together)
… The instructions shown in these brackets must be repeated for the whole round/ row or with the number after x.
(..) At the end of the round/row – indicates the total number of stitches.
If nothing else is specified, work in spiral rounds.
To finish the work, join the round with a sl st.
Leave a 20 cm length of yarn and cut. Pull the yarn through the stitch.
It is recommended that the filling continues on an ongoing basis as the work progresses.
Mounting of the safety eyes and nose:
The eyes/noses are inserted, and the rear stops to the eyes/noses are pushed from the inside.
The rear stops can and should be a little hard to plug in to ensure that they are sticking well.
Curly
super soft textured and light weight yarn with sheepy curls
Developed for both knitting and crocheting projects – clothing, cushions, blankets, teddy bears and dolls hair.
Only the fantasy sets the limit.
Machine washable.
59% Polyester/12% Nylon/29% Acrylic,
50 g/120 m.
CURLY BUNNIES
BODY
1.) cr with 8 dc (8)
2.) 2 dc inc (16)
3.) 1 dc, 2 dc inc (24)
4.) 2 dc, 2 dc inc (32)
5.) 3 dc, 2 dc inc (40)
6.) 4 dc, 2 dc inc (48)
7.) 5 dc, 2 dc inc (56)
8.) 6 dc, 2 dc inc (64)
9 – 12.) 64 dc (64)
13.) 6 dc, dc 2 tog (56)
14 – 15.) 56 dc (56)
16.) 5 dc, dc 2 tog (48)
17.) 48 dc (48)
18.) 4 dc, dc 2 tog (40)
19 – 22.) 40 dc (40)
23.) 3 dc, dc 2 tog (32)
24 – 26.) 32 dc (32)
27.) 2 dc, dc 2 tog (24)
28 – 32.) 24 dc (24)
Fill the body.
HEAD
1.) cr with 6 dc (6)
2.) 2 dc inc (12)
3.) 1 dc, 2 dc inc (18)
4.) 2 dc, 2 dc inc (24)
5 – 7.) 24 dc (24)
The eyes are inserted after row 7.
8.) 2 dc, 2 dc inc x 6, 6 dc (30)
9.) 3 dc, 2 dc inc x 6, 6 dc (36)
10.) 4 dc, 2 dc inc x 6, 6 dc (42)
11.) 5 dc, 2 dc inc x 6, 6 dc (48)
12.) 6 dc, 2 dc inc x 6, 6 dc (54)
13.) 7 dc, 2 dc inc x 6, 6 dc (60)
14.) 8 dc, 2 dc inc x 6, 6 dc (66)
15 – 21.) 66 dc (66)
22.) 9 dc, dc 2 tog (60)
23.) 8 dc, dc 2 tog (54)
24.) 54 dc (54)
25.) 7 dc, dc 2 tog (48)
26.) 6 dc, dc 2 tog (42)
27.) 5 dc, dc 2 tog (36)
28.) 36 dc (36)
29.) 4 dc, dc 2 tog (30)
30.) 3 dc, dc 2 tog (24)
31.) 2 dc, dc 2 tog (18)
32.) 1 dc, dc 2 tog (12)
33.) dc 2 tog (6)
Add filling to the head.
Cut the yarn and pull through the stitches, tighten and sew the head together.
Shape the head and the eye hollows:
With Curly, thread a needle with approx. 25 cm yarn.
Put the needle in from under the chin and out at the side of the eye.
Guide the thread around a stitch by the eye and then back out under the chin. Tighten the yarn to form the hollow around the eye, tighten the yarn through a few stitches under the chin.
The hollow for the eye is now completed. Should you want the hollow deeper the process can be repeated.
Repeat the process for the other eye.
See illustration.
Embroider eyebrows as shown in the pictures.
EARS (2 X)
1.) cr with 6 dc (6)
2.) 2 dc inc (12)
3.) 1 dc, 2 dc inc (18)
4.) 2 dc, 2 dc inc (24)
5.) 3 dc, 2 dc inc (30)
6.) 4 dc, 2 dc inc (36)
7.) 5 dc, 2 dc inc (42)
8 – 12.) 42 dc (42)
13.) 5 dc, dc 2 tog (36)
14 – 18.) 36 dc (36)
19.) 4 dc, dc 2 tog (30)
20 – 24.) 30 dc (30)
25.) 3 dc, dc 2 tog (24)
26 – 30.) 24 dc (24)
31.) 2 dc, dc 2 tog (18)
32 – 36.) 18 dc (18)
37.) 1 dc, dc 2 tog (12)
38 – 42.) 12 dc (12)
Add 2 layers of Rattle cellophane to the ears.
Sew the ears onto the head as seen in the pictures.
Sew the head to the body when all parts have been attached.
ARMS (2 X)
1.) cr with 6 dc (6)
2.) 2 dc inc (12)
3.) 1 dc, 2 dc inc (18)
4.) 2 dc, 2 dc inc (24)
5.) 3 dc, 2 dc inc (30)
6.) 4 dc, 2 dc inc (36)
7 – 8.) 36 dc (36)
9.) 4 dc, dc 2 tog (30)
10 – 11.) 30 dc (30)
12.) 3 dc, dc 2 tog (24)
13.) 24 dc (24)
14.) 2 dc, dc 2 tog (18)
15 – 30.) 18 dc (18)
31.) 1 dc, dc 2 tog (12)
32.) dc 2 tog (6)
Insert the Squeakers and filling into the arms.
Sew the arms to the body.
LEGS (2 X)
1.) Chain 8, 2 dc in 2nd ch from hook, 5 dc, 5 dc in the final ch, 5 dc in ch on the opposite side, 2 dc in the final ch (19)
2.) 2 dc inc, 7 dc, 2 dc inc x 3, 7 dc, 2 dc inc (24)
3.) 2 dc inc x 2, 8 dc, 2 dc inc x 5, 8 dc, 2 dc inc (32)
4.) 2 dc inc x 3, 11 dc, 2 dc inc x 5, 12 dc, 2 dc inc (41)
5 – 6.) 41 dc (41)
7.) 1 dc in the back loop of each dc (41)
8.) 18 dc, dc 2 tog x 4, 15 dc (37)
9.) dc 2 tog x 2, 13 dc, dc 2 tog x 3, 14 dc (32)
10.) 14 dc, dc 2 tog, 1 dc, dc 2 tog, 13 dc (30)
11.) dc 2 tog, 10 dc, dc 2 tog x 3, 10 dc, dc 2 tog (25)
12.) 9 dc, dc 2 tog, 3 dc, dc 2 tog, 9 dc (23)
13 – 17.) 23 dc (23)
18.) 6 dc, dc 2 tog, 4 dc, dc 2 tog, 5 dc, dc 2 tog, 2 dc (20)
19 – 23.) 20 dc (20)
24.) 7 dc, dc 2 tog, 7 dc, dc 2 tog, 2 dc (18)
25 – 27.) 18 dc (18)
28.) 3 dc, dc 2 tog, 8 dc, dc 2 tog, 3 dc (16)
29.) 1 dc, dc 2 tog x 5, finish with 1 dc (11)
30.) dc 2 tog x 5, 1 dc (6)
Insert the Rattleboxes and filling into the legs.
Sew the legs to the body.
Enjoy!