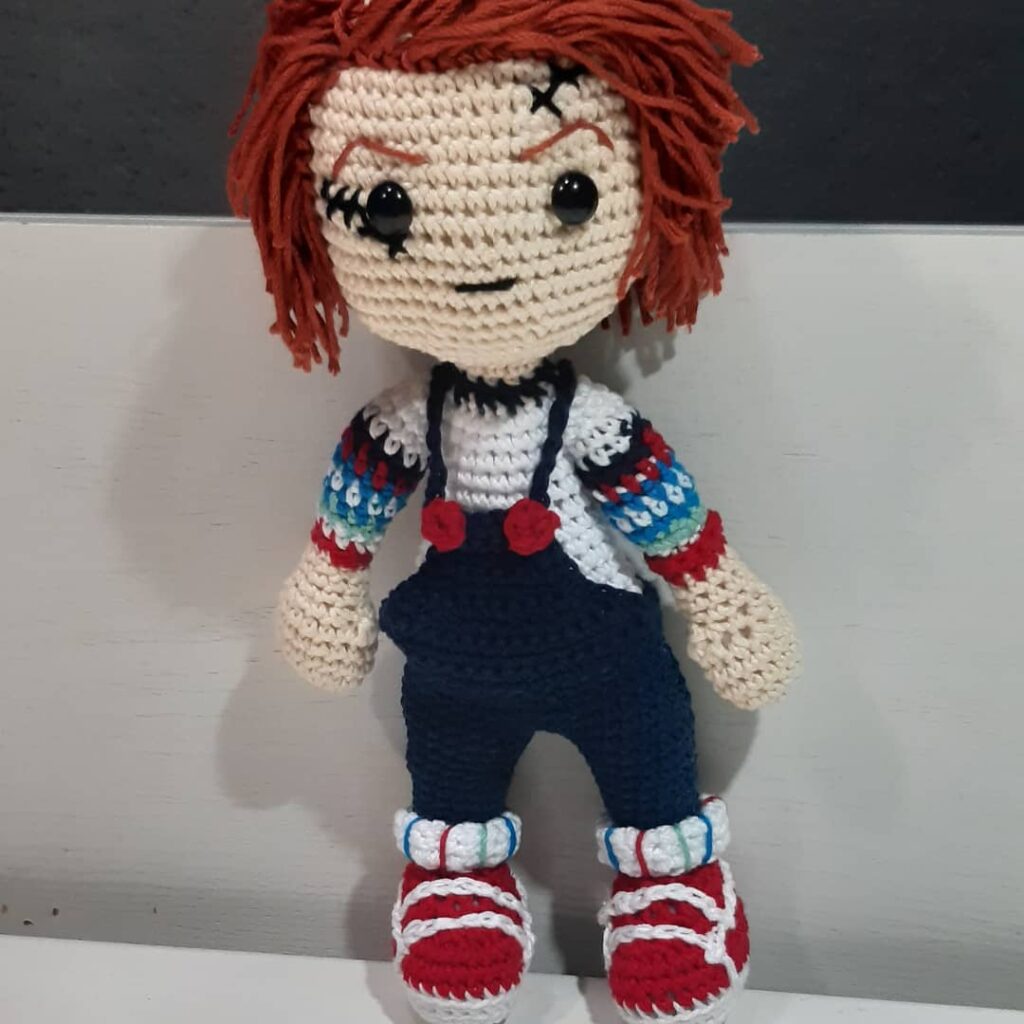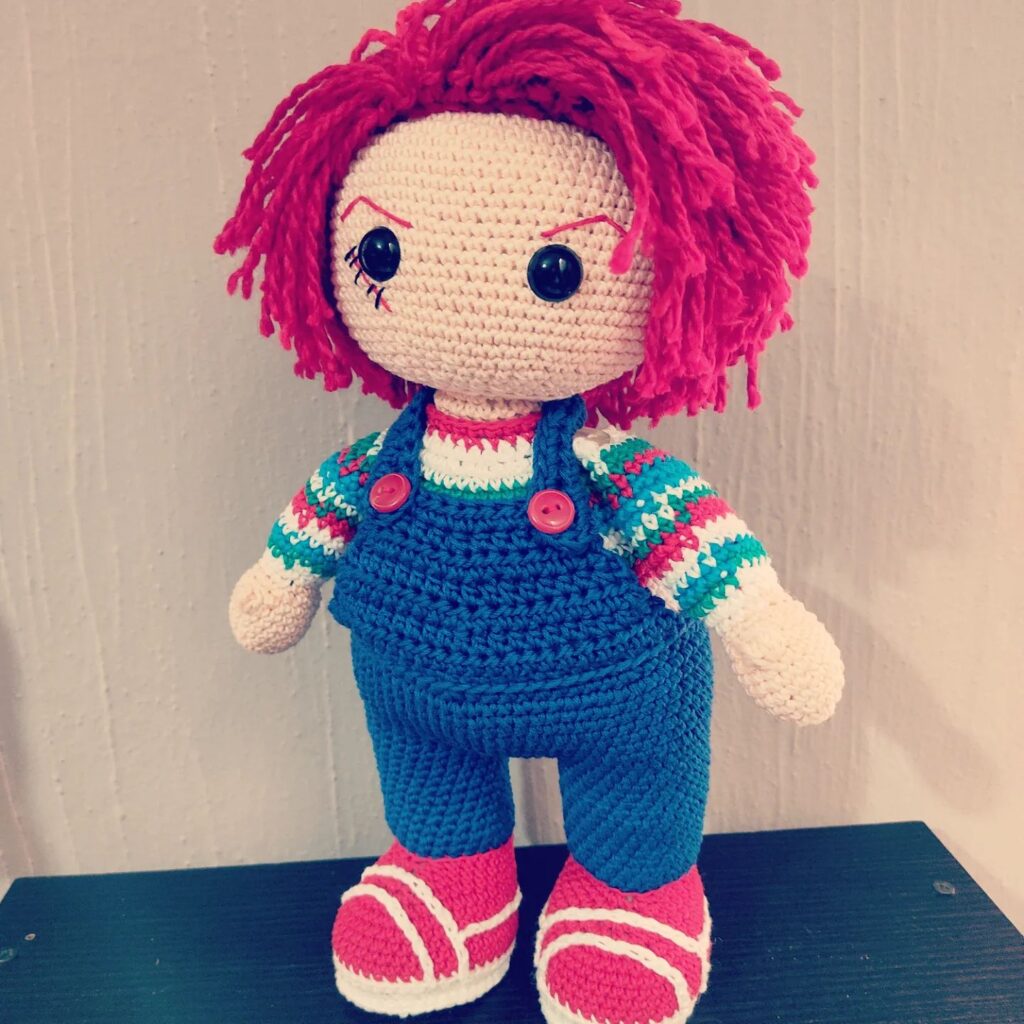
Amigurumi Chucky Doll Crochet Pattern
Hello amigurumi lovers and beautiful visitors, I wanted to share the free amigurumi patterns for you here. In my article I will share 1 pattern and how to make it for you. At the end of my article, I will share amigurumi patterns that can generate ideas for you.
Materials:
Yarn colors: light peach, white, red, dark blue, sky blue, green, copper red.
Hook 2.5 mm
Filler
Small piece of plastic
Scissors
A pair of 6 mm red snap (buttons, beads)
Yarn needle Sewing
needles
Sewing pins
Markers Thread
: red, black, copper red
Terms:
vp – air loop
KA – amigurumi ring
p – loop
sbn – single crochet ss – double
crochet psn
– half crochet
zss – behind the back wall of the loop
zps – behind the front wall of the loop
sbn ps – single crochet knitted from below (embossed purl single crochet, see video lesson )
P – increase
U – decrease
Pbn (ss) – half single crochet, connecting column
Vyt.p. – elongated loop
W – bump: 4 dc with one vertex in the next loop
Sneakers (2 pieces):
1 row. With white yarn we collect 8 ch. Starting from 2 sts from the hook, 6 sbn, P in the last loop turn. Continue on the other side of the chain – 6 sc (14)
2nd row. P in each p. (28)
3rd row. 28 sc (28)
4 row. sbn ps (24)
Make a sole: cut out the desired size of the sole from plastic. We apply to a knitted blank. Should fit to the borders of the 4th row. Make 2 pieces.
We attach the red thread.
5 row. 28 sbn zzs (28).
Attach a plastic insert with a knitted sole with white threads.
Pass the thread from the inside into one hole, bring it out into the other. Fasten the thread with a knot. (Fig. 01-03).
6-7 rows. 28 sc (28)
8 row. 10 sbn, Y * 5, 8 sbn (23)
9th row. 8 sbn, Y * 4, 7 sbn (19)
10th row. 7 sbn, Y * 3, 6 sbn (16)
11 row. 5 sbn, U * 3, 5 sbn (13).
For reliability, we make a “live” loop with a marker. Before continuing the knitting of the legs, we make stripes of the sneaker.
Sneaker strips:
1 strip: with a white thread, dial 14 ch. We fix, cut off, leaving for sewing.
2 strip: white thread 20 ch. We fix, cut off, leaving for sewing.
3 strip: white thread 30 ch. We fix, cut off, leaving for sewing. We pin with pins (Fig. 04-07). We sew.
Legs (2 pieces):
Left
We take sneakers, attach dark blue yarn.
1-4 rows. 13 sc (13)
5 row. / 3 sc, P / * 3, 1 sc (16)
6-7 rows. 16 sc (16)
8 row. / 3 sc, P / * 1 (20)
9 row. 20 sc (20)
We count counterclockwise, 2 sts from the last working loop. Here we will connect the legs together. Pin. Fill.
Right
Repeat from 1 to 9 rows as for the left leg.
We knit 7 ss. Mark the last working loop, here is the end of the circle. We stuff the leg, but do not fasten the thread. Next, attach the left leg.
Body:
Keep both feet together, the live loop leg (left) on the right and the right leg on the left. Make sure your socks are facing away from you.
1 row. Straight loop on the hook, ch. (Fig. 08). We insert the hook into the marked loop of the left leg, and we make sc. Next 19 sbn. Then, 1 sc in the front loop (the loop facing us) in the ch made earlier (Fig. 10-11), in the remaining loops of 20 sc of the right leg. (42).
2 row. 1 sbn zps 1 ch, which was done in the previous row. 42 sc around both legs (42)
3-4 rows. 42 sc (42)
5 row. / 5 sc, U / * 6 (36)
6 row. Marker on the back wall of the next loop and 1 sbn zps, continue 35 sbn zps. (36)
We fix this thread color, hide the end.
The marker for 6, 15, 25 and 32 p. is a belt. Here we will make the bib of the bib and straps (Fig. 12).
We attach the white yarn on the back loop, marked in the 6th row.
7 row. We knit 36 sc zss (Fig. 13-14) (36)
8th row. 36 sc (36)
9 row. We attach red yarn – / 4 sc, U / * 6 (30)
10th row. 30 sc (30)
11 row. We attach green yarn – 30 sc (30)
12 row. White – 30 sc (30)
13 row. We attach blue yarn / 3 sbn, U / * 6 (24)
14th row. 24 sc (24). We fix this color.
15 row. Red – 24 sc (24)
16-17 rows. Green – 24 sc (24). We fix this color.
18-19 rows. White – 24 sc (24). We fix this color.
20 row. Red, sc into the next loop. Place a marker to continue working on the collar later.
21 row. Join the light peach yarn from the reverse side of the loop of the previous row and work U * 12 (12). Stuff the body.
22-29 rows. 12 sc (12).
It is very important to stuff the body as tightly as possible at this very moment so that the neck can bear the weight of the head.
30 row. Y*6 (6)
Fasten off the thread, and pull off the remaining 6 loops using a yarn needle. Hide the end of the thread in the neck. Sweatshirt Collar: Find the red stitch marked on the 20th row. / 2 sc, Y / * 6, sl-st in the next loop (18). Fasten hide the thread.
Cuffs of overalls:
White yarn – 3 ch
1-17 rows. 2 sc, ch, turn (2)
18th row. 2 sc, fasten. Leave for sewing.
Sew vertical stripes along this rectangle with red, blue and green yarn. Wrap the cuff around your leg, just above the shoe, and sew the ends together.
Hands (2 pieces):
1 row. Light peach yarn, 6 sc in KA.
2 row. / P / * 6 (12)
3rd row. / 1 sc, P / * 6 (18)
4-5 rows. 18 sc (18)
6 row. We form a finger: 4 dc with one vertex in the next loop, 17 sbn (18)
7 row. / 1 sc, U / * 6 (12)
8-10 rows. 12 sc (12)
11 row. Attach red yarn, 12 sc (12)
12 row. We attach white yarn – 12 sc zss (12)
13th row. We attach green yarn – 12 sc (12)
14th row. We attach blue yarn – 12 sc (12)
15 row. White – 12 sc (12)
16 row. Red – 12 sc (12). Fix this color.
17-18 row. Green – 12 sc (12). Fix this color.
19 row. White – 12 sc (12)
20 row. Blue – 12 sc (12). Fix this color.
21 row. White – 12 sc (12)
22 row. Y*6 (6). Fasten, leaving the thread.
Using a yarn needle, pull the thread through the front walls of the loop, pull tight, fasten and hide the tail.
Arm cuffs:
Keep arm turned down.
Attach a red thread to the front walls in the 12th row. 1 ch and 12 psn. Attach ss. Fasten and connect the ends of the yarn. Sew the arms on the sides of the body.
Bib:
Keep your body in front of you.
1 row. Attach blue yarn to the loop marked with a marker on the belt on the right – sbn in the same loop, 10 sbn in the next loops, turn in (to the last sbn in the line, the loop marked with a marker on the left) (11).
2-4 rows. 11 sc, ch, turn (11)
5th row. 1 sbn, Y, 5 sbn, Y, 1 sbn, ch, turn (9)
6-7 rows. 9 sc, ch, turn (9)
8 row. 1 sbn, Y, 3 sbn, Y, 1 sbn, ch, turn (7)
9th row. 7 sbn (7)
Fasten the thread.
Straps:
Attach dark blue yarn to the marked loops on the right back of the belt. ch 28 Starting from 5 ch from the hook, we knit 24 sc, sl-st in the next 9 loops of the belt to make the second strap. ch 28 Starting from 5 ch from the hook, we knit 24 sc, sl-st in the next marked loop. Fasten the thread, hide the ends. Sew 6 mm red buttons (or beads, buttons) onto the bib and straps.
Head:
1 row. Light peach yarn. 8 sc in KA (8)
2nd row. / P / * 8 (16)
3rd row. / 1 sc, P / * 8 (24)
4 row. / 2 sc, P / * 8 (32)
5 row. / 3 sc, P / * 8 (40)
6 row. / 4 sc, P / * 8 (48)
7 row. / 5 sc, P / * 8 (56)
8-17 rows. 56 sc (56)
18 row. / 5 sc, U / * 8 (48)
19 row. / 4 sc, U / * 8 (40)
20 row. / 3 sc, U / * 8 (32)
21 row. / 2 sc, Y / * 8 (24)
22 row. / Y / * 12 (12)
Fasten the thread, leave for sewing to the neck. Stuff the head, leaving room in the center to insert the neck.
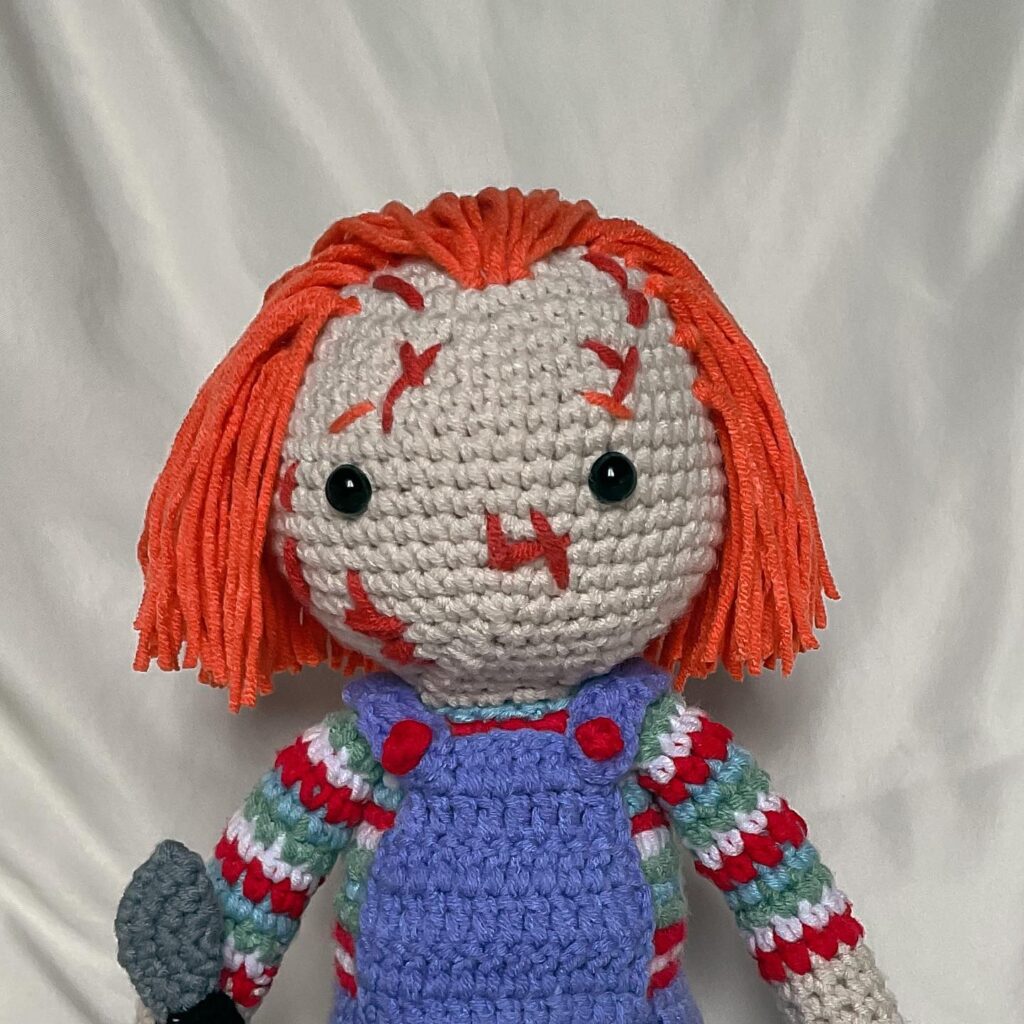
Eyes, scar and eyebrows:
Between 15-16 rows of the head, make a stitch. Another stitch through 8 loops to the right. This is a place for the eyes. But before inserting the eyes, we will embroider the scar.
With red sewing thread, embroider a diagonal scar that starts just below the temple and runs down below the eye. With black thread, make stitches along the scar. Next, sew the eyes on the marked places. (Fig. 15). Embroider eyebrows with a copper-red thread, as in fig. 15. Hair: To make hair, we will work 12.5 cm long loops in each loop, every other row. 1 row. With copper-red yarn – 8 sbn in KA (8) 2nd row. We make vyt.p. / P / * 8 (16) 3rd row. / 1 sc, P / * 8 (24) 4 row. vyt.p. / 2 sc, P / * 8 (32) 5 row. / 3 sc, P / * 8 (40)
6 row. vyt.p. / 4 sc, P / * 8, ch, turn (48)
From here on we will knit in a line.
1 row. 24 sc, ch, turn (24)
2nd row. vyt.p. 24 sc, ch, turn (24)
3rd row. 24 sc, ch, turn (24)
4th row. vyt.p. 24 sc, ch, turn (24)
5-6 rows. 24 sc, ch, turn (24)
7th row. 24 sc (24).
Fasten, leaving for sewing. Attach the wig to your head, secure with pins (Fig. 16-17). Sew on. Cut the ends of the elongated loops, make a hairstyle.
We attach the head to the neck.
The connection of the head should be movable, we thread the copper-red thread and insert the needle into the center of the wig’s KA and take it out of the neck. We count 6 rows down from the top of the neck. Now insert your needle through this point, through the back of the neck into the hole in the head, and again through the center of the CA (fig. 18). Move your head down 2 strands until it fits perfectly around your neck. For reliability, fasten the knot several times. Cut off the excess thread, hide the remaining threads.
Now you can set aside the hook and other materials, your knitted doll is ready! You are well done!
Feel free to tag me (@freeamigurumii) in your photos on Instagram or Facebook if you’d like!
All Finished.