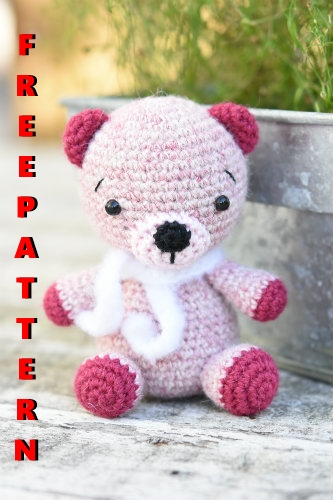
AMIGURUMI BEAR FREE PATTERN
Hello amigurumi lovers and beautiful visitors, I wanted to share the free amigurumi patterns for you here. In my article I will share 1 pattern and how to make it for you. At the end of my article, I will share amigurumi patterns that can generate ideas for you.
Desinger : https://www.lilleliis.com/
Materials:
- DK (8ply) weight Albin Promotion Alpaka (100% alpaca wool; 50 g/110 m) – 2 colors
- some cotton yarn for the muzzle and nose – for example Steinbach Wolle Capri (100% cotton; 50 g/125 m)
- crochet hook 3 mm
- polyester fiberfill
- safety eyes (Ø 6mm)
- some thread for stitching the eyebrows
- darning and embroidery needles
Abbreviations:
sc – single crochet, st(s) – stitch(es), rep – repeat
- WORK IN CONTINUOUS ROUNDS. DO NOT JOIN OR TURN UNLESS OTHERWISE INSTRUCTED.
- IT WOULD BE WISE TO USE A STITCH MARKER AND PLACE IT IN THE FIRST STITCH OF EACH ROUND TO MARK THE BEGINNING OF IT.
- LEAVE EACH PIECE A LONG TAIL FOR SEWING.
HEAD
Main color. Crocheted from top to bottom.
1: Start 6 sc in a magic ring [6]
2: Work 2 sc in each st around [12]
3: (Sc in next st, 2 sc in next st) rep 6 times [18]
4: (Sc in each of next 2 sts, 2 sc in next st) rep 6 times [24]
5: (Sc in each of next 3 sts, 2 sc in next st) rep 6 times [30]
6: (Sc in each of next 4 sts, 2 sc in next st) rep 6 times [36]
7: (Sc in each of next 5 sts, 2 sc in next st) rep 6 times [42]
8-17: Sc in each st around
Fasten safety eyes between rounds 13. and 14. Insert the first eye between them, then count 9 holes to the left and insert the second eye in the next hole. Close the washers from the inside of the piece.
18: (Sc in each of next 5 sts, sc2tog) rep 6 times [36]
19: (Sc in each of next 4 sts, sc2tog) rep 6 times [30]
20: (Sc in each of next 3 sts, sc2tog) rep 6 times [24]
21: (Sc in each of next 2 sts, sc2tog) rep 6 times [18]
Fill the head with fiberfill.
EAR (make 2)
Contrasting color.
1: Start 6 sc in a magic ring [6]
2: Work 2 sc in each st around [12]
3-4: Sc in each st around
Leave a yarn tail for sewing.
MUZZLE
Use cotton yarn.
1: Start 6 sc in a magic ring [6]
2: Work 2 sc in each st around [12]
3: (Sc in next st, 2 sc in next st) rep 6 times [18]
4: Sc in each st around
Leave a yarn tail for sewing.
NOSE
Use cotton yarn.
1: Start 6 sc in a magic ring [6]. Sl st in the first sc.
Leave a yarn tail for sewing.
BODY
Main color. Crocheted from the bottom up.
1: Start 6 sc in a magic ring [6]
2: Work 2 sc in each st around [12]
3: (Sc in next st, 2 sc in next st) rep 6 times [18]
4: (Sc in each of next 2 sts, 2 sc in next st) rep 6 times [24]
5: (Sc in each of next 3 sts, 2 sc in next st) rep 6 times [30]
6: (Sc in each of next 4 sts, 2 sc in next st) rep 6 times [36]
7: (Sc in each of next 5 sts, 2 sc in next st) rep 6 times [42]
8-11: Sc in each st around
12: (Sc in each of next 5 sts, sc2tog) rep 6 times [36]
13: Sc in each st around
14: (Sc in each of next 4 sts, sc2tog) rep 6 times [30]
15-16: Sc in each st around
17: (Sc in each of next 3 sts, sc2tog) rep 6 times [24]
18-19: Sc in each st around
20: (Sc in each of next 2 sts, sc2tog) rep 6 times [18]
Leave a yarn tail for sewing. Fill the body with fiberfill.
ARM (make 2)
Start with contrasting color.
1: Start 6 sc in a magic ring [6]
2: Work 2 sc in each st around [12]
3: Sc in each st around
Continue with the main color.
4-6: Sc in each st around
Fill the tip of the arm. Add some stuffing as the work progresses.
7: (Sc in each of next 2 sts, sc2tog) rep 3 times [9]
8-9: Sc in each st around
10: (Sc in the next st, sc2tog) rep 3 times [6]
11: Sc in each st around
Leave a yarn tail for sewing.
LEG (make 2)
Start with contrasting color.
1: Start 6 sc in a magic ring [6]
2: Work 2 sc in each st around [12]
3: (Sc in next st, 2 sc in next st) rep 6 times [18]
4: Sc in each st around
Continue with the main color.
5-6: Sc in each st around
7: (Sc in the next st, sc2tog) rep 6 times [12]
Fill the tip of the arm. Add some stuffing as the work progresses.
8: Sc in each st around
9: (Sc in each of next 2 sts, sc2tog) rep 3 times [9]
Leave a yarn tail for sewing.
Assembling the pieces
Start with the head – attach the ears and muzzle. Sew the nose onto the muzzle. Stitch the eyebrows. Sew the head together with the body. Attach the arms and legs.
SCARF
I made a scarf for my little bear using some furry leftover yarn. First I made a long chain, just as long as I wanted the finished scarf to be. Then started single crochet back to the beginning. Weave in the yarn ends and it`s done!