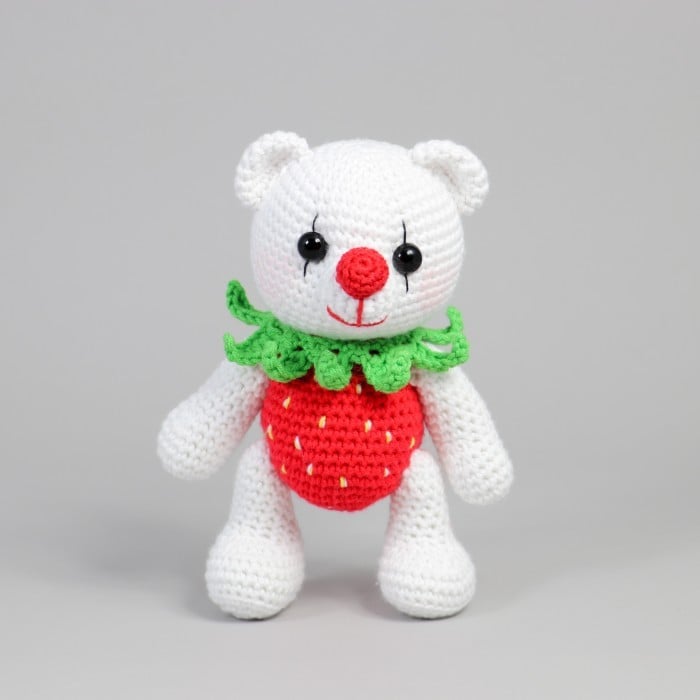
Strawberry Bear Free Pattern
Hello amigurumi lovers and beautiful visitors, I wanted to share the free amigurumi patterns for you here. In my article I will share 1 pattern and how to make it for you. At the end of my article, I will share amigurumi patterns that can generate ideas for you.
Skill level: Beginner
Height: 20 cm
Crochet hook: 3.5 mm
Materials: Embroidery needle & black yarn, 2 safety eyes (12 mm) and toy stuffing.
Yarn: Mayflower Cotton 2
How much yarn do you need?
White (22): 1 ball
Bright red (45): 1 ball
Light Green (33): 1 ball
Light Yellow (28): A leftover to decorate the strawberry
Abbreviations:
ch = chain stitch
sc = single crochet
sl st = slip stitch
hdc = half double crochet
dc = double crochet
MR = magic ring
inc 1 st = work 2 stitches in same
stitch
dec 1 st = work 2 stitches together
[…] = number of stitches
(…) = number of rounds
… = repeat
Head
With White (22).
R1: work 6 sc in MR [6],
R2: inc 1 st 6 times [12],
R3: 1 sc, inc 1 st 6 times [18],
R4: 2 sc, inc 1 st 6 times [24],
R5: 3 sc, inc 1 st 6 times [30],
R6: 4 sc, inc 1 st 6 times [36],
R7: 5 sc, inc 1 st 6 times [42],
R8: 6 sc, inc 1 st 6 times [48],
R9: 7 sc, inc 1 st 6 times [54],
R10-17: work 1 sc in each stitch (8 rounds) [54],
Attach the safety eyes between R11 and R12, with 9 stitches between the eyes.
R18: 7 sc, dec 1 st 6 times [48],
R19: 6 sc, dec 1 st 6 times [42],
R20: 5 sc, dec 1 st 6 times [36],
R21: 4 sc, dec 1 st 6 times [30],
Stuff the head continuously as you go.
R22: 3 sc, dec 1 st 6 times [24],
Bind off. Stuff the head completely and make sure it’s nice and round. You can pull the eyes
together with a thread. Make a little stitch on the backside of the eyes and pull carefully on
the thread and tighten. I make sure, that the ends on the back of the head, always end on
the same place. Tie a knot, cut the yarn and hide the ends in the head.
Snout
With White (22).
R1: work 6 sc in MR [6],
R2: inc 1 st 6 times [12],
R3: 1 sc, inc 1 st 6 times [18],
R4-5: work 1 sc in each stitch (2 rounds) [18].
Bind off. Stuff the snout and leave a long end to sew the snout on R17 on the head, between
the eyes on R11.
Nose
With Bright red (45).
R1: work 6 sc in MR [6],
R2: inc 1 st 6 times [12],
R3-4: work 1 sc in each stitch (2 rounds) [12].
Bind off. Stuff the nose and sew it on top of the snout. Embroider the mouth with red as seen
on the picture below.
Ears
Make 2 with White (22).
R1: work 6 sc in MR [6],
R2: inc 1 st 6 times [12],
R3: 1 sc, inc 1 st 6 times [18],
R4-5: work 1 sc in each stitch (2 rounds) [18].
Bind off, but don’t stuff the ears. You fold them flat and sew them on each side of the head
between R5 and R10.
Body
With Bright red (45).
R1: work 6 sc in MR [6],
R2: inc 1 st 6 times [12],
R3: 1 sc, inc 1 st 6 times [18],
R4: 2 sc, inc 1 st 6 times [24],
R5: 3 sc, inc 1 st 6 times [30],
R6: 4 sc, inc 1 st 6 times [36],
R7: work 1 sc in each stitch [36],
R8: 5 sc, inc 1 st 6 times [42],
R9-14: work 1 sc in each stitch (6 rounds) [42].
Stuff the body continuously as you go.
R15: 5 sc, dec 1 st 6 times [36],
R16: work 1 sc in each stitch [36],
R17: 4 sc, dec 1 st 6 times [30],
R18: work 1 sc in each stitch [30],
R19: 3 sc, dec 1 st 6 times [24],
R20: work 1 sc in each stitch 6 times [24].
Bind off and leave a long end to sew the head on the body.
Stuff the body completely and thoroughly. Sew the head on the body. Embroider the little seeds on the body with yellow.
Arms
Make 2 with White (22).
R1: work 6 sc in MR [6],
R2: inc 1 st 6 times [12],
R3: 1 sc, inc 1 st 6 times [18],
R4-6: work 1 sc in each stitch (3 rounds) [18],
R7: *7 sc, dec 1 st 2 times, 7 sc [16],
R8: 6 sc, dec 1 st 2 times, 6 sc [14],
R9-15: work 1 sc in each stitch (7 rounds) [14],
R16: 5 sc, dec 1 st 2 times [12].
Stuff the arm.
R17: *dec 1 st* 6 times [6]
Pull the thread through the front loops of the 6 sc on R17. Tighten and bind off.
Sew the arms on R18 on each side of the body. I sew two times around the arms to make
sure they were firmly attached.
Legs
Make 2 with White (22).
Ch 8, begin in 2
nd ch from hook:
R1: 6 sc, 3 sc in last stitch and continue working around the corner: 5 sc, 2 sc in last st [16],
R2: inc 1 st 2 times, 4 sc, inc 1 st 3 times, 5 sc, inc 1 st, 1 sc [22],
R3: 1 sc, inc 1 st, 1 sc, inc 1 st, 4 sc, inc 1 st, 1 sc, inc 1 st, 1 sc, inc 1 st, 7 sc, inc 1 st, 1 sc [28],
R4: work 1 sc in each stitch, through back loop only [28],
R5-7: work 1 sc in each stitch (3 rounds) [28],
R8: dec 1 st, 8 sc, dec 1 st 6 times, 6 sc [21],
R9: 7 sc, dec 1 st 5 times, 4 sc [16],
R10: 2 sc, dec 1 st 4 times [12],
R11-16: work 1 sc in each stitch [12].
Stuff the leg continuously as you go.
R17: 2 sc, dec 1 st 3 times [9],
R18: 1 sc, dec 1 st 3 times [6].
Stuff the legs thoroughly. Bind off and close the leg: pull the thread through front loops of the
last 6 sc and tighten carefully. Pull the thread to the inside of the leg, so you can sew it on to
the body between R6 and R9.
Tail
With White (22).
R1: work 6 sc in MR [6],
R2: inc 1 st 6 times [12],
R3-4: work 1 sc in each stitch (2 rounds) [12],
Bind off, and stuff the tail a little bit. Sew the tail on the backside of the body between R5 and
R7.
Collar
With Light Green (33)
Ch 31 and begin in 2
nd ch from hook:
R1: 1 sc, ch 8, begin in d. 2. ch from hook, 1 sl st, 1 sc, 1 hdc, 1 hdc, 1 dc, 1 dc, 1 dc, skip 1 stitch and work 1 sc repeat 10 times. Finish with a sl st and bind off. Leave a long end to
sew the collar around the neck.
Have fun making this pattern!