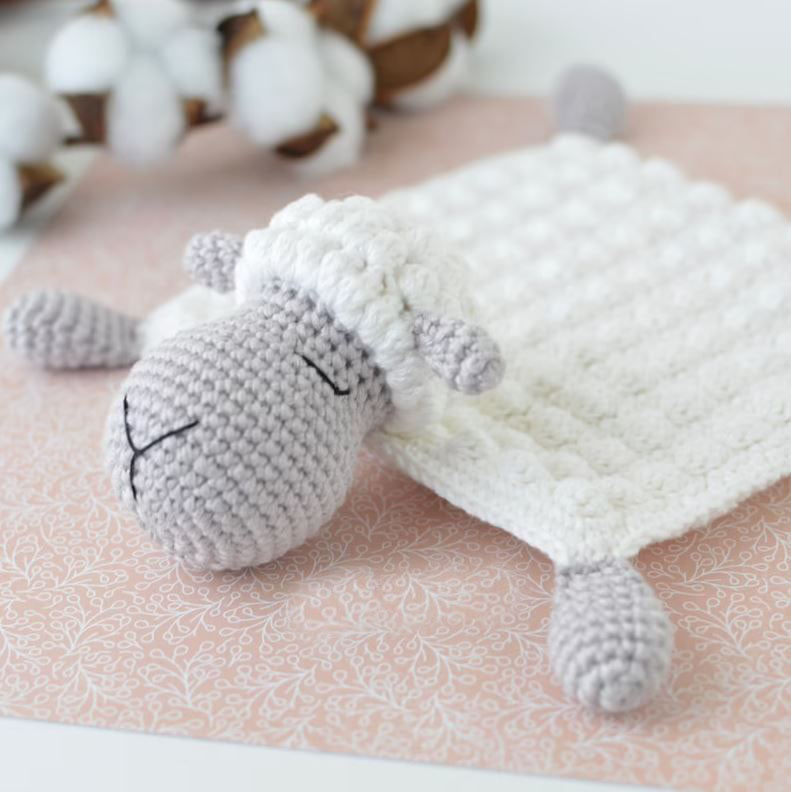
Sheep Security Blanket Free Crochet Pattern
Hello amigurumi lovers and beautiful visitors, I wanted to share the free amigurumi patterns for you here. In my article I will share 1 pattern and how to make it for you. At the end of my article, I will share amigurumi patterns that can generate ideas for you.
YARN: Light (3) – White and Gray; Cotton Thread in Black
MATERIALS: 3.25 mm Crochet Hook; Poly Filling
DIMENSION: 9.5” x 7.5”
ABBREVIATIONS: magic ring (mr), stitch (st), slip stitch (sl st), single crochet (sc), double crochet (dc), bobble stitch (dc6tog), fasten off (F/O)
SKILL LEVEL: Intermediate
SEAMLESSLY COLOR CHANGE: Work in the color A until two loops of the last stitch remain on the hook. Use the color B to complete the stitch.
BOBBLE STITCH: Work each st to the last loop but leave the last loop on the hook while you are working the rest of the stitches in the bobble. Then, yarn over and draw a loop through all the loops on the hook to complete the stitch.
BLANKET PANEL A (white yarn; work in rows)
Row 1: 38 ch, 1 sc into the 2nd ch from the hook, 36 sc (37); ch 2 and turn
Row 2: 1 dc into the 1st st, (skip one st, 1 dc6tog, ch 1, skip 1 st, work 1 dc into the next st) rep 9 times (19 sts, 9 chs); ch 1 and turn
Row 3: 1 sc into the dc st, (1 sc into the space between the dc and the bobble st, 1 sc into the bobble st, 1 sc into the ch space, 1 sc into the dc st) rep 9 times (37); ch 2 and turn
Rows 4 – 23: rep rows 2-3; F/O and cut the yarn

BLANKET PANEL B (white yarn; work in rows)
Row 1: 38 ch, 1 sc into the 2nd ch from the hook, 36 sc (37); ch 2 and turn
Row 2: dc even (37); ch 1 and turn
Row 3: sc even (37); ch 2 and turn
Rows 4 – 23: rep rows 2-3
Do not F/O or cut the yarn. Place the two panels together, matching up all sides and making sure the right side of the bubble panel is facing outwards. Start joining the panels by crocheting the edges together with single crochet stitches. Work 3 sc stitches in each corner. F/O, cut the yarn and wave in end.
HEAD (gray and white yarn; join with a sl st at the end of each rnd)
Rnd 1: starting off with gray yarn, 8 sc in a mr (8); ch 1
Rnd 2: sc inc around (16); ch 1
Rnd 3: (1 sc, 1 sc inc) rep around (24); ch 1
Rnd 4: (2 sc, 1 sc inc) rep around (32); ch 1
Rnd 5: sc even (32); ch 1
Rnd 6: (3 sc, 1 sc inc) rep around (40); ch 1
Rnd 7 – 12: sc even (40); ch 1
Rnd 13: (3 sc, 1 sc dec) rep around (32); ch 1
Rnd 14: sc even (32); ch 1
Rnd 15: (2 sc, 1 sc dec) rep around (24); ch 1
Rnd 16: sc even (24); ch 1
Rnd 17: sc even (24)
Rnd 18: switch to white yarn, ch 2 and turn (work facing the inside of the head), dc6tog even (24); ch 2
Rnd 19: (2 dc6tog, skip one st, 1 dc6tog in the next st) rep 6 times (18); ch 2
Rnd 20: (1 dc6tog, skip one st, 1 dc6tog in the next st) rep 6 times (12); ch 2; finish stuffing the head
Rnd 21: dc6tog dec around (6)
F/O and close the hole.
EARS (gray yarn; make two)
Rnd 1: 6 sc in a mr (6)
Rnd 2: (1 sc, 1 sc inc) rep around (9)
Rnd 3: sc even (9)
Rnd 4: (1 sc, 1 sc dec) rep around (6)
Rnd 5: (1 sc, 1 sc dec) rep twice (4)
F/O and leave a long strand of yarn to attach the ears to the side of the head, between rnds # 18-19. Do not stuff the ears.
Embroider the NOSE between rnd # 1-8 with black cotton thread.
Embroider the EYES between rnd # 14-16 (4 sts apart) with black cotton thread.
LEGS (gray yarn; make 4)
Rnd 1: 6 sc in a mr (6)
Rnd 2: sc inc around (12)
Rnd 3: (2 sc, 1 sc inc) rep around (16)
Rnd 4 – 5: sc even (16)
Rnd 6: (2 sc, 1 sc dec) rep around (12)
Rnd 7: (4 sc, 1 sc dec) rep twice (10)
Rnd 8: (3 sc, 1 sc dec) rep twice (8); stuff the leg
Rnd 9: flatten the leg and work through both layers, 4 sc (4)
F/O and leave a long strand of yarn to attach the legs to the corners of the blanket.
Attach the sheep’s head to one of the sides of the blanket using some white yarn.
All Finished.