Piplup Amigurumi Free Pattern
Hello amigurumi lovers and beautiful visitors, I wanted to share the free amigurumi patterns for you here. In my article I will share 1 pattern and how to make it for you. At the end of my article, I will share amigurumi patterns that can generate ideas for you.
Materials :
2mm hook
Stylecraft Special DK in Aster, Cloud Blue and Citron
8mm Oval Black safety eyes
White felt
Polyester toy filling
Pins to place pieces before sewing together
Darning needle
Stitch markers (I prefer using scrap yarn as “stitch markers”)
Fibres in Cloud Blue needle felting*
Needle felting tool*
* Please note that I have used needle felting to create zig zag shape between the eyes. Needle felting is still quite new to me so I will not be including instructions on how to do this. You may want to look into alternative ways to create this.
Size
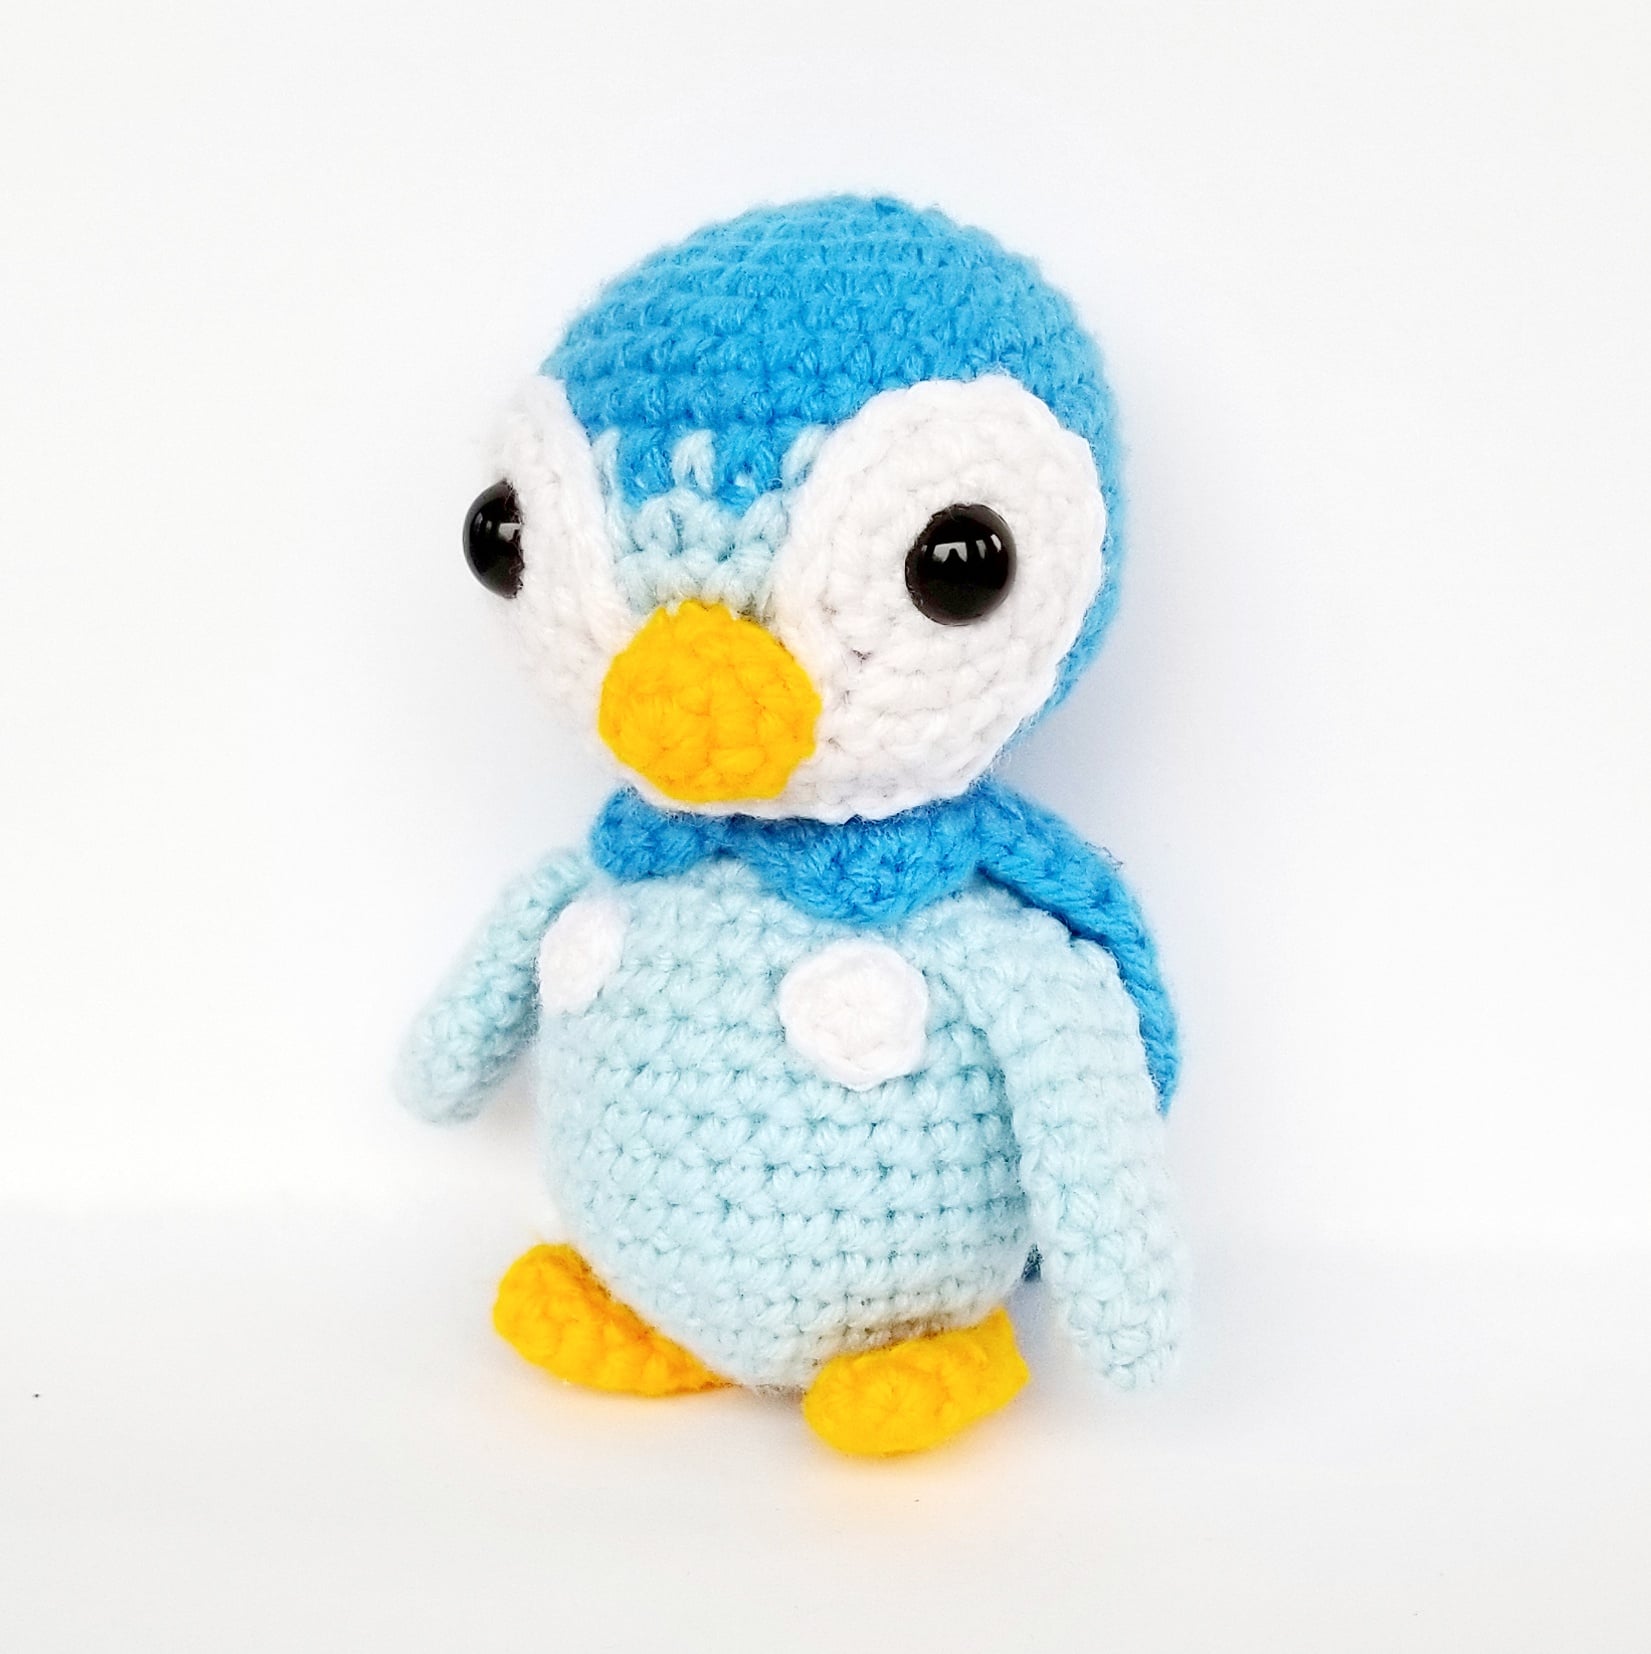
Piplup is approximately 7.5cm tall, and 7.5cm from arm to arm, and approximately 4cm from front to back (5.5cm inl the cape).
Weight: 20 grams (this includes all materials used to make Piplup
Stıtches & Abbrevıatıons – Uk Englısh
ch chain
dc double crochet
htr half treble
sl st slip stitch
st/sts stitch/es
inc dc 2 in one st
dec decrease; insert hook in the front loop of the next two sts, yarn over, pull through both loops, y.o. and pull through remaining two loops –> one dc placed into two sts
Assembly
Assemble in the same order the pattern is written. I would recommend using a photo of Piplup as reference for best possible outcome. Pin all the pieces in place before sewing to make sure it looks right, including the felt pieces. Once all the crocheted pieces are attached use fabric glue to attach the felt pieces.
The Pattern
Head & Body
Yarn: Aster and Cloud Blue
Starting with Aster
Round 1: dc 6 in Magic Ring (6)
R2: inc in all sts around (12)
R3: (dc, inc) x 6 (18)
R4: (dc, inc, dc) x 6 (24)
R5: dc 24
R6: (dc 3, inc) x 6 (30)
R7: dc 30
R8: (inc, dc 4) x 6 (36)
R9-11: dc 36
R12: (dc 2, dec, dc 2) x 6 (30)
R13: (dc 3, dec) x 6 (24)
R14: dc 24
R15: (dc, dec, dc) x 6 (18)
R16: (dc, dec) x 6 (12)
Change to Cloud Blue
R17: in the front loops only (dc, inc) x 6 (18)
R18: (dc, inc, dc) x 6 (24)
R19-20: dc 24
R21: (dc 3, inc) x 6 (30)
Put work aside, and create the white felt piece for the face. I would recommend playing around with a piece of paper first to get the size right before cut into the felt. Find st 16 and st 24 of round 10. This is the placement for the eyes. Cut out two small holes in the felt that matches the stitch placements. Use the safety eyes to attach the felt to the head, and fasten with the washers. I would recommend completing the rest of Piplup before gluing the loose parts of the felt piece to the head.
R22-23: dc 30
R24: (dc 3, dec) x 6 (24)
R25: (dc 10, htr 2) x 2 (24)
R26: (dc 10, htr 2) x 2 (24)
R27: dec x 12 (12)
Fasten off and leave a long end for sewing. Flatten the bottom of the piece so that you have 6 sts at the front of the body and 6 sts at the back. Sew these two sides together. Each corner being Piplup’s legs.
Cut out two small round pieces of felt for the body. Leave this to one side until Piplup is finished, and then glue onto body.
Feet
Yarn: Citron
Make 2
Round 1: dc 4 in Magic Ring (4)
R2: inc, dc 3 (5)
R3-5: dc 5
Fasten off. Weave in loose end by inserting darning needle in the front loop of each st and pull tight to close the hole.
Arms
Yarn: Cloud Blue
Make 2
Round 1: dc 5 in Magic Ring (5)
R2: inc, dc 4 (6)
R3: (inc, dc 2) x 2 (8)
R4: (inc, dc 3) x 2 (10)
R5: dc 10
R6: (dec, dc 3) x 2 (8)
R7: dc 8
R8: (dec, dc 2) x 2 (6)
Fasten of and leave a long end to sew the piece onto body.
CAPE
Yarn: Aster
ch4 – we will be working around the chains to make an oval shape.
Round 1: dc in second ch from hook, inc in the middle ch, and dc in the last chain. Continue to the other side of the chains: dc in the first ch, inc in the middle ch, and dc in the last chain. (8)
R2: inc in all sts around (16)
R3: (inc, dc 6, inc) x 2 (20)
R4-10: dc 20
R11: dc 2 only
Fasten of and leave a long end to sew the piece onto body.
Using Aster create 2 bobbles to attach to the bottom of the cape:
Round 1: dc 4 in Magic Ring (4)
R2: inc, dc 4 (5)
Fasten off. Weave in loose end by inserting darning needle in the front loop of each st and pull tight to close the hole.
Collar
Yarn: Aster
Round 1: dc 5 in Magic Ring (5)
R2: inc in all sts around (10)
R3: dc 10
Fasten off and put to one side to make another:
Round 1: dc 5 in Magic Ring (5)
R2: inc in all sts around (10)
R3: dc 10
R4: dc 5, pick up the first piece and dc in each of the first 5 sts turning it into one piece. Fasten of and leave a long end to sew the piece onto body.
Needle Felting
I’ve used scraps of Cloud Blue yarn and needle felting to create the light blue zig zag shape between the eyes/above the beak.
Beak
Yarn: Citron
Round 1: dc 4 in Magic Ring (4)
R2: inc in all sts around (8)
R3: dc 8
Fasten off and leave long end for sewing. You may need a sharper needle in order to carefully sew through the felt and needle felted part of the face.
Finished.