Pear Bear Amigurumi Free Pattern
Hello amigurumi lovers and beautiful visitors, I wanted to share the free amigurumi patterns for you here. In my article I will share 1 pattern and how to make it for you. At the end of my article, I will share amigurumi patterns that can generate ideas for you.
Materials Needed:
• 3.5 mm crochet hook (size E)
• Small amounts of worsted weight cotton yarn (I used Knit Picks Dishie Yarn) in: Begonia/ Dark Pink,
Crème Brulee /Dark Yellow, Coffee/ Brown, Jalapenol Dark Green, Blush/ Light Pink, Honeydew/Light Green,
• Polyfill stuffing
• Tapestry needle
• Brown embroidery floss
• 6 mm safety eyes
• Stitch marker
• Scissors
Abbreviations:
MR – Magic Ring
st – stitch
ch – chain
slst – slip stitch
sc – single crochet
dec – decrease
inc – increase
()– repeat instructions in parenthesis
X6 – repeat instructions the number of times indicated
FO – fasten off
*Please note that this pattern is crocheted in continuous rounds. Use your stitch marker to mark your last stitch in each round.
Let’s start making the amigurumi bear pattern.
Are you ready?
Let’s crochet the snout part of the amigurumi bear pattern
Snout
Using Dark Yellow Yarn.
Ch 4
Rnd 1. sc in 2nd ch from hook, sc, sc 3 in last ch. Working down the other side of the chain, sc, then sc 2 in last stitch (8 sts)
Rnd 2. sc all around (8 sts) FO.
Now take a small piece of brown embroidery thread and stitch a small nose across the top of her snout. I made mine in between rows 1 and 2, approximately 2 stitches wide. Do not stuff.
We have completed the snout part of the amigurumi toy. Now we crochet the ears.
Ears (make 2)
Using Dark Green Yarn
Rnd 1. MR 6 Sc (6 sts)
Rnd 2. slst in each st around (6 sts) FO. Leave long tail for sewing.
Let’s make the stem of the pear on the head of the amigurumi pattern
Stem
Using Brown Yarn.
Ch 6
Row 1. sc in 2nd ch from hook. Slst in same st and in each stitch down. FO. Leave long tail for sewing.
We crochet the head and body part of the amigurumi bear pattern.
Head and Body
Using Dark Pink/Light Green or Yellow Yarn
Rnd 1. MR 6 sc (6 sts)
Rnd 2. inc in each st around (12 sts)
Rnd 3. (sc, inc) x6 (18 sts)
Rnd 4. (sc 2, inc) x6 (24 sts)
Rnd 5-9. sc around (24 sts)
Rnd 10. (sc 3, inc) x 6 (30 sts)
Sew the snout on between rows 6 and 10. Place the safety eyes close to each side of the snout. Using your brown embroidery thread, sew on a couple of upturned eyebrows. Using your light pink yarn, sew on some little cheeks underneath her eyes. Pinch the bottom of the ear in a little and sew it in place between rounds 3 and 4. Sew the stem onto the very top of your Pear Bear over the MR.

Now continue working on the body of your Pear Bear.
Rnd 11. (sc 4, inc) x 6 (36 sts)
Rnd 12. sc all around (36 sts)
Rnd 13. (sc 5, inc) 6 (42 sts)
Rnd 14. sc all around (42 sts)
Rnd 15. (sc 6, inc) x 6 (48 sts)
Rnd 16-22. sc all around (48 sts)
Rnd 23. (sc 6, dec) x 6 (42 sts)
Rnd 24. (sc 5, dec) x 6 (36 sts)
Using a long strand of Dark Yellow Yarn and your tapestry needle, we will make small freckles/ highlighted spots on the Pear Bear’s belly before we close her up using the lazy daisy stitch.
Let’s make the little flowers on the body of the amigurumi toy.
Lazy Daisy Stitch is as Follows:
Bring your needle up through, (from the inside of the bear, out) where you want your first freckle to be. Once pulled through, put your needle back through the same stitch that it came out but don’t pull it all the way the through. Leave a small loop of yarn. Now bring your needle up through the bear again but this time one stitch above the first stitch. Bring the needle up through the loop and pull taught. Then take your needle back down the same stitch to secure your loop in place. Voila! One lazy daisy stitch complete. I placed four lazy daisy stitches to the top left of the belly and three to the bottom right.

Rnd 25. (sc 4, dec) x 6 (30 sts)
Rnd 26. (sc 3, dec) x 6 (24 sts)
Rnd 27. (sc 2, dec) x 6 (18sts)
Place stuffing inside of your Pear Bear.
Rnd 28. (sc 1, dec) x 6 (12 sts)
Rnd 29. dec in each st around. (6 sts) FO. Stitch the opening closed.
Arms: (make 2)
Using Dark Pink Yarn.
Rnd 1. MR 6 sc (6 sts)
Rnd 2. (sc, inc) x 3 (9 sts)
Rnd 3-7. sc all around (9 sts)
FO. Leave long tail for sewing. Do not stuff. Squeeze the opening flat and sew to the body between rows 10 and 11.
Legs: (wake 2)
Using Dark Pink Yarn.
Rnd 1. MR 6 sc (6 sts)
Rnd 2. inc in each st around (12 sts)
Rnd 3. (sc, inc) x 6 (18 sts)
Rnd 4-5. sc all around (18 sts)
FO. Leave long tail for sewing. Sew legs to the bottom of the pear placing a little stuffing inside before you sew it shut. See photos for reference.

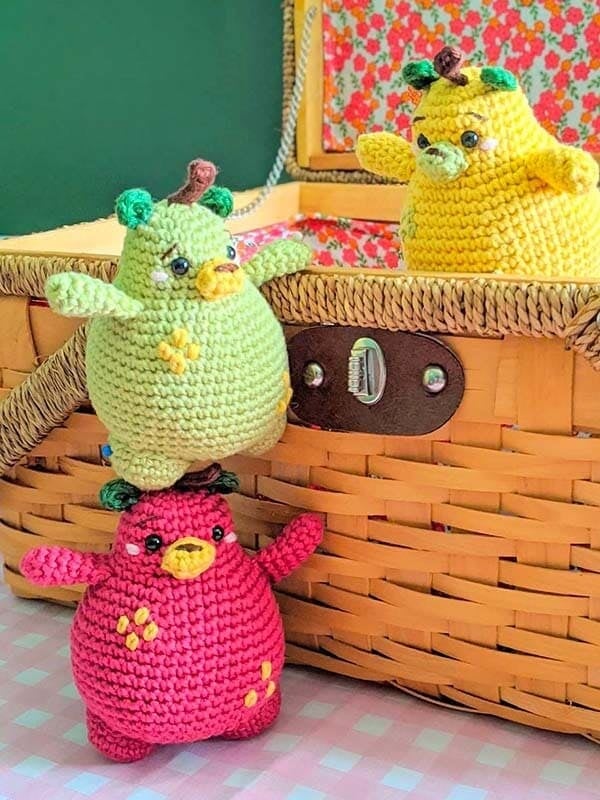
And there you have it. Your own Pink Pear Bear. You can complete the little family of pear bears by using other color combinations.
Congratulations, you have completed the Amigurumi pear bear pattern.