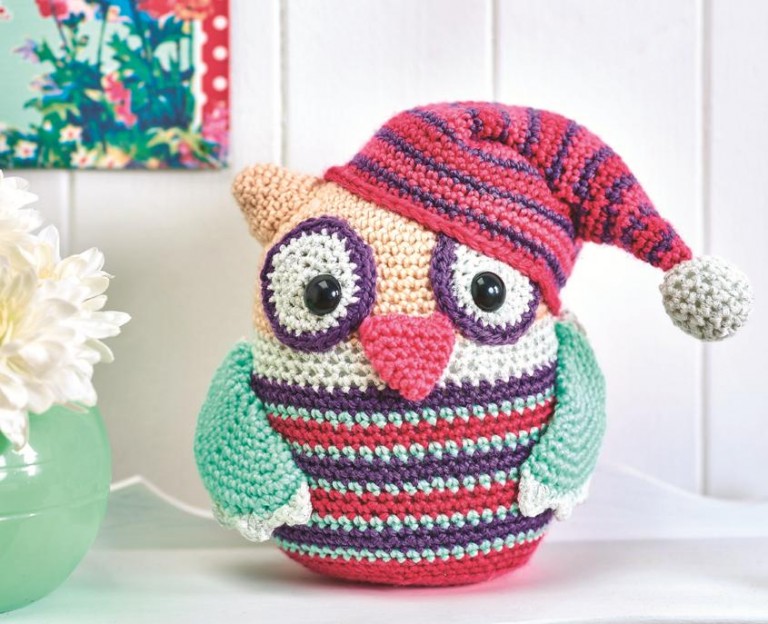
Mini Owl Amigurumi Crochet Pattern
Hello amigurumi lovers and beautiful visitors, I wanted to share the free amigurumi patterns for you here. In my article I will share 1 pattern and how to make it for you. At the end of my article, I will share amigurumi patterns that can generate ideas for you.
You will need:
- hook 3.75 mm,
- yarn of red, pink, cream, purple, green (turquoise) colors, as well as a little white yarn with silver lurex,
- filler,
- safety eyes 15 mm,
- tapestry needle.
Knitted toy size:
Height – approximately 20 cm.
Symbols:
KR – a circular row
of RLS – a single crochet column
PSN – a half-column with a crochet
decrease. RLS – decrease, knit two columns together
vp – air loop
p. – loop
connection. Art. – connecting column
* … * – the repeat section is highlighted with asterisks
(..) – the total number of loops is indicated in brackets
Head and body
With a 3.75 mm crochet hook and cream yarn, knit an amigurumi ring, 6 sc in a ring (6 loops) Kr1
: 2 sc in each st to the end (12 loops)
*, repeat to the end of the row (18 loops)
KR3: * 2 sc, 2 sc in the next. *, repeat to the end of the row (24 loops)
KR4: * 3 sc, 2 sc in the next. *, repeat to the end of the row (30 loops)
KR5: * 4 sc, 2 sc in the next. *, repeat to the end of the row (36 loops)
KR6: * 5 sc, 2 sc in the next. *, repeat to the end of the row (42 loops)
KR7: * 6 sc, 2 sc in the next. *, repeat to the end of the row (48 loops)
KR8: * 7 sc, 2 sc in the next. *, rep to end of row (54 sts)
KR9-16: 1 sc in each st to end of row.
Switch to white yarn with silver lurex.
Color Change:To keep your owlet looking neat, try changing colors on the wrong side of the body when making the toy.
KR17-20: 1 sc in each st to end of row.
KP21: * 8 sc, 2 sc in the next. *, repeat to the end of the row (60 loops)
Knit the strips in the following order: * 2 KR in purple yarn, 1 KP in green, 2 KP in red yarn, 1 KP in green * – repeat 2 times, 2 KP in purple yarn, 1 KP in green , 2 CR of red
KR22-38: 1 sc in each loop to the end. Continue with red yarn.
CR39: *8 sc, decrease. Sc *, repeat to the end of the row (54 loops)
Change to pink yarn.
KR40: knit behind the back walls of the loops * 7 sc, decrease. RLS *, repeat to the end (48 loops)
KR41: * 6 RLS, decrease. Sc*, repeat to end of row (42 sts)
KR42: *5 sc, dec. Sc *, rep to end of row (36 sts)
KR43: *4 sc, dec. Sc *, repeat to the end of the row (30 loops)
CR44: *3 sc, decrease. Sc *, repeat to the end of the row (24 loops)
Stuff.
CR45: *2 sc, decrease. Sc*, rep to end of row (18 sts)
KR46: *1 sc, dec. Sc *, repeat to the end of the row (12 loops)
KR47: decrease. Sc to the end (6 loops)
Cut the thread, leaving a long tail, with a tapestry needle, pull this tail through the remaining loops and close.
Eyes (2 pcs.)
With a 3.75 mm crochet hook and white yarn with silver lurex, tie an amigurumi ring, 6 sc in the ring (6 loops)
KR1: 2 sc in each st to the end (12 loops)
Insert the eye.
KP2-3: Repeat KP 2-3 for head and body (24 sts)
Change yarn to purple.
KP4: repeat KP 4 head and body (30 sts)
Bind off the last st.
Beak
With 4.5 mm crochet and pink yarn, tie an amigurumi ring, 3 sc in a ring (3 loops)
KP1-3: repeat KP 1-3 head and body (12 loops)
KP 4: 1 sc in each stitch to the end.
CR5: *3 sc, 2 sc next. *, repeat to the end (15 loops)
KP6: repeat KP4. Close the last loop.
Wing (2 pcs.)
With a 3.75 mm crochet hook and green yarn, knit an amigurumi ring, 6 sc in a ring (6 loops)
KR1-6: repeat KR 1-6 of the head and body of a knitted owl (42 loops)
Fold in half and continue:
Row 7: ch 1 (do not count as a separate stitch), 21 sc through both layers, unfold (21 loops)
Change to white yarn with lurex.
Row 8: ch 1 (do not count as a separate st), * 1 conn. Art., (1 RLS, 1 PSN, 1 RLS, 1 PSN, 1 RLS) in the next. p., 1 compound *, repeat to the end (you get 7 teeth)
Ear
Crochet 3.75 mm and cream yarn to tie an amigurumi ring, 6 sc in a ring (6 loops)
KR1: * 1 sc, 2 sc in the next. *, rep to end of row (9 sts)
KR2: 1 sc in each st to end.
KP3-5: repeat KP 3-5 of head and body (18 sts)
KP6: repeat KP 2
Bind off last st.
Cap
Crochet 3.75 mm and pink yarn to tie an amigurumi ring, 6 sc in a ring (6 loops)
KR1: 1 sc in each st to the end.
Work the strips in the following order: *one kp in purple yarn, 2 kp in red, 1 kp in purple, 2 kp in pink* – repeat 5 times.
KR2: *1 sc, 2 sc next. *, rep to end of row (9 sts)
KP3-4: 1 sc in each st to end.
CR5: *2 sc, 2 sc next. *, repeat to the end (12 loops)
KR6-7: repeat KR3-4
KR8: * 3 sc, 2 sc in the next. *, repeat to the end (15 loops)
KR9-10: repeat KR3-4
KR11: * 4 sc, 2 sc in the next. *, repeat to the end (18 loops)
KR12-13: repeat KR3-4
KR14: * 5 sc, 2 sc in the next. *, repeat to the end (21 loops)
KP15-16: repeat KP3-4
KP17: *6 sc, 2 sc next. *, repeat to the end (24 loops)
KP18-19: repeat KP3-4
KP20: repeat KP 8 (30 loops)
KP21: repeat KP11 (36 loops)
KP22: 1 sc in each loop to the end.
KP23: Repeat KP 14 (42 sts)
KP24: Repeat KP17 (48 sts)
KP25: *7 sc, 2 sc in next. *, repeat to the end (54 loops)
KR26-31: 1 sc in each p. to the end.
Change to purple yarn.
KR32: 1 sc in each st to end.
Change to red yarn
KP33-34: repeat KP3-4
Bind off last st.
Ball at the end of the cap
Crochet 3.75 mm and white yarn with lurex to knit an amigurumi ring, 6 sc in a ring (6 loops
)
. *, rep to end (15 sts)
KP3-5: 1 sc in each st to end.
CR6: *3 sc, dec. RLS *, repeat to the end (12 loops)
Stuff.
CR7: decrease. Sc to the end (6 loops)
Cut the thread, leaving a long tail, with a tapestry needle, pull this tail through the remaining loops and close.
Knitted amigurumi owl assembly
Sew eyes to the face with a slight overlap on the first white row of the body, leaving a distance of 4 stitches between the eyes. Sew the beak sewn on top over the upper edge between the eyes. Stuff the ear and sew it to one side of the head. Sew wings on the sides of the body with a slight slope from the back to the front. Lightly fill the cap and sew the last CR to the top of the head at an angle opposite the eye. Sew the ball to the end of the cap. Position the hanging part of the cap as you wish and sew.
Feel free to tag me (@freeamigurumii) in your photos on Instagram or Facebook if you’d like!
All Finished.