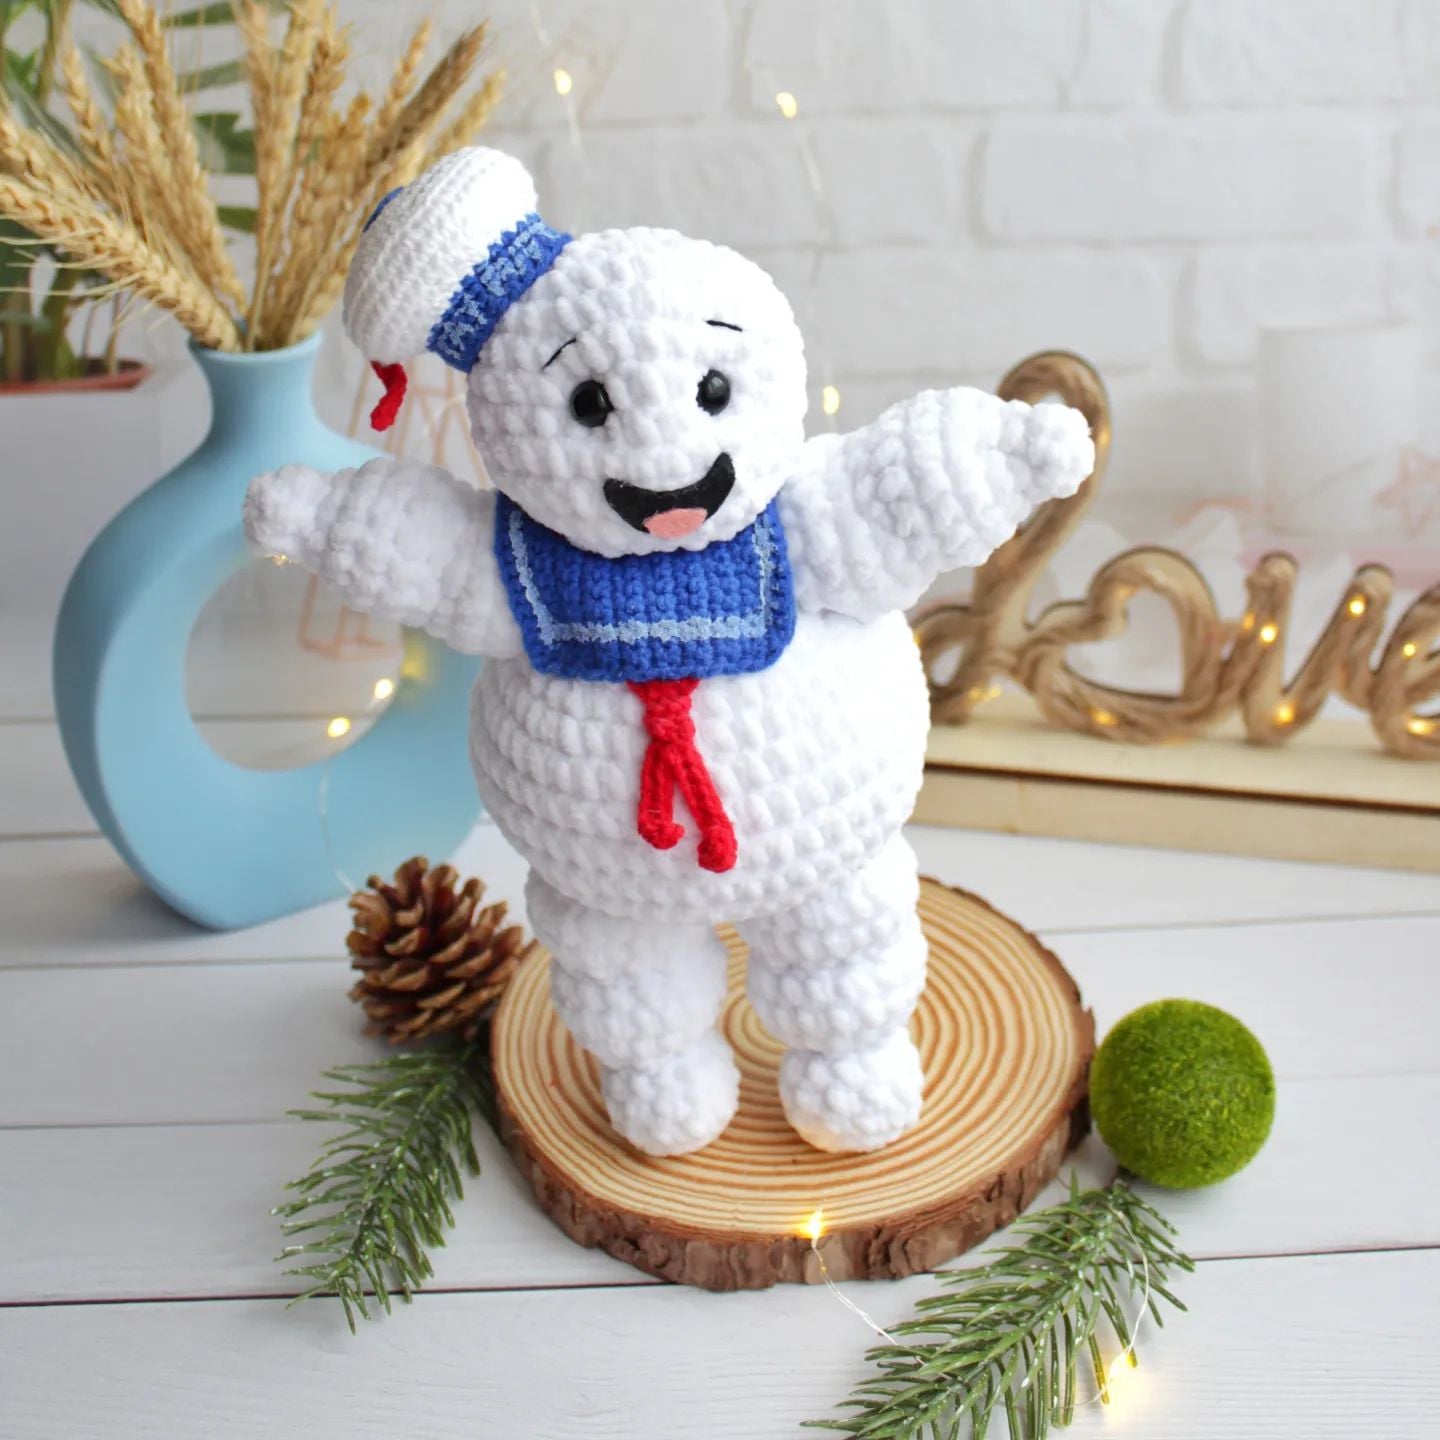
Marshmallow Man Amigurumi Pattern
Hello amigurumi lovers and beautiful visitors, I wanted to share the free amigurumi patterns for you here. In my article I will share 1 pattern and how to make it for you. At the end of my article, I will share amigurumi patterns that can generate ideas for you.
Materials
Yarn
Scissors
Felt
Paint
Abbreviations
MR: Amigurumi Magic ring
sc : Single Crochet
inc : Increase
dec : Decrease
tr : Triple Crochet/ Treble Crochet
st: Stitch
dc : Double Crochet
hdc: Half Double Crochet
slst : Slip Stitch
ch : Chain
..in : make increase into same stitch as many as the number which is given in front of “inc” abbreviation (exp; 3inc, 4inc..).
FLO : Crochet into front loops only
BLO : Crochet into back loops only
Head
1. 6ch, from the 2nd loop from the hook: 1inc, 3sc, 4sc in 1 loop, 3sc, 1inc = 14
2. 2inc, 3sc, 4inc, 3sc, 2inc = 22
3. (1sc, 1inc)*2, 3sc, (1sc, 1inc)*4, 3sc, (1sc, 1inc)*2 = 30
4. 30sc
5. 30sc
6. 30sc
7. 30sc
8. 30sc
9. 30sc
10. (1sc, 1dec)*2, 3sc, (1sc, 1dec)*4, 3sc, (1sc, 1dec)*2 = 22
11. 2dec, 3sc, 4dec, 3sc, 2dec = 14
12. 7 decrease – pull off the hole.
We insert the eyes between the 6th and 7th row, if you have them on a secure mount.
We make a tightening:
From the bottom of the head we insert the yarn and output it in image.4 – we enter it in image.3 and output it in image.2 –
we enter in image. 1 and output at the bottom, next to the input yarn, tighten.
Cut out the mouth from felt and sew or glue.
Body
1. 6MR
2. 6inc = 12
3. (1sc, 1inc)*6 = 18
4. (2sc, 1inc)*6 = 24
5. (3sc, 1inc)*6 = 30
6. 30sc
7. (2sc, 1inc)*10 = 40
8. (3sc, 1inc)*10 = 50
9. 50sc
10. 50sc
11. 50sc
12. 50sc
13. 50sc
14. (3sc, 1dec)*10 = 40
15. (2sc, 1dec)*10 = 30
16. (3sc, 1dec)*6 = 24
17. (2sc, 1dec)*6 = 18
18. (1sc, 1dec)*6 = 12
19. 6 decrease – pull off the hole.
Legs (2 parts)
1. 6MR
2. 6inc = 12
3. 12sc BLO
4. 12sc
5. 12sc
6. 3dec, 6sc = 9
7. 9inc = 18
8. (8sc, 1inc)*2 = 20
9. 20sc
10. (2sc, 1dec)*5 = 15
11. (3sc, 1dec)*3 = 12
12. 12inc = 24
13. 24sc
14. 24sc
15. (1sc, 1dec)*8 = 16
16. 8 decrease, pull off the hole.
Handles (2 parts)
1. 6MR
2. 6sc
3. 6sc
4. 6inc = 12
5. (3sc, 1inc)*3 = 15
6. 15sc
7. 15sc
8. (1sc, 1dec)*5 = 10
9. 10inc = 20
10. 20sc
11. 20sc
12. Decreases to close.
Sailor’s hat
YarArt Jeans white yarn:
1. 8MR
2. 8inc = 16
3. (1sc, 1inc)*8 = 24
4. (2sc, 1inc)*8 = 32
5. (3sc, 1inc)*8 = 40
6. (4sc, 1inc)*8 = 48
7. 48 BLO
8. 48sc
9. 48sc
10. (1sc, 1dec)*16 = 32
11. (3sc, 1dec)*6 = 24, change to blue and crochet 24sc – 4 rows, fasten, leaving the tip for embroidery.
We dial in blue 6 MR, then (2sc 1 inc)*2 = 8 – cut the yarn – this is a pip on the Hat.
We dial in red 20ch, with 2 loops 19sc – fix, cut.
We crochet the collar in rotary rows.
21ch, then we turn and crochet 16 rows of 20sc, each row ending in the ascent.
We collect a chain of 61 ch in red and crochet from the 2nd loop 60sc this is a scarf.
ASSEMBLY
The legs are fastened with a yarn, but they are not made on the side of the body, as in many toys, but from below, for this, pull the yarn from the head down with a long needle, grab the legs and pull it back, fix it.
The handles are also on the yarn fastening on the side; we yarn the yarn not from the side of the hands, but from above, where there are decreases. You can sew on.
First, we sew on the collar, and the head is already on top. I used fabric paints for the white stripes and the lettering on the cap.
All Finished.