Free Crochet Bunny Pattern
Hello amigurumi lovers and beautiful visitors, I wanted to share the free amigurumi patterns for you here. In my article I will share 1 pattern and how to make it for you. At the end of my article, I will share amigurumi patterns that can generate ideas for you.
Notes
Skill level: basic/intermediate crochet skills and knowledge
Finished size when seated: 23cm / 9 inches with a 3mm; C/2 hook
Finished size from ears to toes: 30cm / 12 inches with a 3mm; C/2 hook
Materials and Equipment
Yarn I used:
– Fine Sport #2 = 4 ply
– 55% cotton and 45% acrylic
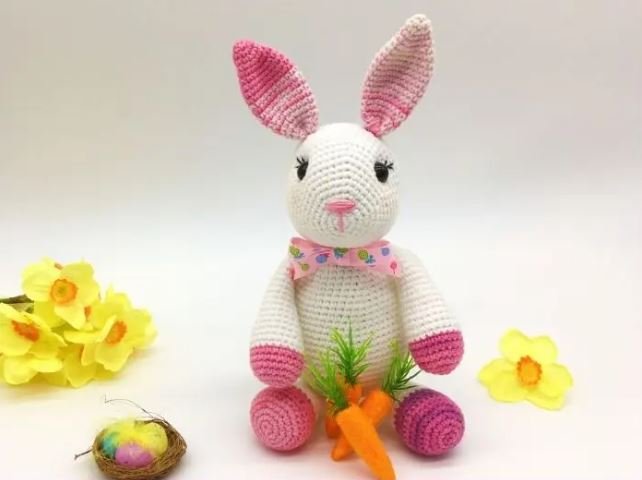
– 2x ball of white yarn – YarnArt Jeans – colour 62 – (50g/160m)
– 1x ball of pink yarn – YarnArt Jeans Crazy – colour 8206 – (50g/160m)
Abbreviations Used
This pattern is written using US crochet terminology
MR: magic ring – watch this step by step video tutorial on How to crochet a magic ring for Amigurumi
ST: stitch
SC: single crochet stitch
HDC: half double crochet stitch
DC: double crochet stitch
CH: chain stitch
SL: slip stitch
INC: increase = two single crochet stitches in the same stitch
L INC: large increase = three single crochet stitches in the same stitch
INV DEC: invisible decrease = insert the hook into the front loop of the first stitch (two loops on hook) and immediately insert it again into the front loop of the next stitch (three loops on the hook). Yarn over and draw through the first two loops on the hook (two loops on the hook). Yarn over and draw through the two loops on the hook to finish your invisible decrease. Watch this step by step video tutorial on How to crochet an invisible decrease for Amigurumi
BLO: back loops only
FO: fasten off
(…..) x 6: repeat the pattern inside the brackets six times
(…..) x 3: repeat the pattern inside the brackets three times
{…}: number shown inside these brackets equals the number of total stitches at the end of each round
How to Crochet the Ears
Crochet from the point to the base.
R1: MR – 6 x SC into the ring {6} – watch this step by step video tutorial on How to crochet a magic ring for Amigurumi
R2: (SC in next ST, INC) x 3 {9}
R3: SC in each ST around {9}
R4: (SC in next 2 ST, INC) x 3 {12}
R5: (SC in next 3 ST, INC) x 3 {15}
R6: (SC in next 4 ST, INC) x 3 {18}
R7: (SC in next 5 ST, INC) x 3 {21}
R8-R13 (6 rounds): SC in each ST around {21}
R14: (SC in next 5 ST, INV DEC) x 3 {18} – watch this step by step video tutorial on How to crochet an invisible decrease for Amigurumi
R15-R16 (2 rounds): SC in each ST around {18}
R17: (SC in next 4 ST, INV DEC) x 3 {15}
R18: SC in each ST around {15}
R19: (SC in next 3 ST, INV DEC) x 3 {12}
R20: SC in each ST around and FO leaving a long piece of yarn for sewing {12}
Fold the bottom of each ear in half and sew it together as shown in Pic E1 before attaching the ears to the head.
How to Crochet the Head
Start from the nose to the back of the head.
R1: MR – 6 x SC into the ring {6}
R2: INC in each ST around {12}
R3: (SC in next ST, INC) x 6 {18}
R4: (SC in next 2 ST, INC) x 6 {24}
R5: (SC in next 3 ST, INC) x 6 {30}
R6: SC in each ST around {30}
R7: (SC in next 4 ST, INC) x 6 {36}
R8: (SC in next 5 ST, INC) x 6 {42}
R9: (SC in next 6 ST, INC) x 6 {48}
R10: SC in each ST around {48}
R11: (SC in next 7 ST, INC) x 6 {54} – leave your marker in at the beginning of R11 as you will need to refer to it when placing the eyes
R12-R18 (7 rounds): SC in each ST around {54}
R19: (SC in next 7 ST, INV DEC) x 6 {48}
R20: SC in each ST around {48}
R21: (SC in next 6 ST, INV DEC) x 6 {42}
R22: SC in each ST around {42}
R23: (SC in next 5 ST, INV DEC) x 6 {36}
R24: SC in each ST around {36}
You can now place the eyes:
– stuff the head well first
– place eyes between rounds R11 and R12
– first eye – count 18 stitches from your marker at the start of R11 and place the eye between ST18 and ST19
– second eye – count 35 stitches from your marker at the start of R11 and place the eye between ST35 and ST36
– you should have 17 ST in between the eyes
– it helps to use pins with large heads to first mark the spots where the eyes will be placed (Pic H1) – you can make a decision whether you are happy with the placement and if it looks symmetrical before you insert the safety eyes; the safety eyes usually make a large hole in between the stitches so it is not recommended to change the placement of the eyes once they are in
– you can now insert the safety eyes but do not put the safety backs on yet (Pic H2)
Sculpting the eyes (indented eye look):
– take a long piece of yarn and thread your needle
– remove the left eye; place the needle in a hole next to the left eye hole (Pic H3)
– remove the right eye; come across the side with the needle and place it into a hole next to the right eye hole; pull all the way through till the yarn tail is not showing
– place your needle in a second hole next to the right eye and come across the side with the needle again (Pic H5)
– repeat the process back and forth between the two eye holes while pulling on the yarn tightly each time you come across the side
– you will need to repeat this about three times until you achieve the indented eye look you want and then you can weave the yarn in
– place the eyes back in the holes; remove some or most of the stuffing and place the safety backs on making sure they snap in place tightly
– you can now re-stuff the head (Pic H7) and continue crocheting R25
R25: (SC in next 4 ST, INV DEC) x 6 {30}
R26: (SC in next 3 ST, INV DEC) x 6 {24}
R27: (SC in next 2 ST, INV DEC) x 6 {18}
R28: (SC in next 1 ST, INV DEC) x 6 {12}, FO closing the hole using a yarn needle
How to Crochet the Body
Start from the bottom of the body to the top.
R1: MR – 6 x SC into the ring {6}
R2: INC in each ST around {12}
R3: (SC in next ST, INC) x 6 {18}
R4: (SC in next 2 ST, INC) x 6 {24}
R5: (SC in next 3 ST, INC) x 6 {30}
R6: (SC in next 4 ST, INC) x 6 {36}
R7: (SC in next 5 ST, INC) x 6 {42}
R8: (SC in next 6 ST, INC) x 6 {48}
R9: (SC in next 7 ST, INC) x 6 {54}
R10: (SC in next 8 ST, INC) x 6 {60}
R11: (SC in next 9 ST, INC) x 6 {66}
R12-R17 (6 rounds): SC in each ST around {66}
R18: (SC in next 9 ST, INV DEC) x 6 {60}
R19-R20 (2 rounds): SC in each ST around {60}
R21: (SC in next 8 ST, INV DEC) x 6 {54}
R22: SC in each ST around {54}
You can now start stuffing the body
R23: (SC in next 7 ST, INV DEC) x 6 {48}
R24-R25: (2 rounds): SC in each ST around {48}
R26: (SC in next 6 ST, INV DEC) x 6 {42}
R27: SC in each ST around {42}
R28: (SC in next 5 ST, INV DEC) x 6 {36}
R29-R30: (2 rounds): SC in each ST around {36}
R31: (SC in next 4 ST, INV DEC) x 6 {30}
R32: SC in each ST around {30}
R33: (SC in next 3 ST, INV DEC) x 6 {24}
R34: SC in each ST around and FO leaving a long piece of yarn for sewing {24}
How to Crochet the Arms
Start from the bottom of the arm upwards.
R1: Magic ring – 6 x SC into the ring {6}
R2: INC in each ST around {12}
R3: (SC in next ST, INC) x 6 {18}
R4: (SC in next 2 ST, INC) x 6 {24}
R5-R9 (5 rounds): SC in each ST around – change your yarn to white after R7 {24}
R10: (SC in next 6 ST, INV DEC) x 3 {21}
R11: SC in each ST around {21}
R12: (SC in next 5 ST, INV DEC) x 3 {18}
You can now start stuffing the arm
R13-R14 (2 rounds): SC in each ST around {18}
R15: (SC in next 4 ST, INV DEC) x 3 {15}
R16-R17 (2 rounds): SC in each ST around {15}
R18: INV DEC, SC in next 13 ST {14}
R19: SC in each ST around {14}
R20: INV DEC, SC in next 12 ST {13}
You can now stop stuffing the arm
R21: SC in each ST around {13}
R22: INV DEC, SC in next 11 ST {12}
R23-R24 (2 rounds): SC in each ST around {12}
R25: Right arm – SC in next 1 ST and then SC the opening together to close the arm, FO leaving a long piece of yarn for sewing
R25: Left arm – SC in next 4 ST and then SC the opening together to close the arm, FO leaving a long piece of yarn for sewing
How to Crochet the Legs
Start from the bottom of the leg upwards.
R1: Magic ring – 6 x SC into the ring {6}
R2: INC in each ST around {12}
R3: (SC in next ST, INC) x 6 {18}
R4: (SC in next 2 ST, INC) x 6 {24}
R5: (SC in next 3 ST, INC) x 6 {30}
R6-R9 (4 rounds): SC in each ST around {30}
R10: (SC in next 3 ST, INV DEC) x 6 {24}
Change your yarn to white after R10 and start stuffing the leg
R11-R12 (2 rounds): SC in each ST around {24}
R13: (SC in next 6 ST, INV DEC) x 3 {21}
R14-R15 (2 rounds): SC in each ST around {21}
R16: (SC in next 5 ST, INV DEC) x 3 {18}
R17-R18 (2 rounds): SC in each ST around {18}
R19: INV DEC, SC in next 16 ST {17}
You can now stop stuffing the leg
R20: SC in each ST around {17}
R21: INV DEC, SC in next 15 ST {16}
R22-R23 (2 rounds): SC in each ST around {16}
R24: SC the opening together to close the leg, FO leaving a long piece of yarn for sewing
How to Crochet the Tail
Start from the centre of the tail.
R1: MR – 6 x SC into the ring {6}
R2: INC in each ST around {12}
R3: (SC in next ST, INC) x 6 {18}
R4: (SC in next 2 ST, INC) x 6 {24}
R5-R7 (3 rounds): SC in each ST around {24}
R8: (SC in next 2 ST, INV DEC) x 6 {18} and FO leaving a long piece of yarn for sewing
You can now stuff the tail
Free Crochet Bunny Rabbit Pattern – Assembly
Head and ears: Pin the ears to the head to make sure they are symmetrical from the front, side and the back too. Sew the ears to the head. I placed the ears between R16 and R19.
Head and body: Pin the body to the head first making sure that the head is in the centre. Sew the body to the head, adding more stuffing if needed.
Arms: Pin the arms to the body in a forward facing angle (at about 45°) making sure both arms are symmetrical from the front and back. Sew the arms to the body. I placed the arms between R17 and R23.
Legs: Turn the body upside down with the nose facing away from you. Pin the legs to the body as shown in the photo below making sure they look symmetrical. The best way to ensure you are happy with the placement of the legs is to sit your toy up and adjust the placement of the legs if needed. Sew the legs to the body. I placed the legs between R2 and R9.
Tail: Pin the tail to the body first making sure that it is placed in the centre of the lower back. It helps to sit your toy up to ensure the tail is not attached too low. Sew the tail to the body, adding more stuffing if needed. I placed the tail between R10 and R16.
Nose embroidery: To make the nose you will need a piece of pink yarn and a yarn needle. Place pins into the stitches where you would like to embroider the nose first to ensure the nose is symmetrical.
Eye lash embroidery and rose cheeks:
You can choose to embroider eye lashes with a thin black yarn as shown in the photos. To paint the rose cheeks, you can either use a make-up blusher, water paint or a crayon. I used a make-up blusher and just gently tapped the cheeks with the makeup brush.
Free Crochet Bunny Rabbit Pattern – Your Finished Crochet Toy:
You have now finished your crochet toy and as a final touch you can tie a bow around its neck with a nice ribbon of your choice! I hope you found my free crochet bunny rabbit pattern easy to follow and enjoyed making the bunny!

