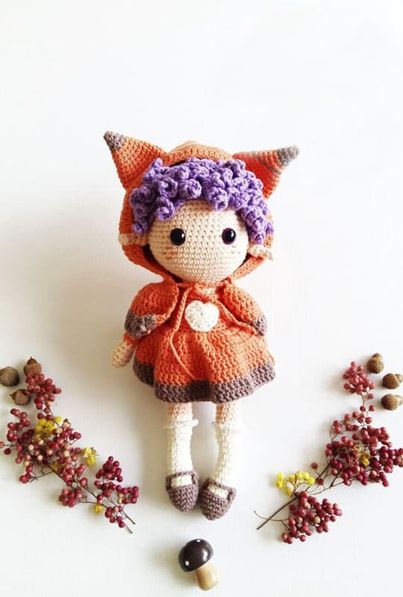
Fox Girl Foxella Doll Amigurumi Free Pattern
Hello amigurumi lovers and beautiful visitors, I wanted to share the free amigurumi patterns for you here. In my article I will share 1 pattern and how to make it for you. At the end of my article, I will share amigurumi patterns that can generate ideas for you.
Abbreviations
sc : Single Crochet
inc : Increase
dec : Decrease
tr: Treble/Triple stitch
dc :Double Crochet
hdc: Half Double Crochet
sl-st :Slip stitch
ch : Chain
DCinc: Double crochet increase
st/sts: stitch/stitches
DCdec: Double crochet decrease
FLO : Use the front loops only
BLO : Use the back loops only
(..) :Total number of stitches after the round / row.
(…) x …. Times: Repeat instructions in parentheses x times
Materials
Yarnart Jeans / Skin color (Color code 73)
Yarnart Jeans / Brown (Color code71)
Yarnart Jeans / Cream(Color code03)
Yarnart Jeans / Orange (Color code23)
Yarnart Jeans / Purple (Color code72)
12 mm security eyes (Purple)
Polyester Fiberfill
Tapestry Needle
Pins
2.5mm Hook
Scissors
Legs (Cream) x 2
Begin with the legs, We will make the body by joining two legs.
Rnd1. Sc6 into the magic ring.
Rnd2. (inc)x 6 times (12)
Rnd3-11. Sc around (12)
Rnd12. (Dec)x twice, sc3, (dec)x twice, sc3 (12)
Rnd13. Sc around (12)
Rnd14. (Dec)x twice, sc3, (dec)x twice, sc3 (12)
Rnd15-16. Sc around (12)
Rnd17. Work BLO sc12 (12)
Change to skin color.
Rnd18-24. Sc around (12)
Change to orange color.
Rnd25-26. Sc around (12)
You have finished the first leg. Crochet the second leg in the same way.
When you have finished Round 26, make 2 single crochets into the stitches of the second leg to reach the middle. The underpant and dress will be orange so we join and keep crocheting with orange color. It is important to make the tips of the feet look at each other.
Stuff the legs after joining.
Let’s start the amigurumi fox girl doll with her legs, then crochet the body part.
Body
Keep crocheting with orange color.
Rnd27. Join legs with ch6
Rnd28-38. Sc around (36)
Rnd39. Work BLOsc36
Rnd40. Sc around(36)
Rnd41. (Sc4, dec)x 6 times (30)
Rnd42-43. Sc around (30)
Rnd44. (Sc3,dec)x 6 times (24)
Rnd45. Sc around (24)
Rnd46. Sc2, dec (18)
Change to skin color.
Rnd47. Work BLOsc18(18)
Rnd48-49. Sc around (18)
You have finished the body, do not break the yarn we will crochet the head.
For the ruffles of the socks; Join the yarn in the BLO stitches of round 17 and { (Ch1,sc1 )x12 } around. Repeat this process for the other leg.
Start stuffing and keep stuffing as you go on.
After completing the body part of the amigurumi fox girl with crochet, we begin to make her head.
Head (Skin Color)
Rnd50. (Sc2, inc)x 6 times (24)
Rnd51. (Sc3,inc) x 6 times (30)
Rnd52. (sc4, inc)x 6 times (36)
Rnd53. (Sc5, inc)x 6 times (42)
Rnd54. (sc6,inc)x times (48)
Rnd55. (sc7,inc)x 6 times (54)
Rnd56-60. Sc around(54)
Rnd61.(sc7,dec)x 6 times(48)
Rnd62-66. Sc around(48)
Rnd67. (sc6,dec)x 6 times(42)
Rnd 68. (sc5,dec)x 6 times (36)
Rnd69. (sc4,dec)x 6 times(30)
Rnd70. (sc3,dec)x 6 times(24)
Rnd71. (sc2,dec)x 6 times(18)
Rnd72. (sc1,dec)x 6 times(12)
Rnd73. (dec) x 6 times(6) Fasten off.
After completing the amigurumi teak girl’s head, we start knitting her arms and fix them to the body.
Arms (Skin Color) x 2
Rnd 1. Sc5 into the magic ring
Rnd 2. (inc)x 5 times (10)
Rnd 3-5. Sc around (10)
Rnd 6. dec, sc6, dec (8)
Rnd 7. Sc around (8)
Change to orange color.
Rnd 8-20. Sc around (8)
Rnd 21. (dec)x 4 times (4) Fasten off.
Place the security eyes between round 60-61 with adistance of 7 stitches between them. Leave a long tail after finishing the arms. Stuff them firmly and sew them to the body by closing the holes. Sew the arms on the body where the collar section begins.
(See page 8 for collar) Do NOT forget to sew them by hiding the color changes.
To start the amigurumi fox girl’s hair, we first work the hair hat with crochet and fix it.
Hair Cap (Purple)
Rnd1. Sc6 into the magic ring
Rnd2. Work BLO (inc)x6 times (12)
Rnd3. Work BLO (sc1,inc)x 6 times(18)
Rnd4. Work BLO (sc2,inc)x 6 times
Rnd5. Work BLO (sc3,inc)x 6 times (30)
Rnd6. Work BLO (sc4,inc)x 6 times (36)
Rnd7. Work BLO(sc5,inc)x 6 times(42)
Rnd8. Work BLO(sc6,inc)x 6 times(48)
Rnd9. Work BLO sc48
Rnd10. Work BLO (sc7, inc) x 6 times (54)
Rnd11-16. Work BLO sc54
Crochet the whole hair cap by working BLO stitches as the curlycues will be sewn on it.
Leave a long tail and break the yarn after crocheting the hair cap.
Then we create curls with crochet to make her hair.
Curlycues (Purple)
Join your yarn into the first BLO stitch of the Round2 with a sl-st. Crochet all the rounds as sc. Increase in every stitch and you will have 20 sc in total. Sl-st 6 times after the first curlycues and repeat this. You will have 107 curlycues at the end.
Sl-st in to the first BLO stitch of Round 2.
Ch11,insert your hook into the second stitch from your hook and (inc) x 10 times.(sl-st)x 6 times, ch11…Repeat until the last stitch.

Hair(Pictorial)
After crocheting the curlycues sew the hair cap on head with the long tail we have left before

After creating the hair of the amigurumi character, we can move on to knitting the ears.
Ears (Skin color) x 2
Rnd1. Sc4 into the magic ring
Rnd2-3. Sc around (4)
Rnd4. (inc)x 4 times (8)
Rnd5. Sc around
Rnd6. (dec)x 4 times (4)
Fasten off.

Please follow the pictorial!
Crochet the ears after sewing the hair.
Place the ears on the right and left sides of the head under the curlycues.
Use pins to fix the ears and sew them.
Do not stuff the ears. The pointed edges of the ears should be on the outer side and upwards.
Embroider the freckles using the orange yarn.(approximately 1 stitch long). Look at the pictures please!
For the collar; Join your yarn into the BLO stitches of Round 47 with a sl-st.
{ (Ch1,sc1 )x12 times} (18)
After crocheting her ears, we fix them on her head and move on to making a crocheted skirt in orange.
Skirt(Orange)
Join your yarn into the BLO stitches of round 39. Crochet the whole skirt as DC.
Rnd1.(DCinc)x 36 times(72)
Rnd2-3. Dc around
Rnd4. Dc3, DCinc around(90)
Rnd5. Dc around (90)
Change to brown color.
Rnd6-7. Dc around (90)
Please follow the pictorials.
Ch2 at the beginning of each round.
After completing the crochet dress, we embroider a cream-colored heart on the dress with a crochet.
Heart(Cream)
4th stitch of the ch4 will be our magic ring. Last 3 chains will be counted as first tr.
All the stitches will be crocheted into the ch4.
Rnd1. Ch4
Rnd2. Tr3, dc3, ch1, tr1, ch1, dc3, tr3, sl-st into the beginning.
Sew the heart between body and collar and into the middle of the body.
Pin it before you sew, this will help you to fix it into the correct place.

After embroidering the heart pattern on the dress with crochet, we can move on to embroidering the fox girl’s hoodie pattern.
Hood (Orange)
Crochet the hood on ch71. Ch1 and turn at the beginning of each round.
Rnd1. Ch71
Rnd2. Insert your hook in to the 2nd stitch from you rhook and sc3,(hdc)x 5 times,(dc)x 54 times,(hdc)x 5 times,sc3,ch1 and turn (70)
Rnd3-14. sc3,(hdc)x 5 times,(dc)x 54 times,(hdc)x 5 times,sc3,ch1 and turn (70)
Break the yarn leaving a long tail.
Fold the hood in half and sew.
Sc26 under the hood and start crocheting the cloak.
After completing the crochet fox model hoodie, we move on to making the cape.
Cloak (Orange)
Sc26 after sewing the hood. Ch2 after crocheting the first round.
Rnd1. Sc26, ch2 and turn
Rnd2. (DCinc)x 26 times(52)
Rnd3-5. (dc)x 52 times
Change to brown color.
Rnd6-7. (dc)x 52 times (52)
Lace(Orange)x2
Rnd1. Ch25
Crochet the laces after completing the cloak.
Sl-st where you have joined the hood and the cloak and ch25,do this for both sides(right and left sides) Please follow the pictorial.
Fox Ears (Brown) x2
Rnd1. Sc5 into the magic ring
Rnd2. Sc5
Rnd3. (inc)x 5 times (10)
Rnd4. Sc10
Change to orange color.
Rnd5. Sc1,inc around (15)
Rnd6-7. Sc15
Rnd8. Sc2, inc around (20)
Rnd9-10. Sc20
Rnd11. Sc3, inc around (25)
Rnd12. Sc25
Put the hooded cloak on Foxella as in the picture.
Sew the fox ears on the 3rd round (in the front) of hood on the right and left sides.
Fix the ears with pins, then sew them.
Shoes (Brown) x2
Rnd1. Sc6 into the magic ring
Rnd2. (inc) x 6 times (12)
Rnd3. Sc3, inc around (15)
Rnd4-6. Sc15
Rnd7-8. Ch1, turn, sc10
Ch5 to make the shoe lace and sew it on the opposite side.