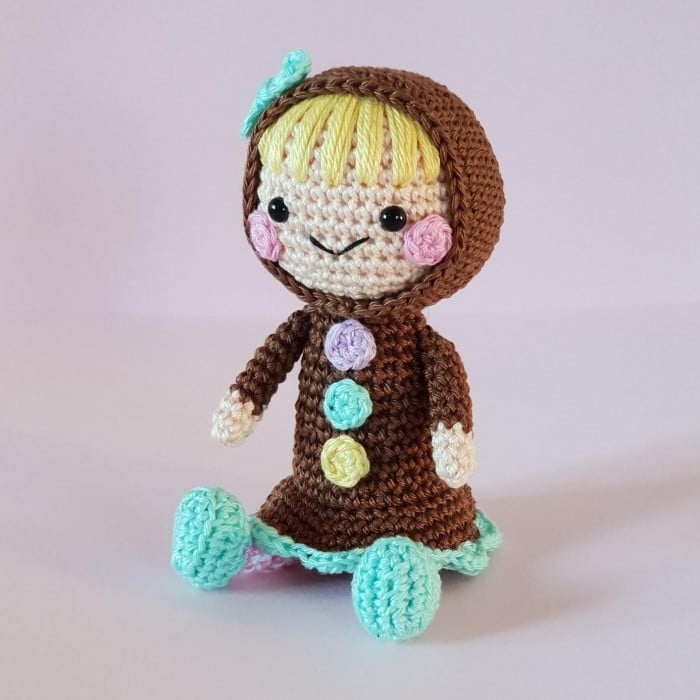
Doll Free Pattern
Hello amigurumi lovers and beautiful visitors, I wanted to share the free amigurumi patterns for you here. In my article I will share 1 pattern and how to make it for you. At the end of my article, I will share amigurumi patterns that can generate ideas for you.
Skill level: Intermediate/ experienced
Crochet hook: B/C – 2/3 (2.5 mm)
Size: Approx. 5” x 2½” (13 x 6 cm)
Materials: Pins, fiber filling, black embroidery yarn, safety eyes (6mm)
Yarn: Rainbow Cotton 8/4:
Light purple (40) Pastel mint (25) Pastel
Yellow (53) White (01) Pink (44) Nude (03)
Brown (007)
How much yarn do you need?
You need 1 skein of each color.
Abbreviations:
st = stitch
ch = chain
sc = single crochet
1 inc = 1 increase – 2 sc in the same st
1 dec = 1 decrease – 2 sc worked together
sl st = slip stitch
hdc = half double crochet
Head
In nude
Start with a magic ring.
R 1: 6 sc in the magic ring (6)
R 2: [1 inc] x6 (12)
R 3: [1 sc, 1 inc] x6 (18)
R 4: 1 sc, 1 inc [2 sc, 1 inc] x5, 1 sc (24)
R 5: [3 sc, 1 inc] x6 (30)
R 6: 2 sc, 1 inc [4 sc, 1 inc] x5, 2 sc (36)
R 7: [5 sc, 1 inc] x6 (42)
R 8-13: 42 sc (6 rounds, 42)
R 14: [5 sc, 1 dec] x6 (36)
Attach safety eyes between rounds 10-11 with 6 sts between the eyes.
R 15: 2 sc, 1 dec [4 sc, 1 dec] x5, 2 sc (30)
R16: [3 sc, 1 dec] x6 (24)
Put fiber filling in the head and add while you work.
R 17: 1 sc,1 dec [2 sc, 1 dec] x5, 1 sc (18)
R 18: [1 sc, 1 dec] x6 (12)
R 19: [1 dec] x6 (6)
Sew the hole.
Embroider a black mouth.
Embroider hair using brown or yellow yarn.
Cheeks (Make 2)
In pink yarn
Start with a magic ring.
R 1: 6 sc in the ring (6)
Finish with 1 sl st in the first sc. Weave in ends and leave a long tail, approx. 4”, for attaching
the cheeks.
Hood
In brown
Start with a magic ring.
R 1: 6 sc in the ring (6)
R 2: [1 inc] x6 (12)
R 3: [1 sc, 1 inc] x6 (18)
R 4: 1 sc, 1 inc [2 sc, 1 inc] x5, 1 sc (24)
R 5: [3 sc, 1 inc] x6 (30)
R 6: 2 sc, 1 inc [4 sc, 1 inc] x5, 2 sc (36)
R 7: [5 sc, 1 inc] x6 (42)
R 8-18: 42 sc (11 rounds, 42)
1 sl st in the last st.
Weave in ends a leave a long tail for sewing.
Place the hood on the head. Sew it to the head using small stitches.
Legs (Make 2)
Start in the color you want for the foot.
R 1: Cast on 5 ch.
R 2: Start in 2nd ch from the hook, 3 sc, 3 sc in the same st, turn without turning the work, 2
sc, 2 sc in the same st.
R 3: 2 sc in the same st, 3 sc, 2 sc in the same st, 1 sc, 2 sc in the same st, 2 sc, 2 sc in the same st, 1 sc.
R 4: Through back loop, 5 sc, 3 hdc, 6 sc
R 5: 4 sc, 1 dec, 2 sc, 1 dec, 4 sc
Put fiber filling in the foot.
R 6: [1 dec] x6 (6)
R 7: Switch to pink, 6 sc (6)
R 8: Switch to white, 6 sc (6)
R 9: Switch to pink, 6 sc (6)
R 10: Switch to white, 6 sc (6)
R 11: Switch to pink, 6 sc (6)
R 12: Switch to white, 6 sc (6)
R 13: Switch to pink, 6 sc (6)
R 14: Switch to white, 6 sc (6)
R 15: Switch to pink, 6 sc (6)
Weave in ends and leave a long tail for sewing the legs to the body later.
Body
In brown
Start with a magic ring
R 1: 6 sc in the magic ring (6)
R 2: [1 inc] x6 (12)
R 3: [1 sc, 1 inc] x6 (18)
R 4: 1 sc, 1 inc [2 sc, 1 inc] x5, 1 sc (24)
R 5: [3 sc, 1 inc] x6 (30)
R 6: 30 sc (30)
R 7: Through back loop, 30 sc (30)
R 8: 13 sc, 1 dec, 13 sc, 1 dec (28)
R 9: 6 sc, 1 dec, 12 sc,1 dec, 6 sc (26)
R 10: 26 sc (26)
R 11: 1 dec, 13 sc, 1 dec, 9 sc (24)
R 12: 24 sc (24)
R 13: 4 sc, 1 dec, 10 sc, 1 dec, 6 sc (22)
R 14: 22 sc (22)
R 15: 1 dec, 9 sc, 1 dec, 9 sc (20)
R 16: 20 sc (20)
R 17: 2 sc, 1 dec, 8 sc, 1 dec, 6 sc (18)
R 18: 18 sc (18)
Finish with 1 sl st in the last st.
Now, make the skirt.
In front loop only on round 7.
R 1: 2 sc, 1 inc [4 sc, 1 inc] x5, 2 sc (36)
R 2: [5 sc, 1 inc ] x6 (42)
R 3: 3 sc, 1 inc [6 sc,1 inc ] x5, 3 sc (48)
R 4-5: 48 sc (2 rounds, 48)
R 6: switch to pastel mint 1 tog, skip 1, 5 st in the same st, skip 1 repeat across.
Finish with 1 sl st. Weave in ends.
Arms (Make 2)
In nude
Start with a magic ring
R 1: 6 sc in the magic ring (6)
R 2-3: 6 sc (2 rounds, 6)
R 4-10: Switch to brown, 6 sc (7 rounds, 6)
Weave in ends and leave a long tail for sewing on the arms.
Candy buttons
Make 3. 1 in purple, 1 in pastel mint and 1 in pink.
Start with a magic ring.
R 1: 6 sc in the ring (6).
Finish with 1 sl st in the first sc. Weave in ends and leave a long tail.
Bow
In pastel mint
Start with a magic ring but don´t tighten too much. You are going to work everything below
inside the ring, so it needs to be spacious.
Make 3 ch, 2 st, 3 ch, 1 tog, 3 ch, 2 st, 3 ch, 1 sl st.
Now tighten the ring.
Weave in ends and leave a long tail, approx. 8”, for winding the yarn around the middle of the
bow a few times until you think it looks good.
Assembly
Attach the head with the hood to the body with pins and sew.
Attach the legs with pins and sew them on, one at a time. Do the same with the arms. Sew
on the buttons. Attach the bow to the side of the head.
The doll is ready!