Christmas Kitty Free Pattern
Hello amigurumi lovers and beautiful visitors, I wanted to share the free amigurumi patterns for you here. In my article I will share 1 pattern and how to make it for you. At the end of my article, I will share amigurumi patterns that can generate ideas for you.
MATERIALS
1 skein of Fluffy Day – Light Grey (03)
1 skein of Fluffy Day – Jade (23)
1 skein of Fluffy Day – Marsala (17)
1 skein of Fluffy Day – White (01)
Crochet hook 2.75 mm
Crochet hook 5.00 mm
2 safety eyes 7 mm
Stuffing
Yarn needle
Scissors
ABBREVIATIONS
FO = fasten off
MR = magic ring
YO = yarn over
ch = chain
sl st = slip stitch
sc = single crochet
hdc = half double crochet
dc = double crochet
fdc = foundation double crochet
SIZE
One size
MEASUREMENTS
Height: Approx. 10 cm (without counting tail)
PATTERN INFORMATION
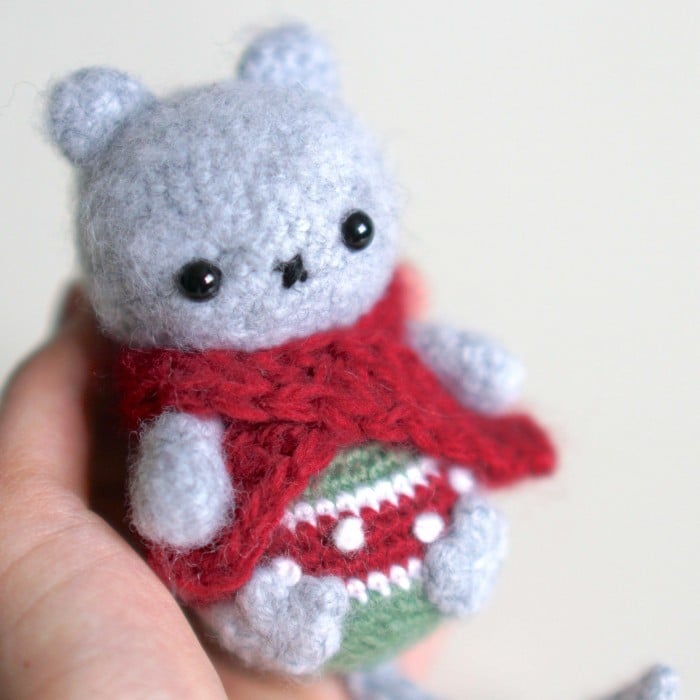
This adorable Christmas Kitty is the perfect stocking stuffer for the holiday season! You can turn this amigurumi kitten into a tree
ornament if desired.

INFO AND TIPS
● Use the 2.75mm hook for all parts of the pattern, except for the scarf. You will use the 5mm hook for the scarf.
● To give your amigurumi a furry texture using the Fluffy Day yarn, crochet the kitten’s grey parts (e.g., head, ears, arms, legs) with the wrong side out. For contrast, crochet the body part with the right side to give a smoother look.
EARS (x2)
Work with grey yarn.
R1: 6 sc in MR. (6)
R2: (Sc 2, inc) x 2. (8)
R3: (Sc 3, inc) x 2. (10)
FO with a long tail for sewing to the head later.
ARMS (x2)
Work with grey yarn.
R1: 6 sc in MR. (6)
R2: (Sc 2, inc) x 2. (8)
R3-R6: Sc around. (8)
R7: (Sc 2, dec) x 2. (6)
R8: Sc around. (6)
R9: (Sc, dec) x 2. (4)
R10: Sc around. (4)
FO with a long tail for sewing to the body later.
FEET (x2)
Work with grey yarn.
R1: 6 sc in MR. (6)
R2: Sc in first st. In the second st: sc, ch, dc, ch, sl st. In each of the next 2 sts: ch, dc, ch, sl st.
Sl st in the last 2 sts.
FO with a long tail for sewing to the body later.
HEAD
Start with grey yarn.
R1: 6 sc in MR. (6)
R2: Inc around. (12)
R3: (Sc, inc) x 6. (18)
R4: (Sc 2, inc) x 6. (24)
R5: (Sc 3, inc) x 6. (30)
R6: (Sc 4, inc) x 6. (36)
R7-R13: Sc around. (36)
R14: (Sc 4, dec) x 6. (30)
R15: (Sc 3, dec) x 6. (24)
Place 7mm eyes between R10-R11, 7 sts apart. Sew on the two ears. Stuff the head well and continue stuffing as you work along.
R16: (Sc 2, dec) x 6. (18)
R17: (Sc, dec) x 6. (12)
R18: Sc around. (12)
Do not FO. Continue with ‘Body’ instructions below.
BODY
Switch to green yarn.
R19: (Sc, inc) x 6. (18)
R20: (Sc 2, inc) x 6. (24)
R21: (Sc 3, inc) x 6. (30)
R22: (Sc 4, inc) x 6. (36)
R23: (Sc 5, inc) x 6. (42)
R24-R25: Sc around. (42)
Switch to white yarn.
R26: Sc around. (42)
Switch to red yarn.
R27-R29: Sc around. (42)
Switch to white yarn.
R30: Sc around. (42)
Switch to green yarn.
R31: Sc around. (42)
R32: (Sc 5, dec) x 6. (36)
R33: (Sc 4, dec) x 6. (30)
R34: (Sc 3, dec) x 6. (24)
R36: (Sc 2, dec) x 6. (18)
Sew the arms between the head and body area. Sew the feet to the body.
R37: (Sc, dec) x 6. (12)
R38: Dec around. (6)
FO with a tail and use it to sew the hole shut.
TAIL
Work with grey yarn.
Note: The tail is made using the “i-cord” crochet technique.
Set up the i-cord: Ch 3. Insert hook into 2
nd ch from hook, YO, pull up a loop, insert hook into
next ch, YO, and pull up a loop. (3 loops on hook)
R1: Drop 2 loops from hook, but hold onto them tightly with your non-hook hand so that they do not come undone. YO, pull through loop on hook. Insert hook into first dropped loop, YO, pull through. (2 loops on hook.) Insert hook into second dropped loop, YO, and pull through. (3 loops on hook)
R2-R15: Repeat R1.
To finish, YO and pull through all 3 loops on hook.
FO with a long tail for sewing to the body later.
SCARF
Start with red yarn, and use the 5mm crochet hook for this piece.
R1: Fdc 30.
FO.
Finishing Instructions
- If you haven’t already, sew the ears to the head, and the arms and legs to the body.
- Sew the tail to the bottom of the body.
- Use white yarn and sew french knots to the center stripe of the cat’s body.
- Sew a small nose and mouth to the face.
- Wrap the scarf around the neck and sew it in place.
Enjoy!