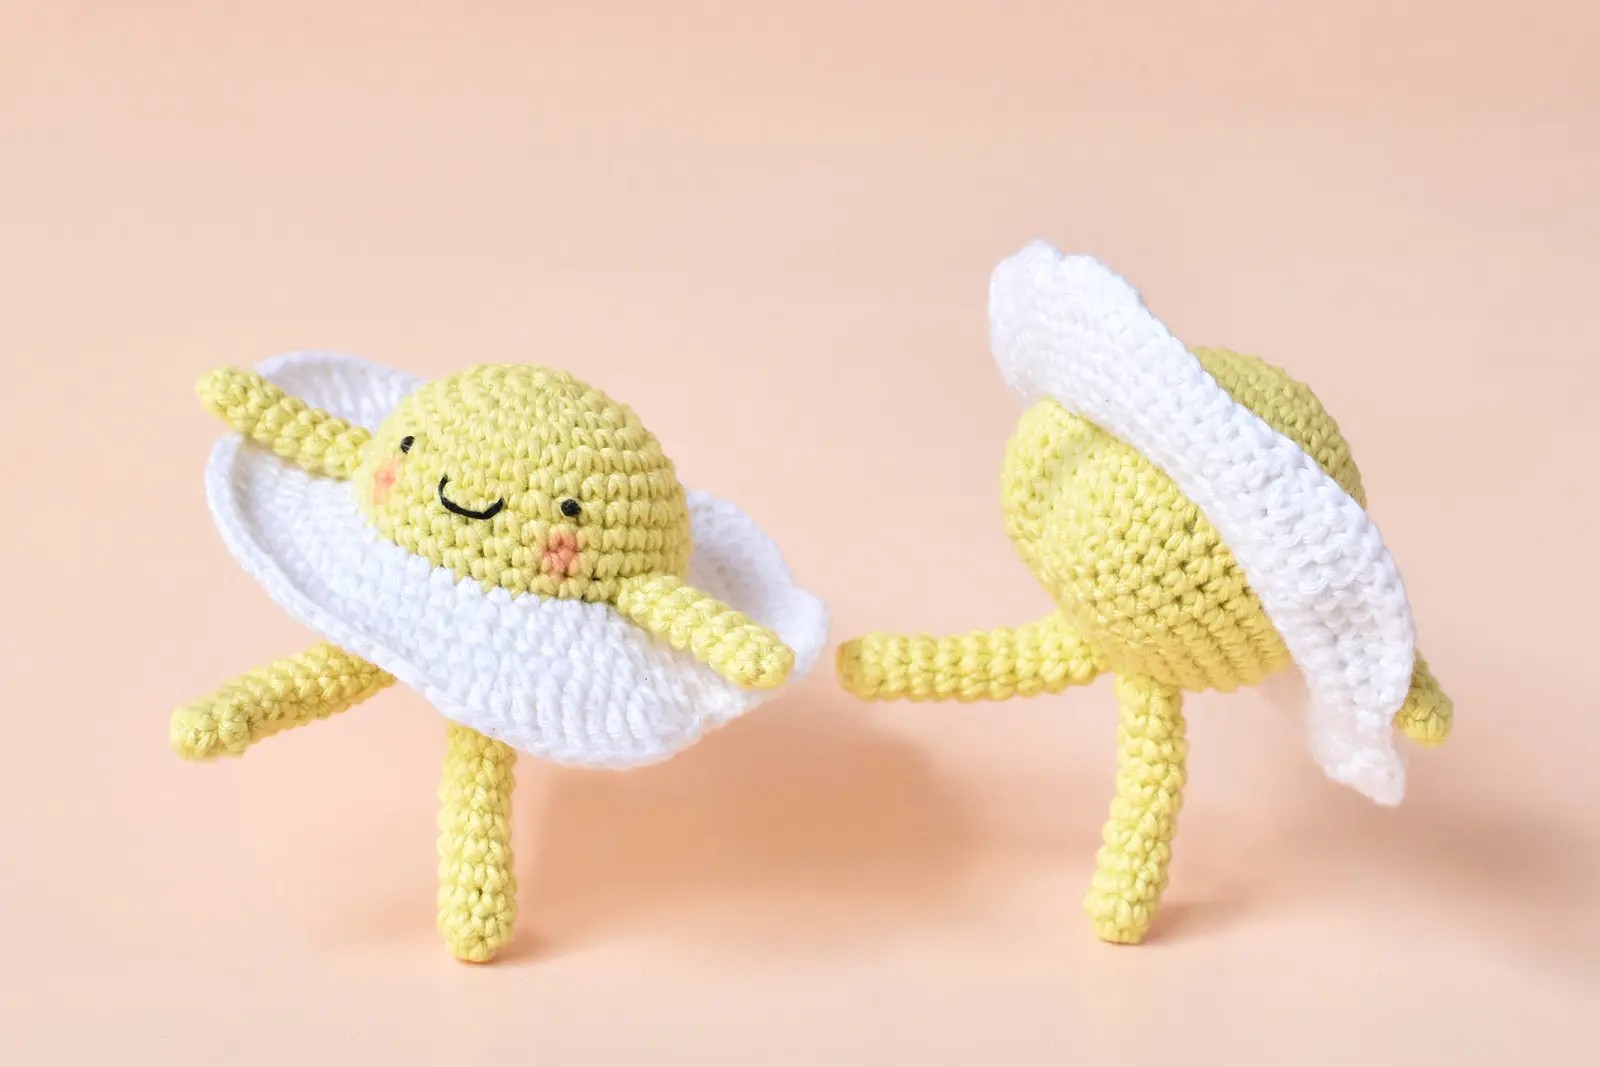
Cheeky Egg Amigurumi Free Crochet Pattern
Hello amigurumi lovers and beautiful visitors, I wanted to share the free amigurumi patterns for you here. In my article I will share 1 pattern and how to make it for you. At the end of my article, I will share amigurumi patterns that can generate ideas for you.
MATERIALS
Lightweight yarn (light worsted, DK weight, 8-ply) in 2 colors
Color A – Egg Yolk (Rico Design Ricorumi dk weight yarn in Pastel Yellow)
Color B – Egg White (Rico Design Ricorumi dk weight yarn in White)
2.25 mm (B) hook (Clover Amour)
Toy stuffing (Fairfield Poly-Fil)
Embroidery/sewing needle (DMC Embroidery Needle)
Tapestry needle (DMC Tapestry Needle Size 16)
Stitch marker (Clover Quick Locking Stitch Markers Small – I LOVE these, they don’t leave big holes in your work!)
Embroidery floss in black for face (DMC Embroidery Floss in black)
Scissors (Gingher Stork Scissors)
Cosmetic blush and paintbrush for cheeks
ABBREVIATIONS
BLO – back loop only
ch – chain
dc – double crochet
dc inc – double crochet increase
hdc – half double crochet
hdc inc – half double crochet increase
inc – single crochet increase
inv dec – invisible decrease
rnd(s) – round(s)
sc – single crochet
sl st – slip stitch
st(s) – stitch(es)
tr – treble crochet
tr inc – treble crochet increase
[ ] – repeat steps between brackets for the specified number of times
( ) – the number of stitches you should have at the end of each round
EGG YOLK
rnd 1: With color A sc 6 into a magic ring (6 sts)
rnd 2: Inc 6 (12 sts)
rnd 3: [sc 1, inc 1] 6 times (18 sts)
rnd 4: [sc 1, inc 1, sc 1] 6 times (24 sts)
rnd 5: [sc 3, inc 1] 6 times (30 sts)
rnd 6: Sc around (30 sts)
rnd 7: [sc 2, inc 1, sc 2] 6 times (36 sts)
rnds 8-10: Sc around (36 sts for 3 rnds)
EMBROIDERING THE FACE
We’ll now be embroidering Cheeky Egg’s face. Embroidering on crochet takes a bit of practice, but it gives your amigurumi lots of personality. The key to embroidering on crochet is to make sure to insert your needle through your stitches and not in a hole between stitches so your thread remains secure. It is also much easier to embroider on crochet before you’ve finished and stuffed your piece. For more tips and tricks to embroider faces on amigurumi, check out this blog post (it even has a video tutorial)!
To begin, cut a 16-inch piece of embroidery floss (using all 6 strands), thread your embroidery needle, and triple knot end. You’ll be embroidering backstitches for the mouth on rnds 7-8 and French knots for eyes on rnd 7 with 8 sts between each eye. Check out the photos below for step-by-step instructions.
1. On side opposite stitch marker, bring your threaded embroidery needle out through a stitch on rnd 8.
2. Skip one stitch and insert embroidery needle into next stitch. Pulling thread taut.
3. Bring needle out through stitch on rnd 7, slightly to the side of mouth. Insert needle into corner of mouth to connect. Repeat for other side of mouth.
4. Counting 2 stitches to the right of mouth, bring needle up through stitch on rnd 7.
5. Make a French knot for the eye. Holding needle close to egg, wrap thread 3 times around the needle.
6. Insert needle back into egg very close to where your thread is coming out.
7. Eye 1 is complete!
8. Make another French knot for eye 2, with 8 stitches between eyes.
EGG YOLK, CONTINUED
rnd 11: In BLO, sc around (36 sts)
rnds 12-14: Sc around (36 sts for 3 rnds)
rnd 15: [sc 4, inv dec 1] 6 times (30 sts)
rnd 16: [sc 3, inv dec 1] 6 times (24 sts)
– – – STUFF EGG YOLK NOW & CONTINUE STUFFING UNTIL END. STOP HERE AND COMPLETE STEPS 1-4 OF THE MAKING THE BUTT PHOTO TUTORIAL BELOW. – – –
rnd 17: [sc 2, inv dec 1] 6 times (18 sts)
rnd 18: [sc 1, inv dec 1] 6 times (12 sts)
rnd 19: Inv dec 6 (6 sts)
Sl st 1 into next st. Fasten off and cut yarn, leaving a 16-inch yarn tail for closing ending hole and making butt crack. Don’t close opening yet! See the photo tutorial below for making Egg’s little butt.
MAKING THE BUTT
This egg ain’t called cheeky for nothin! Cheeky Egg’s butt is easily formed using the yarn tail and 2 small balls of toy stuffing. The photo tutorial below will show you how to do it!
1. After completing rnd 16 of egg yolk, form 2 small balls of stuffing about 1 inch in diameter for the cheeks.
2. On side opposite face, insert stuffing ball into opening for first cheek.
3. Press ball into stitches to slightly stretch out cheek and make it more pronounced.
4. Repeat on other side to make 2 butt cheeks. Finish stuffing the egg yolk until the shape is round. Complete rnds 17-19 of Egg Yolk before moving to next step.
5. Finish off your piece. With the tapestry needle and yarn tail, weave tail through front loop of last rnd’s sts from inside to out. Pull yarn tail tightly to close hole.
6. Insert threaded tapestry needle through center of hole and bring out between sts under rnd 11, between butt cheeks.
7. Make a long line with yarn tail to make butt crack, inserting your needle between sts under rnd 16
8. Bring needle through another part of egg yolk and pull yarn tail tightly so the butt crack is defined between the cheeks.
9. Weave the yarn tail through several stitches on 2 rnds of the yolk to make it extra secure. Then bring yarn tail through the egg again and cut yarn tail close to body.
EGG WHITE SKIRT
rnd 1: On side opposite egg’s face, attach color B through front loop of st of rnd 10, ch 1 (don’t count as st), hdc 1 into same st as ch (photo A below), hdc 4, hdc inc 1, [hdc 5, hdc inc 1] 5 times (42 sts)
rnd 2: Continue onto rnd 2 without joining and chaining (photo B below), [hdc 4, hdc inc 1] 8 times, hdc 2 (50 sts)
rnd 3: [hdc 4, hdc inc 1] 10 times (60 sts)
rnd 4: [hdc 4, hdc inc 1] 12 times (72 sts)
– – – THERE ARE 2 VERSIONS FOR RND 5 – JUST CROCHET RND 5 ONCE! VERSION 1 GIVES YOU A SMOOTHER EDGE AND VERSION 2 IS A LITTLE WAVIER. PHOTOS C & D BELOW SHOW BOTH OPTIONS.– – –
rnd 5 (VERSION 1): Hdc 1, dc 1, dc inc 1, dc 2, [hdc 3, inc 1, sc 3, hdc 1, dc 1, dc inc 1, tr 5, tr inc 1, dc 1, hdc 1, sc 3, inc 1, hdc 1, dc 4, dc inc 1, dc 1, hdc 1] 2 times, sc 3, inc 1, sc 3 (84 sts)
rnd 5 (VERSION 2): Hdc 1, dc 2, dc inc 1, dc 1, hdc 1, [hdc 1, sc 2, inc 1, sc 1, hdc 1, dc 1, tr 2, tr inc 1, dc 1, hdc 1] 2 times, sc 3, inc 1, hdc 1, dc 4, hdc inc 1, [sc 3, hdc 1, dc 1, tr inc 1, tr 4, dc 1, hdc inc 1] 2 times, sc 5, inc 1, sc 2 (84 sts)
Sl st 1 into 1st st of rnd. Fasten off yarn and weave in tail.
ARM (MAKE 2)
rnd 1: With color A, sc 6 into magic ring (6 sts)
rnds 2-7: Sc around (6 sts for 6 rnds)
Sl st 1 into next st. Fasten off, leaving an 8-inch tail for attaching.
LEG (MAKE 2)
rnd 1: With color A, sc 6 into magic ring (6 sts)
rnd 2: Inc 1, sc 5 (7 sts)
rnds 3-11: Sc around (7 sts for 9 rnds)
Sl st 1 into next st. Fasten off, leaving an 8-inch tail for attaching.
ATTACHING ARMS & LEGS
Now it’s time to attach the arms and legs. The placement photos below show where the arms and legs should be attached on the yolk. The arms are attached over rnd 10 and the legs are attached over rnd 16 of the egg yolk. The photo tutorial below shows my method for attaching using the arms as an example. I use the same method for attaching the legs.
1. Insert tapestry needle threaded with arm’s yarn tail under st of rnd 10.
2. Insert needle into st on arm from inside to outside.
3. Insert needle under st above rnd 10. Repeat steps 2 and 3 until you’ve worked all the way around the arm.
4. Once you’ve worked all the way around, insert needle into egg yolk and bring up the yarn through another part of the body. Weave through several stitches to secure. Bring yarn through body again and cut close so thread retracts inside.
5. Repeat the process with the other arm!
APPLYING BLUSH
This step is optional, but it adds a really cute look to your finished Cheeky Egg! Using regular blush makeup and a small brush, I bring blush under the egg’s eyes. Use a light hand at first, you can always add more! If you’ve added a bit too much, you can use your finger to smudge and blur the blush.
If you don’t have blush, you can try this technique with a wax crayon and a paper towel. Rub the crayon on the paper towel first and then rub it on your egg!