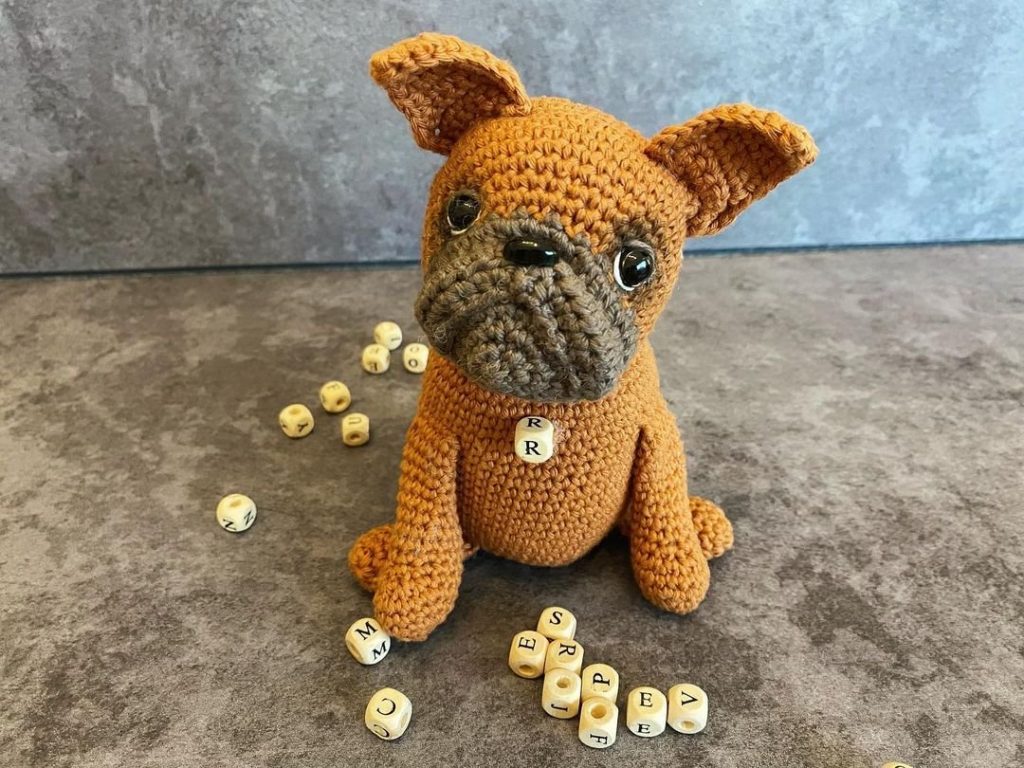
Cartoon Bulldog Amigurumi Free Pattern
Hello amigurumi lovers and beautiful visitors, I wanted to share the free amigurumi patterns for you here. In my article I will share 1 pattern and how to make it for you. At the end of my article, I will share amigurumi patterns that can generate ideas for you.
Additional Information:
Difficulty: Intermediate
• Getting started
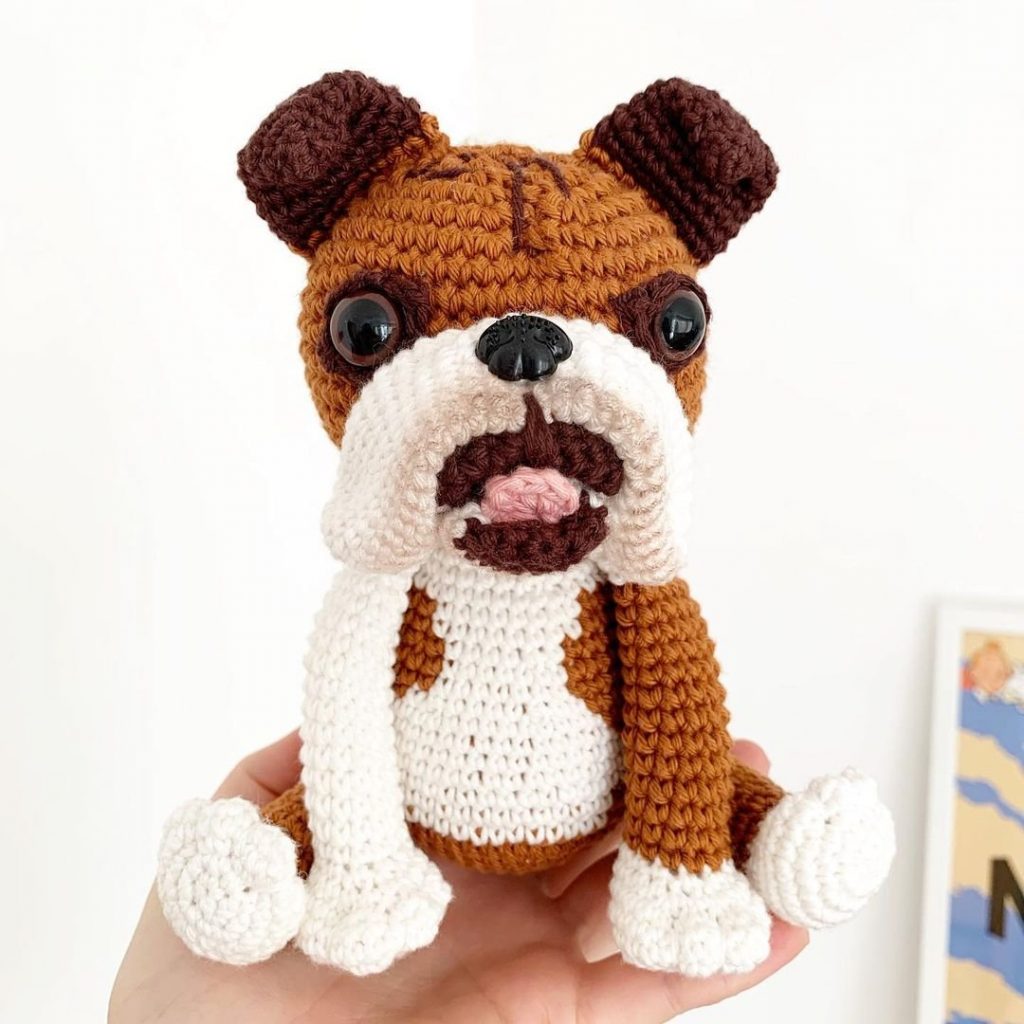
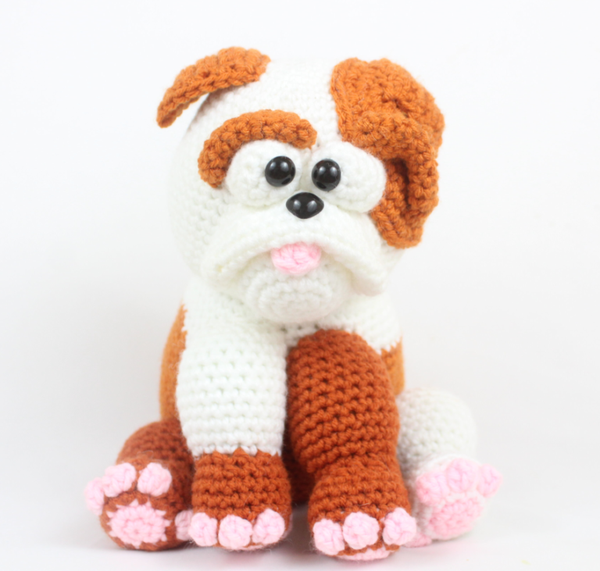
This bulldog is so cute and you can make him either cartoony or a regular style, it just depends on how you do the eyes. I will show you how we can do both!
This bulldog is easy, however there are a lot of parts. If you prefer, you can make each part then pin them on once they are all made and sew them on once you’re happy with how they look!
• Also included
How we will do the popcorn stitch and color change for when we meet making the toes.
Bulldog
Let’s make the head!
This pattern will slightly differ if you want a cartoon bulldog or a regular bulldog. If you want a cartoon bulldog, don’t insert any safety eyes into the head! If you want a regular bulldog, insert 1 safety eye into any stitch in between Round 12 & 13. We will insert the other safety eye later.
Head:
In White
Round 1: 6 Sc into a Magic Ring (6)
Round 2: *Inc* all around (12)
Round 3: *Inc, Sc* all around (18)
Round 4: *Inc, Sc 2* all around (24)
Round 5: *Inc, Sc 3* all around (30)
Round 6: *Inc, Sc 4* all around (36)
Round 7: *Inc, Sc 5* all around (42)
Round 8-12: *Sc* all around (42)
Round 13: *Inc, Sc 6* all around (48)
Round 14: *Inc, Sc 7* all around (54)
Round 15-23: *Sc* all around (54)
Round 24: *Dec, Sc 7* all around (48)
Round 25: *Dec, Sc 6* all around (42)
Round 26: *Dec, Sc 5* all around (36)
Stuff the head very firmly here.
Round 27: *Dec, Sc 4* all around (30)
Finish off now, leaving a very long tail for sewing. We aren’t fully closing the head because we can sew it on as is to the body! Set the head aside for now.
Face Spot:
In Brown
Round 1: 6 Sc into a Magic Ring (6)
Round 2: *Inc* all around (12)
Round 3: *Inc, Sc* all around (18)
Round 4: *Inc, Sc 2* all around (24)
Round 5: *Inc, Sc 3* all around (30)
Round 6: *Inc, Sc 4* all around (36)
Round 7: *Inc, Sc 5* all around (42)
Round 8: *Inc, Sc 6* all around (48)
Finish off, leaving a very long tail for sewing. Pin the spot onto the dog as shown. I pinned mine closer to the front of the dog. Don’t sew it on yet, since we will need to later place a safety eye into this face spot!
Eye White for Regular Bulldog:
In White
Round 1: 6 Sc into a Magic Ring (6)
Round 2: *Inc* in each stitch all around (12)
Finish off, leaving a long tail for sewing. Place a 12mm safety eye into this piece, don’t secure yet. Place the eye on top of the brown face spot as shown and now secure the safety eye. Pin the eye on as shown and sew on.
Note: We will do the cartoon eyes later if you want to do those instead. Skip eye whites if doing cartoon eyes.
Ears: (Make 2)
In Brown
Row 1: Ch 2, Sc in the 2nd ch from the hook (1)
Row 2: Turn, Ch 1, Sc 2 times in next st (2)
Row 3: Turn, Ch 1, *Inc* in the next 2 st (4)
Row 4: Turn, Ch 1, *Inc* in the next st, Sc in the next 2 st, *Inc* in the next st (6)
Row 5-10: Turn, Ch 1, Sc in the next 6 st (6)
Row 11: Crochet around the entirety of the ear to give a smooth even looking ear. If this is too difficult for you, you can skip this.
Finish off, leaving a long tail for sewing. Pin the ears onto the head as shown. Specifically, between round 5 and 6.
Eye Wrinkles: (Make 2)
In Brown
Round 1: 6 Sc into a Magic Ring (6)
Round 2-11: *Sc* all around (6)
Finish off, leaving a long tail for sewing. Don’t stuff this piece. Now bend this part as shown and pin onto the doll around the eyes. Make sure these pieces align with each other! Sew on now or if you’re making cartoon eyes sew on the wrinkles later.
Top Mouth:
In White
To make the mouth mask we are making a foundation chain. This means we will make a chain, work down one side of the chain, turn to the other side where we haven’t made ANY stitches and crochet down that opposite side of chains. This will make a round.
Round 1: Ch 16. Sc 3 times into the 2nd Ch from the hook. Sc in the next 13 st. Now we meet the end of the chain. Turn the chain to the other side, where we haven’t made any stitches yet. Sc 3 times into the next st, Sc next 13 st (32)
Round 2: *Inc* in the next 3 st. Sc in the next 13 st. *Inc* in the next 3 st, Sc in the next 13 st (38)
Round 3: *Inc, Sc in the next st* 3 times. Sc in the next 13 st. Repeat *Inc, Sc* 3 times, Sc in the last 13 st (44)
Round 4: *Sc* in each stitch all around (44)
Finish off, leaving a very long tail for sewing. Fold the oval in half as shown. Place a 12mm safety nose in the middle of this oval as shown. Now bend the sides of the mouth as shown.
Pin the bent mouth onto the doll as shown. Specifically, the very top of the mouth on Round 14. The two bent sides should land on Round 20. Don’t sew on yet.
Bottom Mouth:
In White
Round 1: 6 Sc into a Magic Ring (6)
Round 2: *Inc* all around (12)
Round 3: *Inc, Sc* all around (18)
Round 4: *Inc, Sc 2* all around (24)
Round 5-6: *Sc* all around (24)
Finish off, leaving a very long tail for sewing. Pin the mouth below the top mouth as shown. You can readjust the top mouth to better fit the bottom mouth. Be sure to stuff the bottom mouth before fully sewing closed. Sew on both pieces.
Tongue:
In Pink
Round 1: Make a magic ring and Chain 2. Make 5 Dc into the magic ring and tighten the ring. SlSt to the very first Dc make to complete the tongue.
Finish off, leaving a long tail for sewing on.
Pin the tongue on as shown, onto the bottom mouth piece.
Cartoon Eyes: (Make 2)
In White
Round 1: 6 Sc into a Magic Ring (6)
Round 2: *Inc* in each stitch all around (12)
Round 3-4: *Sc* all around (12)
Finish off, leaving a long tail for sewing. Place a 10mm safety eye into this piece, between round 2 and 3. Pin the eyes on as shown. You can readjust the eye wrinkles around the cartoon eyes. Sew on, making sure to stuff before fully sewing closed.
Body:
In white
Round 1: 6 Sc into a Magic Ring (6)
Round 2: *Inc* all around (12)
Round 3: *Inc, Sc* all around (18)
Round 4: *Inc, Sc 2* all around (24)
Round 5: *Inc, Sc 3* all around (30)
Round 6: *Inc, Sc 4* all around (36)
Round 7: *Inc, Sc 5* all around (42)
Round 8-10: *Sc* all around (42)
Round 11: *Inc, Sc 6* all around (48)
Round 12: *Sc* all around (48)
Round 13: Change to brown and Sc in the next 19 st. Change to white and Sc in the next 15 st. Change to brown and Sc in the next 14 st (48)
Round 14: In brown Sc in the next 21 st. Change to white and Sc in the next 12. Change to brown and Sc in the next 15 st (48)
Round 15: In brown, Repeat *Inc, Sc in the next st* 6 times. Sc in the next 11 st. Change to white and Sc in the next 7 st. Change to brown and Sc in the next 13 st. *Inc* in the next 3 st, Sc in the last st (56)
Round 16-28: *Sc* all around (56)
Round 29: *Dec, Sc 5* 8 times (48)
Round 30: *Dec, Sc 6* all around (42)
Round 31: *Dec, Sc 5* all around (36)
Round 32: *Dec, Sc 4* all around (30)
Stuff here. Continue stuffing after each round.
Round 33: *Dec, Sc 3* all around (24)
Round 34: *Dec, Sc 2* all around (18)
Round 35: *Dec, Sc* all around (12)
Round 36: *Dec* all around (6)
Finish off and sew the end closed.
Head & Body Assembly:
Pin the head to the body. The head should be aimed more towards the front of the body so it looks like he’s sitting. Sew on with brown yarn!
Limbs:
We will be making a different limb for each of the 4 limbs.
In doing this we will also be making popcorn stitches for the toes. This is a guide to reference when doing the popcorn stitches, as we will also be changing color when completing a popcorn stitch.
Change color to pink to make the next toe. Make 3 Dc into the next stitch Take hook out of current stitch and place into the first Dc made Now also put hook into the current working loop
Yarn over with brown and pull through both loops at the same time When making your next single crochet in the next stitch, yarn over both loops in pink to complete the Sc and to start working in pink again!
Crocheting on top of a popcorn stitch:
Find the stitch behind the popcorn stitch. It should be pink Insert hook into that stitch Yarn over and pull up a loop.
Yarn over and pull through both loops
Right Leg: (Will be brown)
Start in Pink
Round 1: 6 Sc into a Magic Ring (6)
Round 2: *Inc* all around (12)
Round 3: *Inc, Sc* all around (18)
Round 4: Sc in the next 4 st, Repeat *In pink, Popcorn st in the next st. Change to brown and Sc in the next st* 3 times. Sc in the next 3 st, Change to pink and Popcorn st in the next st. Change to brown and Sc in the next 4 st (18)
Round 5-7: *Sc* all around (18)
Round 8: Sc in the next 8 st, *Dec* 1 time, Sc in the next 8 st (17)
Round 9: Sc in the next 5 st, *Dec* 3 times, Sc in the next 6 st (14)
Round 10: Sc in the next 6 st, *Dec* 1 time, Sc in the next 6 st (13)
Round 11: Sc in the next 4 st, Repeat *Inc, Sc in the next st* 4 times, Sc in the last st (17)
Round 12: Sc in the next 4 st, Repeat *Inc, Sc 2* 4 times, Sc in the last st (21)
Stuff the foot now.
Round 13-17: *Sc* all around (21)
Round 18: *Dec, Sc in the next st* 7 times (14)
Stuff the leg now. Add any additional stuffing after the next round
Round 19: *Dec* all around (7)
Finish off, leaving a long tail for sewing.
Now let’s make the other leg and then pin them on!
Left Leg: (Will be white)
Start in Pink
Round 1: 6 Sc into a Magic Ring (6)
Round 2: *Inc* all around (12)
Round 3: *Inc, Sc* all around (18)
Round 4: Sc in the next 4 st. Popcorn st in the next st. Change to white and Sc in the next 3 st. Repeat *Change to white and Sc in the next st, Change to pink and Popcorn st in the next st* 3 times. Change to white and Sc in the next 4 st (18)
Round 5-7: *Sc* all around (18)
Round 8: Sc in the next 10 st, *Dec* 1 time, Sc in the next 6 st (17)
Round 9: Sc in the next 8 st, *Dec* 3 times, Sc in the next 3 st (14)
Round 10: Sc in the next 8 st, *Dec* 1 time, Sc in the next 3 st (13)
Round 11: *Inc* in the next st, Sc in the next 5 st. Repeat *Inc, Sc in the next st* 3 times. Sc in the last st (17)
Round 12: *Inc* in the next st, Sc in the next 6 st. Repeat *Inc, Sc in the next 2 st* 3 times. Sc in the last st (21)
Stuff the foot now
Round 13-17: *Sc* all around (21)
Round 18: *Dec, Sc* 7 times (14)
Stuff the leg now. Add any additional stuffing after the next round
Round 19: *Dec* all around (7)
Finish off, leaving a long tail for sewing.
Pin the legs on as shown, the toes should be going to the inside. Specifically, the legs should go on Rounds 19 at the top and 24 at the bottom. Sew on!
Right Arm: (Will be brown)
Start in Pink
Round 1: 6 Sc into a Magic Ring (6)
Round 2: *Inc* all around (12)
Round 3: *Inc, Sc* all around (18)
Round 4: Sc in the next 4 st. Repeat *In pink Popcorn st in the next st. Change to brown and Sc in the next st* 3 times. Sc in the next 3 st. Change to pink and Popcorn st in the next st. Change to brown and Sc in the next 4 st (18)
Round 5-7: *Sc* all around (18)
Round 8: Sc in the next 8 st, *Dec* 1 time, Sc in the next 8 st (17)
Stuff the foot now
Round 9: Sc in the next 5 st, *Dec* 3 times, Sc in the next 6 st (14)
Round 10: Sc in the next 5 st, repeat *Inc, Sc in the next st* 3 times, Sc in the next 3 st (17)
Round 11: Sc in the next 5 st, repeat *Inc, Sc in the next 2 st* 3 times, Sc in the next 3 st (20)
Round 12-19: *Sc* all around (20)
Round 20: Repeat *Dec, Sc in the next st* 6 times *Dec* 1 more time (13)
Stuff the rest of the arm now. Add any additional stuffing after the next round.
Round 21: *Dec* 6 times, Sc in the last st (7)
Finish off, leaving a long tail for sewing.
We will make the other arm now and then sew them on!
Left Arm: (Will be brown & white)
Start in Pink
Round 1: 6 Sc into a Magic Ring (6)
Round 2: *Inc* all around (12)
Round 3: *Inc, Sc* all around (18)
Round 4: Sc in the next 4 st. Popcorn st in the next st. Change to brown and Sc in the next 4 st. Repeat *In pink Popcorn st in the next st. Change to brown and Sc in the next st* 3 times. Sc in the next 3 st (18)
Round 5-7: *Sc* all around (18)
Round 8: Sc in the next 12 st, *Dec* 1 time, Sc in the next 4 st (17)
Round 9: Sc in the next 9 st, *Dec* 3 times, Sc in the next 2 st (14)
Round 10: Change to white. Sc in the next 9 st, *Inc, Sc in the next st* 2 times, *Inc* in the last st (17)
Stuff the foot here
Round 11: Sc in the next 9 st, *Inc, Sc in the next 2 st* 2 times, *Inc* in the next st, Sc in the last st (20)
Round 12-19: *Sc* all around (20)
Round 20: Repeat *Dec, Sc in the next st* 6 times, *Dec* 1 more time (13)
Stuff the arm here. Add any additional stuffing after the next round.
Round 21: *Dec* 6 times, Sc in the last st (7)
Finish off, leaving a long tail for sewing.
Pin the arms on now as shown. Specifically, Round 15 for the bottom of the arm and Round 11 at the top of the arm. The thumbs should point inward.
Back Folds:
In Brown
Squish a piece of the back as shown, try to not get much stuffing where you squish Insert needle with a long piece of brown yarn and sew along where you squished Repeat this for 2 more folds, getting slightly smaller in the areas that you squish Tie the ends of yarn into a knot and weave into the doll.
Tail:
In Brown
Round 1: 6 Sc into a Magic Ring (6)
Round 2: *Sc* all around (6)
Round 3: *Inc, Sc* all around (9)
Round 4: *Sc* all around (9)
Round 5: *Inc, Sc 2* all around (12)
Round 6: *Sc* all around (12)
Round 7: *Inc, Sc 3* all around (15)
Round 8: *Inc, Sc 4* all around (18)
Finish off, leaving a long tail for sewing. Pin the tail onto the back and sew on. Stuff the tail before fully sewing on.
All Finished.
Feel free to tag me (@freeamigurumii) in your photos on Instagram or Facebook if you’d like!