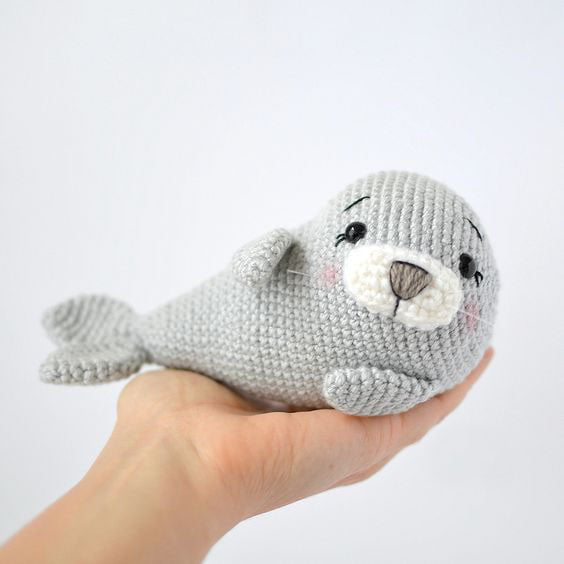
Benny the Seal Free Crochet Pattern
Hello amigurumi lovers and beautiful visitors, I wanted to share the free amigurumi patterns for you here. In my article I will share 1 pattern and how to make it for you. At the end of my article, I will share amigurumi patterns that can generate ideas for you.
YARN: Light (3) in Light Gray, White, Light Brown; Classic Cotton Thread in Black
MATERIALS: C2 – 2.75 mm Hook; Poly Filling; Two 9 mm Black Plastic Safety Eyes
DIMENSION: H. 6” x W. 3.5”
ABBREVIATIONS: magic ring (mr), stitch (st), slip stitch (sl st), single crochet (sc),
back loop only (BLO), fasten off (F/O)
SKILL LEVEL: Beginner
INSTRUCTIONS: work in rounds
(join with a sl st and ch 1 at the end of each round) unless otherwise instructed.
MUZZLE (white yarn)
Rnd 1: 7 ch, 1 sc inc into the 2nd ch from the hook, 1 sc inc, 2 sc, 1 sc inc, 2 sc inc into the next ch, 4 sc, 1 sc inc into the last st that already contains 2 sc (18)
Rnd 2: 2 sc inc, 6 sc, 2 sc inc, 8 sc (22)
Rnd 3: working in BLO, sc even (22)
F/O and leave a long strand of white yarn to sew the muzzle to the body.
Embroider the NOSE with light brown yarn and a tapestry needle.
CAUDAL FINS (light gray yarn; make 2)
Make two:
Rnd 1: 6 sc in a mr (6)
Rnd 2: (2 sc, 1 sc inc) rep twice (8)
Rnd 3: (1 sc, 1 sc inc) rep around (12)
Rnd 4: (2 sc, 1 sc inc) rep around (16)
Round 5 – 6: sc even (16)
Rnd 7: (6 sc, 1 sc dec) rep around (14)
Rnd 8: (5 sc, 1 sc dec) rep around (12)
Rnd 9: (4 sc, 1 sc dec) rep around (10)
Rnd 10: sc dec around (5)
F/O and do not stuff the fin
Do not cut the yarn once you have completed the 2nd fin
BODY (light gray yarn)
Merge the two fins together:
Rnd 11: join the yarn with a sl st to the 1st fin you crocheted, ch 1 and sc in the same st, crochet around 4 sc, then keep working on the 2nd fin, 5 sc (10)
Rnd 12: (4 sc, 1 sc inc) rep twice (12)
Rnd 13: (2 sc, 1 sc inc) rep around (16)
Rnd 14: (3 sc, 1 sc inc) rep around (20)
Rnd 15: (4 sc, 1 sc inc) rep around (24)
Round 16 – 17: sc even (24)
Rnd 18: (5 sc, 1 sc inc) rep around (28)
Rnd 19: sc even (28)
Rnd 20: (6 sc, 1 sc inc) rep around (32)
Rnd 21: sc even (32)
Rnd 22: (7 sc, 1 sc inc) rep around (36)
Rnd 23: (5 sc, 1 sc inc) rep around (42)
Rnd 24: (6 sc, 1 sc inc) rep around (48)
Round 25 – 29: sc even (48)
Rnd 30: (11 sc, 1 sc inc) rep around (52)
Round 31 – 33: sc even (52)
Rnd 34: 28 sc, 8 sc inc, 16 sc (60)
Rnd 35: 28 sc, [(3 sc, 1 sc inc) rep 4 times], 16 sc (64)
Round 36 – 37: sc even (64)
Rnd 38: 28 sc, [(4 sc, 1 sc inc) rep 4 times], 16 sc (68); start stuffing
Round 39 – 41: sc even (68)
Rnd 42: 5 sc, 1 sc dec, 19 sc, 1 sc dec, 24 sc, 1 sc dec, 12 sc, 1 sc dec (64)
Round 43 – 44: sc even (64)
Rnd 45: 26 sc, [(4 sc, 1 sc dec) rep 4 times], 14 sc (60)
Rnd 46: sc even (60)
Rnd 47: (8 sc, 1 sc dec) rep 6 times (54)
Rnd 48: (7 sc, 1 sc dec) rep 6 times (48)
Rnd 49: (4 sc, 1 sc dec) rep around (40)
At this point, pin the muzzle to the body in the desired position and identify the spots where you’d like the eyes to be placed (just to give you a reference, I inserted the 1st eye between rnds # 37-38 and the 2nd one between rnds # 48-49). Insert the safety eyes and secure them with the back pieces. Remove the muzzle – it will be sewn later on onto the body once completed.
Rnd 50: (3 sc, 1 sc dec) rep around (32)
Rnd 51: (2 sc, 1 sc dec) rep around (24)
Rnd 52: (2 sc, 1 sc dec) rep around (18)
finish stuffing the body firmly
Rnd 53: (1 sc, 1 sc dec) rep around (12)
Rnd 54: sc dec around (6)
F/O and wave in end
Embroider the EYEBROWS and the EYELASHES with black cotton thread.
Embroider a contour around the nose and the line below it with black cotton thread.
PECTORAL FINS (light gray yarn; make 2)
Rnd 1: 6 sc in a mr (6)
Rnd 2: (2 sc, 1 sc inc) rep twice (8)
Rnd 3: (3 sc, 1 sc inc) rep twice (10)
Rnd 4: (4 sc, 1 sc inc) rep twice (12)
Rnd 5 – 6: sc even (12)
Rnd 7: (4 sc, 1 sc dec) rep around (10)
Rnd 8 – 9: sc even (10)
F/O and leave a long strand of yarn to sew the fin to the main body; do not stuff the fin.
Sew the right fin between rounds # 24-30, the left one between rounds # 39-44.
If you’d like to add more details to the seal:
· apply some blush to the cheeks using a little make-up brush,
· create the whiskers inserting little strands of nylon thread into the muzzle.