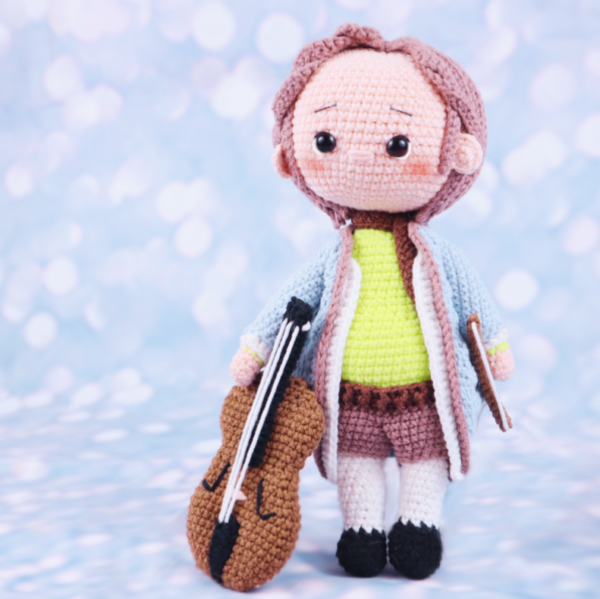
Bach Musical Composer Amigurumi Doll
Hello amigurumi lovers and beautiful visitors, I wanted to share the free amigurumi patterns for you here. In my article I will share 1 pattern and how to make it for you. At the end of my article, I will share amigurumi patterns that can generate ideas for you.
Supplies:
• Yarn 2/Fine Weight Yarn in…
Skin color, light yellow for shirt, white, blue for jacket, light brown for pants and hair, dark brown for pants and scarf
• 2mm Crochet Hook
• 8mm safety eyes
•Tapestry needle
•Scissors
•Stuffing
•Black Embroidery Thread
•Pipecleaner
•Wire for moving arms & stable head
•Fabric glue for toy’s hair
•Red or pink acrylic paint for blush
•Makeup brush for blush
Additional Information:
Difficulty: Advanced
• Supplies information
You must use a small size yarn for this doll. If you use a medium/4 weight yarn, your doll will come our very big. I used Yarn Art jeans for the entire doll. You can find similar yarn. I recommend a cotton or cotton blend yarn. Hobbii’s 8/4 cotton yarn is similar and affordable. You will need wire for the body, I found my inexpensive wire in the floral section at JoAnn Fabrics in a pack. You can use a dowel or chop stick for the head stabilixation instead, but you can’t put the doll in the dryer if you did that.
• About the pattern
This pattern is very detailed and takes a lot of time, but it’s very well worth it! There is very little sewing involved in the doll itself. This is my first “realistic” doll pattern, if you like it please let me know and I can make more
• How to get the clean “x” single crochet
There’s a technique when it comes to making the perfect “x” looking single crochet. View below to see the “x” single crochet tutorial.
How to do the “x” single crochet stitch:
Insert hook into the next stitch yarn under by having your hook above the yarn pull the yarn through you will have 2 loops on your hook, make sure these loops are the same height as shown
Now yarn over as you usually do Pull the yarn through both loops Done!
Important note: You must have tight tension when yarning under and bringing that yarn under through the stitch. Your yarn over should also have tight tension, but not AS tight as your yarn under tension. This is what I’ve found works for me to get the perfect “x” shape.
A quick overview…
We start by making the two legs of the doll. After we make each leg, we’ll crochet them together. This will start to lead into the body as one piece. From the body, we’ll also crochet the arms on, and then form the head. The legs, body, arms, and head are all crocheted together in one piece!
Bacaklar: (2 yap)
Start in black
Round 1: 6 Sc into a magic ring (6)
Round 2: *Inc* all around (12)
Round 3: Sc in the next 5 st, *Inc* in the next 2 st, Sc in the next 5 st (14)
Round 4-6: *Sc* all around (14)
Round 7: Sc in the next 5 st, *Dec* 2 times, Sc in the next 5 st (12)
Round 8: Sc in the next 4 st, *Dec* 2 times, Sc in the next 4 st (10)
Stuff the shoe firmly now. Stuff the leg gradually after every few rounds.
Round 9-11: Change to white. *Sc* all around (10)
Round 12: Repeat *Inc, Sc in the next 4 st* 2 times (12)
Round 13-19: *Sc* all around (12)
Round 20: Repeat *Inc, Sc in the next 5 st* 2 times (14)
Round 21: *Sc* all around (14)
Finish off ONLY the first leg and stuff. Don’t finish off the second leg, instead continue onto the next round:
Round 22: Sc in the next st. Ch 3 Take the first leg we made and count 5 stitches to the right of the stitch marker Sc in that 5th st Continuing on that first leg, Sc in the remaining 13 st Now we meet the chain.
Sc along the next 3 st of the chain Now we meet the second leg, Sc in the next 13 st of that leg
(Stitch Count: 28 stitches from both legs, 6 chain stitches from both sides of the chain. In total: 34 stitches all around)
Round 23: Sc in the next st. Now we meet the chains, Sc in the next 3 ch Now we meet the left leg, Sc in the next 14 of the leg . Now we meet between the legs, Sc in the next 3 between legs (34)
Now we meet the other leg, Sc in the next 13 st of leg
Round 24-26: *Sc* all around (34)
In the next round we will be working on the body/shirt part.
Round 27: Change to yellow. In the BLO *Sc* all around (34)
Round 28: Repeat *Inc, Sc in the next st* 6 times. Sc in the next 18 st. *Inc, Sc in the next st* 2 times. (42)
Round 29-34: *Sc* all around (42)
Round 35: *Dec, Sc in the next 2 st* 4 times. Sc in the next 22 st. *Dec, Sc in the next 2 st* 1 time (37)
Round 36: *Sc* all around (37)
Round 37: Repeat *Sc in the next 2 st, Dec* 2 times. Sc in the next 29 st (35)
Round 38: *Sc* all around (35)
Round 39: Sc in the next 4 st. *Dec* 1 time. Sc in the next 29 st (34)
Round 40-42: *Sc* all around (34)
Stuff the body firmly now. Stop here. Make the arms as mentioned below. After making the arms, continue onto Round 43. On this next round, we will crochet the arms to the body.
Silahlar: (2 yap)
Ten Renginde
Round 1: 8 Sc into a Magic Ring (8)
Round 2-4: *Sc* all around (8)
Stuff the arm here. Continue stuffing after every 2 rounds. You can use the end of a crochet hook to help get the stuffing in.
Round 5-20: Change to yellow. *Sc* all around (8)
Finish off. Weave in ends. We will now crochet these arms to the body.
Round 43: Sc in the next 11 st Take 1 arm and line the stitches up to the body.
Going through BOTH the arm and body, Sc in the next 4 st Continuing on the body, Sc in the next 15 st Line up the second arm to the body. Going through BOTH the arm and body, Sc in the next 4 st
(Stitch count: 34, don’t count the 4 stitches that connected the arm to the body. Count the 4 stitches on the outside of the arm)
Round 44: Sc in the next 11 st. Now we meet the arm Sc in the next 4 st on the OUTSIDE of the arm, not the part where we crocheted the arm to the body Continuing on the body, Sc in the next 15 st Now we meet the second arm. Sc in the next 4 st on the OUTSIDE of the arm. all around (34)
Round 45: *Dec* 1 time, Sc in the next 7 st. Repeat *Dec, Sc in the next st* 3 times. Sc in the next 10 st. Repeat *Dec, Sc in the next st* 2 times. (28)
Şimdi başını sabitlemek ve kolları hareket ettirmek için bebeğin kollarına ve boynuna tel yerleştireceğiz.
Şimdi orta ve iki uç parçaya sahip olacaksınız. Uç parçalarını yukarı kaldır, bunlar kollar için olacak. Uçları bükün, böylece tel kollardan dışarı çıkmaz Telin sol ucunu sol kola , telin sağ ucunu sağ kola yerleştirin ve orta tel başın oluşacağı yer olacaktır
46. Raunt: *Ara* 1 kez, Sc sonraki 6 st. *Ara* 3 kez, sonraki 10’da Sc. *Ara* 2 kez (22)
47. Raunt: *Ara, Sc’yi sonraki st* 7 kez tekrarlayın. Son st’de sc (15)
Şimdi vücudu tekrar doldurun.
48. Tur: *Ara’yı 2 kez, Sc’yi sonraki st* 3 kez tekrarlayın (9)
Sonraki turlarda başı oluşturmaya başlayacağız.
49-51. Tur: Ten rengine geçin. *Sc* her yerde (9)
52. tur: *Ar* her yerde (18)
53. tur: *Ar, sc 2* her yerde (24)
54. tur: *Ar, sc 3* her turda (30)
55. tur: *İnc, Sc 4* her yerde (36)
Tur 56: *İnc, Sc 5* her yerde (42)
57. Tur: *Ak, Ak 6* her yerde (48)
58. Tur: *Ak, Ak 7* her yerde (54)
59. Tur : *Ak, Ak 8* her yerde (60)
60-73. Tur: *Ak* her yerde ( 66)
64 ve 65 raunt arasına 8 ilmek arayla emniyet gözleri ekleyin.
Round 74: *Dec, Sc 9* all around (60)
Round 75: *Dec, Sc 8* all around (54)
Round 76: *Dec, Sc 7* all around (48)
Round 77: *Dec, Sc 6* all around (42)
Round 78: *Dec, Sc 5* all around (36)
Round 79: *Dec, Sc 4* all around (30)
Stuff the head firmly here. Continue stuffing after each round.
Round 80: *Dec, Sc 3* all around (24)
Round 81: *Dec, Sc 2* all around (18)
Round 82: *Dec, Sc* all around (12)
Round 83: *Dec* all around (6)
Finish off and sew closed. Weave in ends.
Facial Features…
Now let’s make his face! There are 3 different things we need to do for his face. First, we have to add the whites of his eyes, then we have to do this eyebrows, blush, eyelashes, and nose!
Eye Whites:
In white
Insert needle with yarn close to the eye and pull needle into the top right corner of the right eye Reinsert needle into the inner left corner of the right eye Pull needle out at the top left corner of the left eye Reinsert needle into the inner right corner of the left eye Pull needle out at the original insertion spot Tie ends firmly and weave into the toys’ head.
Blush:
Use small makeup brush and acrylic paint
Dab a small amount of pink or red acrylic yarn onto a plate. Dab your brush into the paint Rub off most of the paint onto a paper towel, leaving almost none left on the brush You can see how much comes off the brush and onto a paper towel
Now, lightly go over a cheek area with the brush. Swipe over an area only a few times You can always add more but you can’t take blush away! Repeat this for the other cheek
Eyelashes and eyebrows:
In black embroidery thread
Insert needle with black embroidery thread into a stitch near the toy’s right eye, and pull needle out at the top left corner of the left eye as shown Reinsert needle into the middle right area of the right eye as shown Pull needle out 3 stitches directly up as shown Reinsert needle 3 stitches to the left, and 1/2 stitch up as shown
Pull needle out 6 stitches to the left Reinsert needle 3 stitches to the left and 1/2 a stitch down as shown Pull needle out at the top right corner of the left eye as shown Reinsert needle into the middle left area of the left eye as shown Pull needle out at any nearby stitch. Tie the ends of thread into firm knots and bring into the toy’s head to hide. Cut any excess yarn.
Nose:
In Skin Color Yarn
Place skin color yarn on a sewing needle. Insert needle into the toy’s head, 2 stitches left of the right eye. Pull needle a total of 3 stitches over Reinsert the needle into the same right side of the nose Pull needle out 3 stitches to the left, at the same left side of the nose This makes 1 strand of yarn as the nose. Repeat this two more times. Tie the ends of yarn into firm knots and bring into the toy’s head to hide. Cut any excess yarn.
Jacket:
In Light Blue
Row 1: Ch 19. Skip the first 2 chains from the hook (This will count as your first Dc). Dc in the 3rd ch from the hook. Dc in the next next 16 st (18)
Row 2: Turn. Repeat *1 Dc in the next 2 st, Dc 2 times in the next st* 6 times (24)
Row 3: Turn. Repeat *1 Dc in the next 3 st, Dc 2 times in the next st* 6 times (30)
Row 4: Turn. Repeat *1 Dc in the next 4 st, Dc 2 times in the next st* 6 times (36)
Row 5: Turn. Repeat *1 Dc in the next 5 st, Dc 2 times in the next st* 6 times (42)
Row 6: Turn. Repeat *1 Dc in the next 6 st, Dc 2 times in the next st* 6 times (48)
Row 7-9: Turn. Dc in the next 48 st (48)
Row 10: Turn. Repeat *Dc decrease, Dc in the next 6 st* 6 times (42)
Row 11-12: Turn. Dc in the next 42 st (42)
Row 13: Turn. Repeat *Dc decrease, Dc in the next 5 st* 5 times (36)
Row 14: Turn. Repeat *Dc decrease, Dc in the next 4 st* 5 times (30)
In the next round we will make 2 spaces for the arm holes. Later we will crochet into those arm holes to form the sleeves.
Row 15: Turn. Dc dec 1 time. Dc next st. Ch 7, skip the next 5 st. Dc into the next st. This forms an arm hole Dc into the next 13 st. Ch 7, skip the next 5 st. dc next st. dc dec 1 time (32)
Row 16: Turn. Dc in the first st. *Dc Dec 1 time, Dc in the 4* 5 times. Dc in the last st (27)
Now we’re going to spice up the jacket by adding some extra trim! There is no exact pattern for this, as it’s more of a technique. Follow along to see how to do this for your doll.
Jacket Trim:
In jacket color
Continuing with the same yarn, *Sc* all around the outside edge of the jacket. This will make the outside edges look cleaner and help us add additional trim to the jacket. This part doesn’t need to be perfect, just single crochet along the entire outside edge of the jacket. Now you will see that we have a single crochet border around the jacket.
Brown Jacket Trim:
In Light Brown
We will now work this trim in the FLO (Front Loop Only). Attach brown yarn in the FLO to the bottom right corner on the front of the jacket. Single crochet up towards the arm hole. Once we meet the edge of the collar, make 3 Sc into 1 stitch. Continue along the collar making only 1 Sc into each stitch. Now we will meet the collar on the left side. Make 3 Sc into the edge of the collar. Continue down the jacket, making only 1 Sc down. Stop crocheting once you meet the bottom corner, don’t crochet at the back edge of the jacket.
White Jacket Trim:
In White
Remember how we just worked in the front loops? Now we still have back loops left – we’re going to work in those back loops this round! Attach white yarn in the BLO to the bottom right corner on the front of the jacket, like we did previously. Ch 2. Dc up the jacket, towards the arms, for about 26 stitches. Hdc in the next st, SlSt in the next st. Finish off now. Repeat this exact pattern for the left side of the jacket. Finish off and weave in ends.
Jacket Sleeves:
In Jacket Color
Attach jacket color yarn into the arm hole space we left in the jacket. The jacket’s arm holes has 12 stitches in it. We will crochet entirely around the arm hole using those 12 stitches (7 of them are at the top of the arm hole and 4 of them are at the armpit, bottom arm hole area).
Round 1-13: *Sc* all around (12)
Round 14: In the FLO (Front Loop Only), *Sc* all around (12)
In the next round we will create a cuff.
Round 15: Change to white here. Now we will work in the back loops that are left from Round 14. In the BLO, *Dc* all around (12)
Finish off and weave in ends.
NOTE: If Round 15 is hard to do, flip Round 14’s stitches outwards towards you. This will better expose the back loops, making them easier to crochet into. Once done with Round 15, flip Round 14’s stitches back to normal.
Pants:
In Light Brown
Round 1: Ch 20. Sc to very first Ch made. This will form a circle. Be extra sure to make sure you don’t twist this chain! (20)
Round 2: *Sc* all around (20)
Round 3: *Inc, Sc in the next st* all around (30)
Only do the next 2 rounds for the first leg ONLY.
Round 4-5: *Sc* all around (30)
Finish off the first pant leg now. DON’T finish off the second pant leg, instead continue on with the following rounds:
Pant Leg #2, Round 4: *Sc* all around (30)
In the next round we will crochet the pant legs together to form the pants. If you need a visual on crocheting things together, please refer back to when we crocheted the arms to the body!
Round 5: Sc in the next 12 st. Line up the 1st pant leg to second pant leg, making sure the stitches align. Going through BOTH the first and second pant leg’s stitches, Sc in the next 8 st. Continuing on the second leg, Sc in the next 10 st (44 stitches around, 8 stitches in the middle)
Round 6-7: *Sc* all around (44)
Round 8-9: *FpDc in the next st, BpDc in the next st* all around (44)
NOTE: View below to see how to do a FpDc and a BpDc.
Finish off, leaving a long tail for sewing. Place the pants onto the toy’s legs and sew on.
How to do a front post double crochet:
Yarn over Insert hook through the next double crochet by inserting your hook from the right side of the double crochet, over to the left Yarn over
Pull yarn through You will have 3 loops on your hook Yarn over and pull through two loops. You will now have 2 loops left on your hook Yarn over and pull through those remaining two loops
How to do a back post double crochet:
Yarn over Insert hook through the back of the next double crochet by inserting your hook to the right side of the double crochet , over to the left and above the double crochet Yarn over
Pull yarn through You will have 3 loops on your hook Yarn over and pull through two loops. You will now have 2 loops left on your hook Yarn over and pull through those remaining two loops This makes a Back post double crochet!
Scarf:
In Dark Brown
Row 1: Ch 42. Sc in the 2nd Ch from the hook. Sc in the next 40 st (41)
Row 2: Ch 1 & turn. Sc in the next 41 st (41)
Finish off now, leaving a tail of yarn for sewing. Place the scarf on the doll as shown Bring both ends to his back Bring the right piece over his shoulder as shown Continue bringing this strand to the front Sew on.
Hair:
In Light Brown
Round 1: 6 Sc into a Magic Ring (6)
Round 2: *Inc* all around (12)
Round 3: *Inc, Sc* all around (18)
Round 4: *Inc, Sc 2* all around (24)
In the next round we will create hair strands by making a chain, working down that chain, and crocheting back onto the circle of Round 2. We will repeat this all around for a total of 24 different hair strands. There are 4 different types of strands depending on their length. There is A, B, C, and D. This is to help make the pattern easier to understand and keep track of the strands better.
Hair Strands A
Repeat hair strands A for a total of 2 times to make a total of 2 hair strands:
Ch 23 SlSt in the 2nd Ch from the hook. SlSt in the next st, Sc in the next 20 st Now make 1 Sc into the next stitch on the circle (Stitch count: 2 A strands, 22 st on each 1 strand, 1 sc between each strand)
Hair Strands B
Repeat hair strands B for a total of 18 times: Ch 26. Sc in the 2nd Ch from the hook. Sc in the next 24 st. Now make 1 Sc into the next stitch on the circle. (Stitch count: 18 B strands made, 25 st on each 1 strand, 1 Sc between each strand)
Hair Strands C
Repeat hair strands C for a total of 2 times to make a total of 2 hair strands:
Ch 23. SlSt in the 2nd Ch from the hook. SlSt in the next st, Sc in the next 20 st. Now make 1 Sc into the next stitch on the circle. (Stitch count: 2 C strands made, 22 st on each 1 strand, 1 sc between each strand)
Hair strand D
Ch 8. Sc in the 2nd Ch from the hook. Sc in the next 6 st. Now make 1 Sc into the next stitch on the circle.(Stitch Count: 1 D strand made, 7 st on this 1 strand, 1 sc is after the strand)
Hair strand E
Ch 6. Sc in the 2nd Ch from the hook. Sc in the next 4 st. Now make 1 Sc into the next stitch on the circle.(Stitch Count: 1 E strand made, 5 st on this 1 strand, 1 sc is after the strand)
Total hair stitch count: 24 Strands made. 2 short strands, 4 medium strands, 18 long strands. Now we finished making the hair! Let’s pin each strand on and learn how to attach it to the head.
Hair Assembly:
Pin the hair to the doll, the center of the hair should match to the center of the head. The 2 shortest strands (the last 2 strands we made) will be at the middle, front of the face. We will start by pinning down the hair strands at the right of the face. First, skip the first 2 long hair strands we made. Take the 3rd long hand strand and pin it down at the side of the head Pin down the next hair strand Pin down the following hair strands Repeat this until you meet the last 2 long hair strand – don’t pin down those strands yet! You’ll have a 4 long hair strands left, and 2 short strands left
Pin the 2 shortest strands back as shown We’re now going to work with the 2 strands on the right Place the left strand over the right Place the left strand over the right Take the left piece and pin it over to the right as shown The left piece will go straight down as a sideburn
Now we’re working on the left 2 strands Place the right piece over the left Place the right piece over the left again Place the right strand straight down as a side burn Place the left strand over as shown.
Ears: (Make 2)
In Skin Color
Round 1: 6 Sc into a Magic Ring (6)
Round 2: *Inc, Sc* all around (9)
Finish off, leaving a long tail for sewing. Pin the ear between the 2 strands of the hair as shown. Make sure the ear is slightly lower than the eyes, and match the other ear placement. Sew on and weave in ends.
Attaching Hair:
You can sew the hair on, however I find that gluing the hair on is much easier and cleaner than sewing it on. You can use E600 glue, but fabric glue will stick best. Unpin the third long strand of hair Apply glue to the bottom of the strand You don’t need to apply too much, you don’t want glue to come out the sides. Place the strand back onto the same area, pressing your finger over the strand to secure Place a pin at the bottom of the strand to hold as it dries Repeat this with all of the strands.
Cello:
In dark brown or bowny/red yarn
The cello will be made by making a chain. We will work down the chain entirely, turn to the other side of the chain where UNWORKED stitches are, and continue crocheting down that other side. This will form a round. Pictures below show how to do this – even though it’s in a different color it shows the technique!
Round 1: Ch 9 Sc 3 tines in the 2nd Ch from hook Sc in the next 6 st. Sc 3 times in the next st. Now we meet the end of the chains Turn to the other side of the chain where we haven’t made any stitches yet Sc in the next 6 st (18)
Round 2: *Sc* all around (18)
Round 3: Repeat *Inc in the next 3 st, Sc in the next 6 st* 2 times (24)
Round 4: Repeat *Inc, Sc in the next st* 3 times. Sc in the next 6 st. Repeat *Inc, Sc in the next st* 3 times. Sc in the next 6 st (30)
Round 5: *Sc* all around (30)
Round 6: Sc in the next 2 st. Repeat *Inc, Sc in the next 2 st* 3 times. Sc in the next 6 st. Repeat *Inc, Sc in the next 2 st* 6 times. Sc in the next 4 st (36)
Round 7-11: *Sc* all around (36)
Round 12: Sc in the next 4 st. Repeat *Dec, Sc in the next 2 st* 3 times. Sc in the next 6 st. Repeat *Dec, Sc 2* 3 times. Sc in the last 2 st (30)
Round 13: *Sc* all around (30)
Round 14: Sc in the next 3 st. Repeat *Dec, Sc in the next st* 3 times. Sc in the next 6 st. *Dec, Sc in the next st* 3 times. Sc in the next 3 st (24)
Round 15: *Sc* all around (24)
Round 16: Sc in the next 3 st. *Dec* 3 times. Sc in the next 6 st. *Dec* 3 times. Sc in the next 3 st (18)
Round 17: *Sc* all around (18)
Round 18: Sc in the next 4 st. *Inc* 3 times, Sc in the next 6 st, *Inc* 3 times, Sc in the next 2 st (24)
Round 19: *Sc* all around (24)
Round 20: Sc in the next 4 st. *Inc, Sc in the next st* 3 times. Sc in the next 6 st. *Inc, Sc in the next st* 3 times. Sc in the next 2 st (30)
Now we will add cardboard into the cello. This will make it stable and not floppy. Stuffing will make the cello look odd, so for the best look follow the next steps.
Place the cello onto cardboard and trace around it. Cut out around the outline. Now, trace 2 lines where shown and cut along those 2 lines. Place the cardboard into the cello. Continue crocheting the cello.
Cello: (Continued)
Round 21-23: *Sc* all around (30)
Round 24: Sc in the next 4 st. *Dec, Sc in the next st* 3 times. Sc in the next 6 st. *Dec, Sc in the next st* 3 times. Sc in the next 2 st (24)
Round 25: Sc in the next 4 st, *Dec* 3 times, Sc in the next 6 st, *Dec* 3 times, Sc in the next 2 st (18)
Round 26: *Dec, Sc in the next st* all around (12)
Round 27: *Dec* all around (6)
Finish off, leaving a long tail for sewing. Sew the remaining stitches closed and weave in ends.
Cello Bottom Strip:
In Black
Row 1: Ch 11. Skip the next 4 ch. Trc in the 5th ch from the hook. Trc in the next st, Dc in the next 2 st, Hdc in the next st, Sc in the next st, SlSt in the next st (Stitch Count: 8, Ch 4 counts as 1 Trc st) Place onto the cello as shown, and sew on. Make sure to only insert your sewing needle through the stem and only the top layer of the cello. Don’t insert your needle through the cardboard. Once fully sewn on, weave in ends.
Cello Stem: (Make 2)
In Black
Row 1: Ch 24, Sc in the 2nd Ch from the hook. Sc in the next 22 st (23)
Row 2: Ch 1 & Turn. Sc in the next 23 st (23)
Finish off and leave a long tail for sewing on only 1 of the cello stem pieces. Line up the stems together and sew them together to form 1 sturdy stem piece Place onto the cello as shown, and sew on. Make sure to only insert your sewing needle through the stem and only the top layer of the cello, don’t insert your needle through the cardboard Once fully sewn on, weave in ends.
Strings:
In White
Insert needle with long piece of white yarn into the top left of the stem Insert needle into the bottom piece and pull out 1 stitch over Reinsert needle into the next stitch on the top stem
Insert needle into the next stitch of the bottom piece Tie a knot at the top of the stem with the tail end of yarn, then pull the thread to the other side Tie another knot Weave in ends.
Bridge:
In cream colored yarn
Insert needle into the middle of the cello and pull needle out 3 stitches to the left Reinsert into the first area and pull out at the left Repeat this one more time Weave in ends.
Detail:
In Black
Insert needle only through the top layer, NOT through the cardboard.Insert needle where shown Reinsert needle and pull out where shown, making sure the needle lands ABOVE the yarn Insert needle into the same area, making sure the yarn lands ABOVE the needle Weave in ends.
Cello Bow:
In Light Brown
Row 1: Ch 17. Dc in the 2nd Ch from the hook. Dc in the next 15 st (16)
Finish off and leave a tail for sewing. Place a small pipecleaner and fold the piece over the pipecleaner. Sew closed. Thread white yarn from the tip to the other end and weave in the white yarn ends. Place into his hand and sew on.
All Finished.
Feel free to tag me (@freeamigurumii) in your photos on Instagram or Facebook if you’d like!