Azumarill Amigurumi Free Pattern
Hello amigurumi lovers and beautiful visitors, I wanted to share the free amigurumi patterns for you here. In my article I will share 1 pattern and how to make it for you. At the end of my article, I will share amigurumi patterns that can generate ideas for you.
Materials :
2mm hook
Stylecraft Special DK in Turquoise, White, and Black
Black embroidery floss
6mm black safety eyes
Pink and White felt
Black pipe cleaner for the tail (approximately 30cm)
Polyester toy filling
Pins to place pieces before sewing together
Darning needle
Stitch markers (I prefer using scrap yarn as “stitch markers”)
Size
Azumarill is approximately 13cm tall, and 6.5 cm in width (excluding arms), and approximately 16-17 cm from front to the tip of the tail – but this will vary depending on your zig zag tail.
Weight: 50grams (this includes all materials used in making Azumarill)
Stıtches & Abbrevıatıons – Uk Englısh
dc double crochet
sl st slip stitch
st/sts stitch/es
inc dc 2 in one st
dec decrease; insert hook in the front loop of the next two sts, yarn over, pull through both loops, y.o. and pull through remaining two loops –> one dc placed into two sts
htr half treble
Assembly
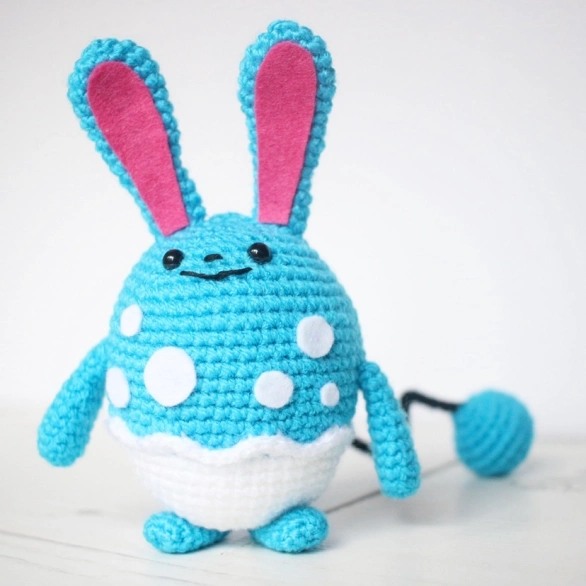
Assemble in the order of the below pieces. I would recommend using a photo of Azumarill as reference for best possible outcome.
Use black embroidery floss to sew on nose and smile.
Cut out two pieces of pink felt for the ears. Cut out 10 round and oval pieces of white felt in various sizes as seen on Azumarill photos. I would recommend glueing the felt pieces onto the ears and body once all the limbs have been sewn onto the body.
The Pattern
The Body & Head
The head and body will be worked as on piece from bottom to top.
Yarn: White
Round 1: dc 6 in Magic Ring (6)
R2: Inc in all sts around (12)
R3: (dc, inc) x 6 (18)
R4: (dc 2, inc) x 6 (24)
R5: (dc 3, inc) x 6 (30)
R6: (dc 9, inc) x 3 (33)
R7: (dc 10, inc) x 3 (36)
R8: (dc 11, inc) x 3 (39)
R9: (dc 12, inc) x 3 (42)
R10: (dc 13, inc) x 3 (45)
R11: (dc 14, inc) x 3 (48)
Make note of colour changes in the next steps:
R12: working in the front loops of R11 only: (htr, 2htr in one st, htr, sl st in the next three sts) x 8 (56), You have now created the white wavy pattern of Azumarill. – fasten off the White yarn.
R12: working in the back loops of R11 only: attach Turquoise yarn in first back loop, dc in same st, and dc in each of the remaining 47 back loops (48)
Continue using Turquoise in the remaining rounds
R13: dc 48
*In the next round (R14) every second and third st will be worked into loop in the back of the white htr of R12 as well as the turquoise st of R13. This is to flatten the white wavy pattern onto the main body.
R14: (dc, *dc in the back of white st as well as turquoise st twice, dc 3) x 8 (48)
R15-21: dc 48
R22: (dc 14, dec) x 3 (45)
R23: (dc 13, dec) x 3 (42)
R24: (dc 12, dec) x 3 (39)
R25: (dc 11, dec) x 3 (36)
R26: (dc 10, dec) x 3 (33)
R27: (dc 9, dec) x 3 (30)
Place Azumarill’s eyes next. First eye in the 18th st between rows 25 and 26,, and the second eye in the 24th st between rows 25 and 26.
Start stuffing Azumarill’s body and head firmly
R28: (dc 3, dec) x 6 (24)
R29: (dc 2, dec) x 6 (18)
Add more stuffing if needed
R30: (dc, dec) x 6 (12)
R31: dec x 6 (6)
Fasten off and weave in loose end.
Ears
Yarn: Turquoise
Make 2
Round 1: dc 5 in Magic Ring (5)
R2: Inc in all sts around (10)
R3: (dc, inc) x 5 (15)
R4-6: dc 15
R7: (dc 3, dec) x 3 (12)
R8-10: dc (12)
R11: (dc 2, dec) x 3 (9)
R12-16: dc 9
Fasten off and leave long end for sewing.
Arms
Yarn: Turquoise
Make 2
ch 3 – we will be working in the round around these chains
Round 1: dc in second ch from hook, inc in next st, dc on the other side of the same ch, inc in last ch (6)
R2: (inc, inc, dc) x 2 (10)
R3-7: dc 10
Stuff lightly in the tip of the arms only
R8: (dc 3, dec) x 2 (8)
R9-11: dc 8
Fasten off and leave long end for sewing.
Feet
Yarn: Turquoise
Make 2
ch 3 – we will be working in the round around these chains
Round 1: dc in second ch from hook, inc in next st, dc on the other side of the same ch, inc in last ch (6)
R2: (inc, inc, dc) x 2 (10)
R3-8: dc 10
R9: dec x 5 (5)
Fasten off and leave long end for sewing. Weavve in end by inserting needle into front loops of the five sts and tighten.
Tail Ball
Yarn: Turquoise
Round 1: dc 6 in Magic Ring (6)
R2: Inc in all sts around (12)
R3: (dc, inc) x 6 (18)
R4: dc 18
R5: (dc 2, inc) x 6 (24)
R6: dc 24
R7: (dc 2, dec) x 6 (18)
R8: 18
Stuff ball firmly
R9: (dc, dec) x 6 (12)
R10: (dec) x 6 (6)
Fasten off and weave in end.
Zig Zag Tail
Yarn: Black
Insert the pipe cleaner around a dc of row 6 in the back of Azumarill. Pull through and fold in half. Pipe cleaners seem to come in different variations of ‘fluffiness’, so I would reccoment trimming it down a little if it’s very fluffy.
Attach the black yarn with a slip stitch in the same stitch you inserted the pipe cleaner. dc around the pipe cleaner until 1 cm of the pipe cleaner remains, fasten off. Insert the remaining pipe cleaner into the tail ball and sew the two together. Once all ends are sewn in fold the tail to create a zig zag look, and voilá! Azumarill is done!
Alternatively check out the slightly different instructions & step-by-step photos I used in my Marill pattern here.
Finished!