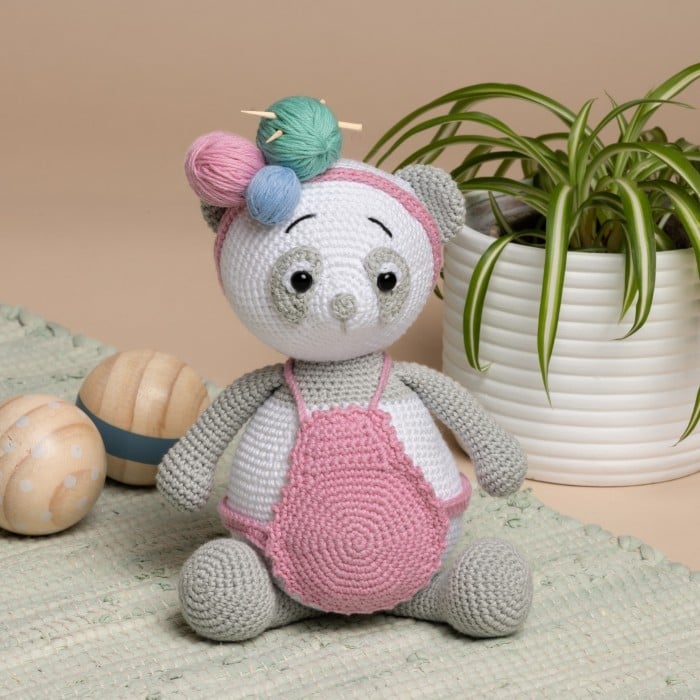
Amigurumi Panda Free Pattern
Hello amigurumi lovers and beautiful visitors, I wanted to share the free amigurumi patterns for you here. In my article I will share 1 pattern and how to make it for you. At the end of my article, I will share amigurumi patterns that can generate ideas for you.
Skill level: Intermediate
Crochet hook: 2.50 mm
Measurements: Approx. 24 cm (9.4 inches)
Materials: A piece of black scrap yarn for the eyebrows, a piece of scrap yarn in 3 different colors for the ribbon, 2 safety eyes 8 mm, 1 wooden button 12 mm, 2 matches (or something else) for knitting needles in the ribbon, fiberfill
Note: We recommend not to use matches if the product is for babies/children
Yarn: Rainbow Cotton 8/4
White (#001) – 1 skein
Light Grey (#016) – 1 skein
Rose (#044) – 1 skein
Abbreviations:
ch = chain
sc = single crochet
sl st = slip stitch
mr = magic ring
hdc = half double crochet
inc = increase – 2 stitches in the same stitch
dec = decrease – 2 stitches together
rnd(s) = round(s)
(xx) = Number of stitches after ended round
Info and tips:
Always stuff the head and body firmly.
Always stuff between head and body as you sew the head on to avoid a wobbly head.
Work tightly to avoid holes between the stitches.
Arm
In Light Grey, make 2
Rnd 1: 6 sc in a mr
Rnd 2: (inc) 6 times (12)
Rnd 3: (1 sc, inc) 6 times (18)
Rnds 4-7: 1 sc in each st (18)
Stuff the hand and the arm lightly as you work.
Rnd 8: (dec) 5 times, 8 sc (13)
Rnds 9-23: 1 sc in each st (13)
Fasten off.
The white part around the eye
In White, make 2
Rnd 1: 4 sc in a mr
DON’T tighten the loop and leave a tail long enough for assembling.
Alternatively, you can embroider a white edge around the eye.
The grey part of the eye
In Light Grey, make 2
Ch 1 to turn the work after each ended row.
Row 1: Ch 4, turn
Row 2: begin in the 2nd chain from the hook, (inc) 3 times, ch 1, turn (6)
Row 3: (inc) 6 times, ch 1, turn (12)
Row 4: make an edge around the entire eye working 1 sc in each st and 2 sc in each corner (19)
Fasten off and leave a tail long enough for sewing.
Attach the safety eye at the edge of the grey part of the eye 3 rounds below the top of the eye, be careful to make sure that the curved part points outwards.
Head
In White
Rnd 1: 6 sc in a mr
Rnd 2: (inc) 6 times (12)
Rnd 3: (1 sc, inc) 6 times (18)
Rnd 4: 1 sc in each st (18)
Rnd 5: (inc) 6 times, 12 sc (24)
Rnd 6: (1 sc, inc) 6 times, 12 sc (30)
Rnd 7: (4 sc, inc) 6 times (36)
Rnd 8: 1 sc in each st (36)
Rnd 9: (5 sc, inc) 6 times (42)
Rnd 10: (6 sc, inc) 6 times (48)
Rnd 11: (7 sc, inc) 6 times (54)
Rnd 12: (8 sc, inc) 6 times (60)
Rnd 13: (9 sc, inc) 6 times (66)
Now, attach the entire grey part of the eye together with the safety eye. Insert the safety eye
between rounds 6 and 7 on the head with 12 sc in between the eyes and approx. 6 sc
between the upper part of the grey part. Be careful to make sure that the snout points
upwards. See picture.
Place the white part around the safety eye and tighten the magic ring.
Sew the grey eye part on. See pictures.
Stuff the head as you make it.
Rnds 14-25: 1 sc in each st (66)
Rnd 26: (9 sc, dec) 6 times (60)
Rnd 27: (8 sc, dec) 6 times (54)
Rnd 28: (7 sc, dec) 6 times (48)
Rnd 29: (6 sc, dec) 6 times (42)
Rnd 30: (5 sc, dec) 6 times (36)
Rnd 31: (4 sc, dec) 6 times (30)
Rnd 32: (3 sc, dec) 6 times (24)
Rnd 33: (2 sc, dec) 6 times (18)
Rnd 34: (1 sc, dec) 6 times (12)
Rnd 35: (2 sc, dec) 3 times (9)
Fasten off and leave a tail long enough for closing the hole. Use a needle to gather the last 9 stitches in the front loop and tighten the yarn to close the hole nicely. Weave in ends.
Body
In White
Rnd 1: 6 sc in a mr
Rnd 2: (inc) 6 times (12)
Rnd 3: (1 sc, inc) 6 times (18)
Rnd 4: (2 sc, inc) 6 times (24)
Rnd 5: (3 sc, inc) 6 times (30)
Rnd 6: (4 sc, inc) 6 times (36)
Rnd 7: (5 sc, inc) 6 times (42)
Rnd 8: (6 sc, inc) 6 times (48)
Rnd 9: (7 sc, inc) 6 times (54)
Rnd 10: (8 sc, inc) 6 times (60)
Rnd 11: (9 sc, inc) 6 times (66)
Rnds 12-24: 1 sc in each st (66)
Stuff the body as you make it.
Rnd 25: (9 sc, dec) 6 times (60)
Rnds 26-27: 1 sc in each st (60)
Rnd 28: (8 sc, dec) 6 times (54)
Rnds 29-30: 1 sc in each st (54)
Rnd 31: (7 sc, dec) 6 times (48)
Rnds 32-33: 1 sc in each st (48)
Rnd 34: (6 sc, dec) 6 times (42)
Change to Light Grey
Rnds 35-36: 1 sc in each st (42)
Rnd 37: (5 sc, dec) 6 times (36)
Now, crochet the arms on this round, crochet through both layers of the arm, i.e. all 4 loops on the arm.
Rnd 38: 8 sc, 6 sc with arm, 15 sc, 6 sc with arm, 1 sc (36)
Rnd 39: 1 sc in each st (36)
Rnd 40: (4 sc, dec) 6 times (30)
Rnd 41: 1 sc in each st (30)
Fasten off and leave a tail long enough for sewing.
Leg
In Light Grey, make 2
Rnd 1: 6 sc in a mr
Rnd 2: (inc) 6 times (12)
Rnd 3: (1 sc, inc) 6 times (18)
Rnd 4: (2 sc, inc) 6 times (24)
Rnd 5: (3 sc, inc) 6 times (30)
Rnd 6: (4 sc, inc) 6 times (36)
Rnds 7-10: 1 sc in each st (36)
Rnd 11: (dec) 6 times, 24 sc (30)
Rnd 12: (3 sc, dec) 6 times (24)
Rnd 13: (2 sc, dec) 6 times (18)
Rnds 14-24: 1 sc in each st (18)
Stuff the foot firmly and the rest of the leg lightly with fiberfill.
Fasten off and leave a tail long enough for sewing.
Ear
In Light Grey, make 2
Rnd 1: 6 sc in a mr
Rnd 2: (inc) 6 times (12)
Rnd 3: (1 sc, inc) 6 times (18)
Rnd 4: (5 sc, inc) 3 times (21)
Rnds 5-7: 1 sc in each st (21)
Fasten off and leave a sufficiently long tail.
Apron
In Rose
Rnd 1: 6 sc in a mr
Rnd 2: (inc) 6 times (12)
Rnd 3: (1 sc, inc) 6 times (18)
Rnd 4: (2 sc, inc) 6 times (24)
Rnd 5: (3 sc, inc) 6 times (30)
Rnd 6: (4 sc, inc) 6 times (36)
Rnd 7: (5 sc, inc) 6 times (42)
Rnd 8: (6 sc, inc) 6 times (48)
Rnd 9: 1 sc in each st (48)
Now, crochet the front panel of the apron in rows and ch 1 to turn the work after each ended row.
Rows 10-13: 8 sc, ch 1, turn
Row 14: skip the first st, 7 sc, ch 1, turn
Row 15: skip the first st, 6 sc, ch 1, turn
Row 16: make an sc row around the entire apron (approx. 58 sc)
Row 17: skip 1 st, (1 sc, ch 2, 1 sc) in the same st, repeat all the way around.
Row 18: ch 40 for the strap which goes around the neck and attach it at the other side of the row. Fasten off and weave in ends.
Tie-strings for the apron
In Rose, make 2
Rnd 1: ch 37
Rnd 2: begin in the 3rd chain from the hook and work 35 hdc
Fasten off and leave a tail long enough for sewing.
Snout
In Light Grey
Rnd 1: 6 sc in a mr, 1 sl st
Fasten off and leave a tail long enough for sewing.
Tail
In Light Grey
Rnd 1: 6 sc in a mr
Rnd 2: (inc) 6 times (12)
Rnd 3: (1 sc, inc) 6 times (18)
Rnds 4-6: 1 sc in each st (18)
Stuff the tail lightly.
Rnd 7: (1 sc, dec) 6 times (12)
Fasten off and leave a tail long enough for sewing.
Ribbon
In Rose
Rnd 1: ch 75
Rnd 2: join into a ring in the first ch and work 74 sc
Fasten off and leave a tail long enough for sewing
Balls of yarn for the ribbon
Wind 3 balls of yarn in the colors you prefer – one approx. 3.5 cm, one approx. 3 cm and one approx. 2.5 cm
We have used 2 matches for knitting needles, the edges were smoothed off a bit with sandpaper.
Assembling
· Sew on the ears on rnd 23 with approx. 13 sc in between
· Embroider the eyebrows between rnds 11 and 12 with 6 sc in between
· Sew the snout onto the tip and embroider a stripe downwards
· Sew on the legs diagonally from rnd 3
· Sew the balls of yarn onto the head together with the ribbon
· Attach the apron and sew on the head
· Sew on the tie-strings at each side of the apron and on the back side
· Sew the button onto the tie-string on the back side of the apron
· Sew on the tail in the middle of the back side
Enjoy!