Amigurumi Jellyfish Crochet Pattern
Hello amigurumi lovers and beautiful visitors, I wanted to share the free amigurumi patterns for you here. In my article I will share 1 pattern and how to make it for you. At the end of my article, I will share amigurumi patterns that can generate ideas for you.
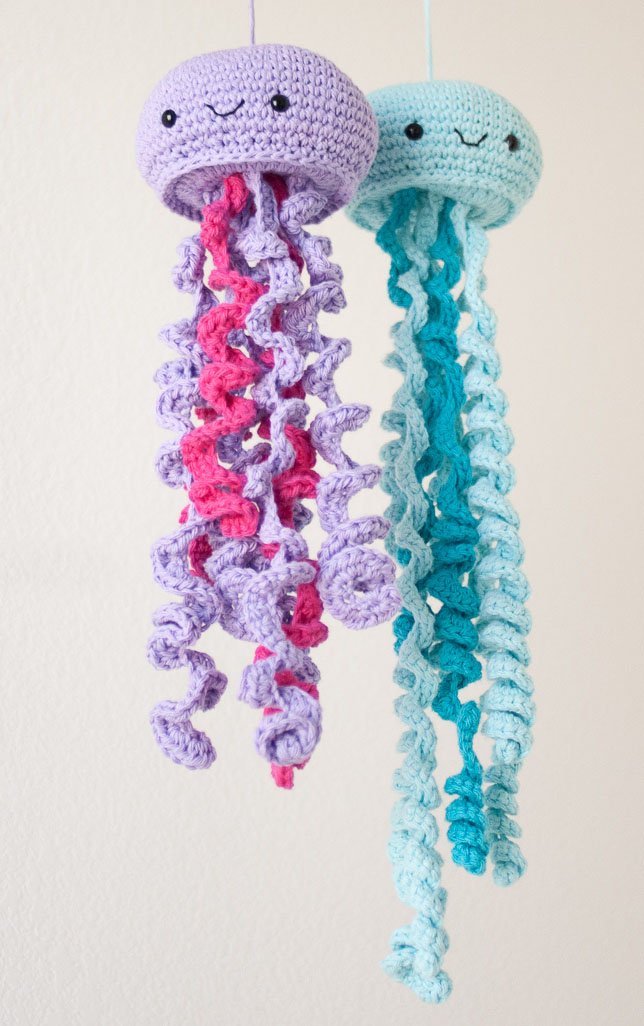
The final size of the jellyfish is about 15 to 18 inches long, with the head about 5 inches across. The length of the jellyfish is up to you and how you want to make and arrange the curly cues. I did notice that after some hard playing, my son’s jellyfish’s curly cues loosened and lengthened a bit.
Just one piece of advice/warning. If you are making this for small children, PLEASE supervise their play. These are long curly cues, and God forbid it becomes a strangulation hazard. This pattern was not designed to be dangerous, but, well, kids. So, be careful if they’re flinging it around, and especially don’t let kids sleep with their jellyfish friends. Maybe it is safer to let them hang out in the bathroom as a cute little towel.
SUPPLIES
- G (4 mm) hook (Clover Amour Hook*)
- Note: I used a G hook for the head of the jellyfish, but tried both a G hook (blue jellyfish) and an H hook (purple jellyfish) for the curly cues.
- Yarnspirations Bernat Handicrafter Cotton Yarn: main color – 2 skeins, secondary color – 1 skein
- The Blue jellyfish is Robin’s Egg Blue and Mod Blue. The Purple jellyfish is Soft Violet and Hot Pink.
- 9mm safety eyes
- Black DMC embroidery thread
- embroidery needle
- scissors
- polyester fiberfill
ABBREVIATIONS
sl st – slip stitch
ch – chain stitch
sc – single crochet
hdc – half double crochet
dc – double crochet
sc2tog – single crochet 2 together (joining/decreasing stitch)
CROCHET JELLYFISH INSTRUCTIONS
Cap/Face
Round 1: Work 8 sc into a magic circle. Join with sl st to first sc. (8)
Round 2: Ch 1. Work 2 sc into each stitch around. Join with sl st to first sc. (16)
Round 3: Ch 1. *Work 1 sc into next stitch, 2 sc into next stitch.* Repeat around. Join with sl st to first sc. (24)
Round 4: Ch 1. *Work 1 sc into each of next 2 stitches, 2 sc into next stitch.* Repeat around. Join with sl st to first sc. (32)
Round 5: Ch 1. *Work 1 sc into each of next 3 stitches, 2 sc into next stitch.* Repeat around. Join with sl st to first sc. (40)
Round 6: Ch 1. *Work 1 sc into each of next 4 stitches, 2 sc into next stitch.* Repeat around. Join with sl st to first sc. (48)
Round 7-8: Ch 1. Work 1 sc into each stitch around. Join with sl st to first sc. (48)
Round 9: Ch 1. *Work 1 sc into each of next 5 stitches, 2 sc into next stitch.* Repeat around. Join with sl st to first sc. (56)
Round 10-14: Ch 1. Work 1 sc into each stitch around. Join with sl st to first sc. (56)
Round 15: Ch 1. *Work 1 sc into each of next 2 stitches. Work 1 sc2tog, 1 sc into next stitch, 1 sc2tog.* Repeat around. Join with sl st to first sc. (40)
Fasten off, and weave in ends.
Jellyfish bottom panel
Round 1: Ch 1. Work 8 sc into a magic circle. Join with sl st to first sc. (8)
Round 2: Ch 1. Work 2 sc into each stitch around. Join with sl st to first sc. (16)
Round 3: Ch 1. *Work 1 sc into next stitch, 2 sc into next stitch.* Repeat around. Join with sl st to first sc. (24)
Round 4: Ch 1. *Work 1 sc into each of next 2 stitches, 2 sc into next stitch.* Repeat around. Join with sl st to first sc. (32)
Round 5: Ch 3 (does not count as stitch). *Work 1 dc into each of next 3 stitches, 2 dc into next stitch.* Repeat around. Join with sl st to first sc. (40)
Fasten off, but leave a long enough tail to sc around. (Probably a few feet at least).
Jellyfish streamers/tentacles
I found the streamers were easiest and most fun when done freeform. All of them are a little different, but I used the same basics for each one to maintain consistency. You can check out my curly cue sampler to get an idea of what each type of curl will look like. Also, you can change up the hook size for a different look. I used a G hook for the blue jellyfish and an H hook for the purple jellyfish. On each jellyfish, there are 8 tentacles of varying width and length.
- Chain either 30, 40, 50, 60 or even 70.
- Work 2 (or 3) sc in each chain stitch OR work 2 (or 3) hdc in each chain stitch. If you’re starting with sc, then work into 2nd chain from hook. If you’re starting with hdc, then work into 3rd chain from hook.
- Now, think of this as a Choose Your Own Crochet Adventure. Continue working sc or hdc, working 2 or 3 stitches into each chain across, then fasten off, leaving a tail.
I found it best if you stick with a particular pattern long enough to establish the right curl, then change it to create a different type curl. Don’t change your stitch type too quickly. You can curl the curly cues properly or leave it messy, up to you!
Assembly
Step 1: Attach the safety eyes between rows 12 and 13 on the cap, about 8 stitches apart.
Step 2: Use the embroidery thread to sew on a mouth halfway between the eyes.
Step 3: Attach the tentacles to the bottom panel by weaving both tails of the tentacles through stitch spaces in the panel, and tie a double knot to secure. You can weave the ends in, or maybe not, since it’ll be hidden inside the stuffed head. I chose to weave in ends because I don’t know how hard the kids will pull on the tentacles.
Step 4: Match up the seam stitch of the panel against the seam stitch of the cap. Insert your hook through both loops (front to back) on one stitch on the cap, and pull through a loop of the panel’s tail. Work a chain stitch. Then insert your hook through the same cap stitch, and through the first stitch on the panel, pull up a loop and complete a sc. (It’s ok if you fudge this. You just need to attach the two pieces together to get started.)
Step 5: For the next stitch and for each stitch around, insert hook from outside of cap through all 4 loops (cap and panel). Work a sc.
Step 6: Once you’ve gone almost around, stuff the head with fiberfill, then continue working sc around to close up the head. Join to the first sc with a sl st. Fasten off and weave in ends.
If you’d like to hang your jellyfish, you can sew on a loop at the top. Otherwise you’re done!
Feel free to tag me (@freeamigurumii) in your photos on Instagram or Facebook if you’d like
All Finished.