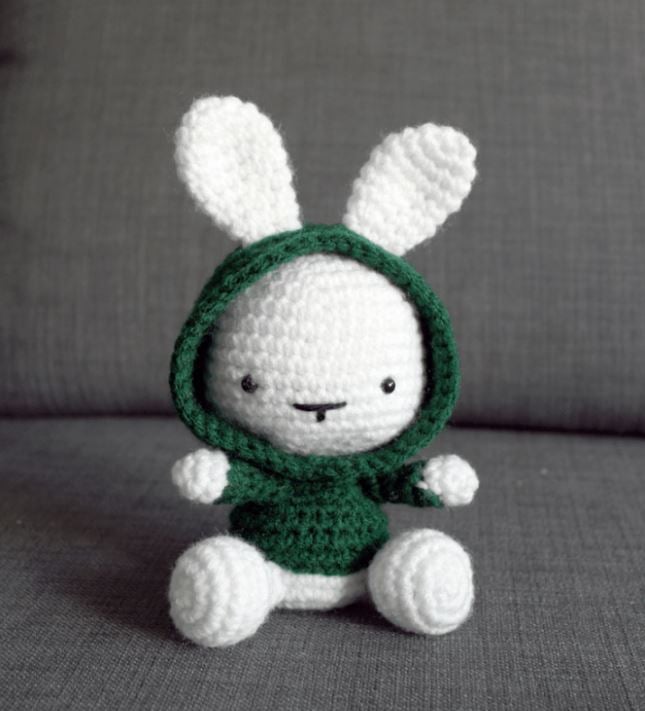
Amigurumi Hoodie Bunny Crochet Pattern
Hello amigurumi lovers and beautiful visitors, I wanted to share the free amigurumi patterns for you here. In my article I will share 1 pattern and how to make it for you. At the end of my article, I will share amigurumi patterns that can generate ideas for you.
WHAT YOU NEED / MATERIALS
* Worsted weight yarn in 2 colours (Colour A for the bunny, Colour B for the hoodie)
* 4.0 mm Crochet Hook
* Yarn Needle
* Safety Eyes (I used 6.0 mm)
* Poly-fil or any polyester stufng of your choice
* Scissors
STITCHES & ABBREVIATIONS
* ch – chain
* sc – single crochet
* st/sts – stitch/stitches
* sc inc – single crochet increase, 2 single crochets in one stitch
* sc dec – single crochet decrease, single crochet 2 stitches together
Head
Using a 4.0 mm crochet hook and Colour A yarn…
Round 1: Magic Ring with a base of 6 sc (6 sts)
Round 2: Sc inc in each st around (12 sts)
Round 3: [Sc, sc inc] x 6 times (18 sts)
Round 4: [2 sc, sc inc] x 6 times (24 sts)
Round 5: [3 sc, sc inc] x 6 times (30 sts)
Round 6: [4 sc, sc inc] x 6 times (36 sts)
Round 7: [5 sc, sc inc] x 6 times (42 sts)
Round 8-14: Sc in each st around (42 sts)
Insert the safety eyes between rows 11 and 12
Round 15: [5 sc, sc dec] x 6 times (36 sts)
Round 16: [4 sc, sc dec] x 6 times (30 sts)
Round 17: [3 sc, sc dec] x 6 times (24 sts)
Stuff firmly as you continue to decrease.
Round 18: [2 sc, sc dec] x 6 times (18 sts)
Round 19: [Sc, sc dec] x 6 times (12 sts)
Fasten off and leave a tail to sew onto the hood.
Ears (x 2)
Using a 4.0 mm crochet hook and Colour A yarn…
Round 1: Magic Ring with a base of 5 sc (5 sts)
Round 2: Sc inc in each st around (10 sts)
Round 3: [Sc, sc inc] x 5 times (15 sts)
Round 4-5: Sc in each st around (15 sts)
Round 6: [3 sc, sc dec] x 3 times (12 sts)
Round 7: Sc in each st around (12 sts)
Round 8: [2 sc, sc dec] x 3 times (9 sts)
Round 9: Sc in each st around (9 sts)
Round 10: [Sc, sc dec] x 3 times (6 sts)
Fasten off and leave a tail to sew onto the head.
Hood
Using a 4.0 mm crochet hook and Colour B yarn…
Round 1: Magic Ring with a base of 6 sc (6 sts)
Round 2: Sc inc in each st around (12 sts)
Round 3: [Sc, sc inc] x 6 times (18 sts)
Round 4: [2 sc, sc inc] x 6 times (24 sts)
Round 5: [3 sc, sc inc] x 6 times (30 sts)
Round 6: [4 sc, sc inc] x 6 times (36 sts)
Round 7: [5 sc, sc inc] x 6 times (42 sts)
Round 8: [6 sc, sc inc] x 6 times (48 sts)
Round 9-12: Sc in each st around (48 sts)
Round 13: Sc in the next 16 sts, chain 7, skip 7 sts and then sc in the next 2 sts, chain 7, skip 7 sts and then sc in the next 16 sts (48 sts)
Round 14-16: Sc in each st around (48 sts)
Feel free to do an extra round or two of sc if you want the hood to extend a little towards the face.
At this point, you might want to attach the ears to the head and try measuring to see if the hood ts the bunny. Depending on the thickness of your yarn and the tension, you might have to increase or decrease a row between rows 9-12.
Body
Using a 4.0 mm crochet hook and Colour A yarn…
Round 1: Magic Ring with a base of 7 sc (7 sts)
Round 2: Sc inc in each st around (14 sts)
Round 3: [Sc, sc inc] x 7 times (21 sts)
Round 4: [2 sc, sc inc] x 7 times (28 sts)
Round 5: Sc in each st around (28 sts)
Change to Colour B yarn…
Round 6: Slst in each st around (28 sts)
Round 7: Sc in the back loop only of each st around (28 sts)
Round 8-10: Sc in each st around (28 sts)
Round 11: [2 sc, sc dec] x 7 times (21 sts)
Round 12: [Sc, sc dec] x 7 times (14 sts)
Fasten off and leave a tail to sew onto the hood.
Arms (Make 2)
Using a 4.0 mm crochet hook and Colour A yarn…
Round 1: Magic Ring with a base of 6 sc (6 sts)
Round 2: [Sc, sc inc] x 3 times (9 sts)
Round 3: Sc in each st around (9 sts)
Change to Colour B yarn…
Round 4: Slst in each st around (9 sts)
Round 5: Sc in the back loop only of each st around (9 sts)
Round 6: [Sc, sc dec] x 3 times (6 sts)
Round 7-8: Sc in each st around (6 sts)
Fasten off and leave a tail to sew onto the body.
Legs (Make 2)
Using a 4.0 mm crochet hook and Colour A yarn…
Round 1: Magic Ring with a base of 6 sc (6sts)
Round 2: Sc inc in each st around (12 sts)
Round 3: [Sc, sc inc] x 6 times (18 sts)
Round 4-6: Sc in each st around (18 sts)
Round 7: [Sc, sc dec] x 6 times (12 sts)
Stuff firmly as you continue to decrease.
Round 8: Sc dec in each st around (6 sts)
Round 9: Sc in each st around (6 sts)
Fasten off, leaving a tail to sew onto the body.
Tail
Using a 4.0 mm crochet hook and Colour A yarn…
Round 1: Magic Ring with a base of 6 sc (6 sts)
Round 2: Sc inc in each st around (12 sts)
Round 3: Sc in each st around (12 sts)
Round 4: Sc dec in each st around (6 sts)
Fasten off and leave a tail to sew to the body.
After that, you basically have all your pieces ready to go.
FYI, this photo is missing the tail piece
ASSEMBLY
On the hood, you have two slits, these are for your bunny’s ears. To line them up correctly, the ears should sit right on top of the head. I attached it right after the rst round (photo 2)
Then, position your bunny’s head by placing it inside the hood with the ears through the slits. Make sure that your bunny’s eyes are facing outside.
Using the long strand that you left on the head, sew bottom of the head to the bottom of the hood (photo 7).
On the bottom of the hood where you sewed the head, you’ll see yarn in Colour A but don’t worry as this will be hidden once the body is attached.
Next, attach your tail to the body, as well as the arms and legs. And then attach the head along with the hood to the body.
If the head and body are attached properly, you should no longer be able to see Colour A yarn on the bottom of the hood. After that, you sew on the details of the bunny’s face and then you’re done!
And there you have it your very own Bunny in the Hood! Look at that, a family reunion!
Enjoy!