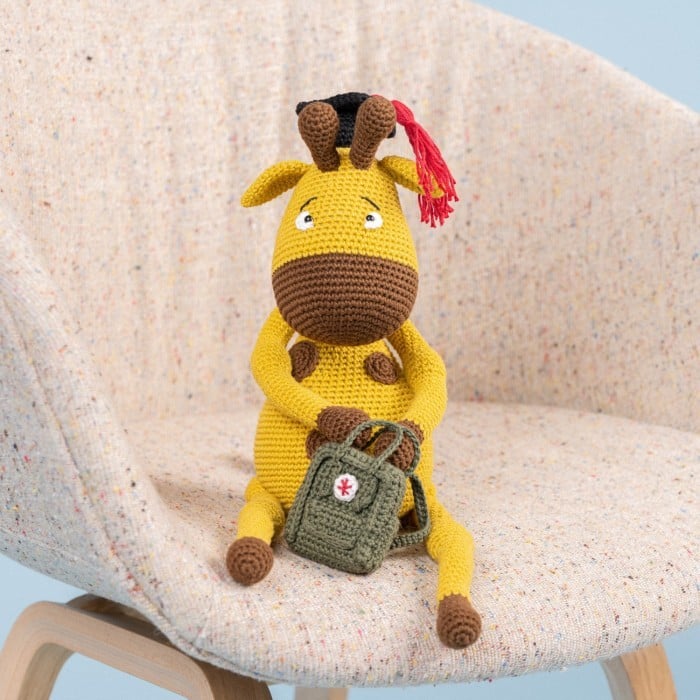
Amigurumi Giraffe Free Pattern
Hello amigurumi lovers and beautiful visitors, I wanted to share the free amigurumi patterns for you here. In my article I will share 1 pattern and how to make it for you. At the end of my article, I will share amigurumi patterns that can generate ideas for you.
MATERIALS
2 skeins of Rainbow Cotton 8/4, color 056 Curry
1 skein of Rainbow Cotton 8/4, color 021 Army
Green
1 skein of Mayflower Cotton 8/4, color 1432
Brown
Crochet hook 2.5 mm
A piece of black scrap yarn for the cap
A piece of dark red scrap yarn for the tassel
A piece of white scrap yarn for the eyes and the
rucksack
Metal wire
Safety eyes 5 mm
Fiberfill
ABBREVIATIONS
mr = magic ring
ch = chain
sc = single crochet
sl st(s) = slip stitch(es)
hdc = half double crochet
dc = double crochet
bl = back loop
inc = increase – 2 stitches in the same st
dec = decrease – 2 stitches together
rnd(s) = round(s)
(xx) = number of stitches after ended round
MEASUREMENTS
Height: 28 cm (11.2”) when sitting on his butt
PATTERN INFORMATION
Always stuff the head and body firmly. Always stuff between head and body as you sew the head on to avoid a wobbly head. Sew the head on with small firm stitches to avoid that it tilts.
Work tightly to avoid holes between the stitches.
All pieces are crocheted in the round, apart from the cap and the rucksack.
THE WHITE PART OF THE EYE
In white, make 2
Rnd 1: 4 sc in a mr, sl st
DON’T tighten the loop as you will have to place it around the safety eyes first. See picture below.
Fasten off and leave a tail long enough for assembling.
HEAD
In color 1432
Rnd 1: 6 sc in a mr
Rnd 2: (inc) 6 times (12)
Rnd 3: (1 sc, inc) 6 times (18)
Rnd 4: (2 sc, inc) 6 times (24)
Rnd 5: (3 sc, inc) 6 times (30)
Rnd 6: 2 sc, inc, (4 sc, inc) 5 times, 2 sc (36)
Rnd 7: (5 sc, inc) 6 times (42)
Rnd 8: 3 sc, inc, (6 sc, inc) 5 times, 3 sc (48)
Rnd 9: (7 sc, inc) 6 times (54)
Rnd 10: 4 sc, inc, (8 sc, inc) 5 times, 4 sc (60)
Rnds 11-15: 1 sc in each st (60)
Switch to color 056.
Rnds 16-19: 1 sc in each st (60)
Rnd 20: (8 sc, dec) 6 times (54)
Rnds 21-23: 1 sc in each st (54)
Rnd 24: (7 sc, dec) 6 times (48)
Rnds 25-27: 1 sc in each st (48)
Rnd 28: (6 sc, dec) 6 times (42)
Rnds 29-31: 1 sc in each st (42)
Rnd 32: (5 sc, dec) 6 times (36)
Rnds 33-34: 1 sc in each st (36)
Attach the eyes between rounds 21-22 with 7 sc in between.
Place the white part around the eye and tighten the magic ring to close it completely. Pull the ends
through to the back side and secure them.
Stuff the head as you make it.
Rnd 35: (4 sc, dec) 6 times (30)
Rnd 36: (3 sc, dec) 6 times (24)
Rnd 37: (2 sc, dec) 6 times (18)
Rnd 38: (1 sc, dec) 6 times (12)
Rnd 39: (2 sc, dec) 3 times (9)
Fasten off and leave a tail long enough for closing the hole. Use a needle to gather the last 9
stitches in the front loop and tighten the yarn to close the hole nicely. Weave in ends.
ARM
Begin with color 1432, make 2
Rnd 1: 6 sc in a mr
Rnd 2: (inc) 6 times (12)
Rnd 3: (1 sc, inc) 6 times (18)
Rnds 4-6: 1 sc in each st (18)
Rnd 7: (1 sc, dec) 6 times (12)
Rnds 8-9: 1 sc in each st (12)
Switch to color 056.
Stuff the hand firmly and the rest lightly as you work.
Rnds 10-24: 1 sc in each st (12)
Rnd 25: (1 sc, inc) 6 times (18)
Rnds 26-29: 1 sc in each st (18)
Rnd 30: (1 sc, dec) 6 times (12)
Rnds 31-45: 1 sc in each st (12)
Fasten off.
BODY
In color 056
Rnd 1: 6 sc in a mr
Rnd 2: (inc) 6 times (12)
Rnd 3: (1 sc, inc) 6 times (18)
Rnd 4: (2 sc, inc) 6 times (24)
Rnd 5: (3 sc, inc) 6 times (30)
Rnd 6: (4 sc, inc) 6 times (36)
Rnd 7: (5 sc, inc) 6 times (42)
Rnd 8: (6 sc, inc) 6 times (48)
Rnd 9: (7 sc, inc) 6 times (54)
Rnd 10: (8 sc, inc) 6 times (60)
Rnd 11: (9 sc, inc) 6 times (66)
Rnd 12: (10 sc, inc) 6 times (72)
Rnds 13-24: 1 sc in each st (72)
Rnd 25: (10 sc, dec) 6 times (66)
Rnds 26-28: 1 sc in each st (66)
Rnd 29: (9 sc, dec) 6 times (60)
Rnds 30-31: 1 sc in each st (60)
Rnd 32: (8 sc, dec) 6 times (54)
Rnds 33-34: 1 sc in each st (54)
Rnd 35: (7 sc, dec) 6 times (48)
Rnds 36-37: 1 sc in each st (48)
Stuff the body as you make it.
Rnd 38: (6 sc, dec) 6 times (42)
Rnd 39: 1 sc in each st (42)
Rnd 40: (5 sc, dec) 6 times (36)
Rnd 41: 1 sc in each st (36)
Rnd 42: (4 sc, dec) 6 times (30)
Rnds 43-44: 1 sc in each st (30)
Rnd 45: (3 sc, dec) 6 times (24)
Rnds 46-48: 1 sc in each st (24)
Crochet the underside of the arms on on the next round, see picture.
Rnd 49: 6 sc with the underside of the arm, 9 sc, 6 sc with the underside of the arm, 3 sc (24)
Crochet the upper side of the arms on on the next round, see picture.
Rnds 50-57: 1 sc in each st (24)
Rnd 58: (6 sc, dec) 3 times (21)
Rnds 59 -64: 1 sc in each st (21)
Rnd 65: 1 sc in each of the next 18 sts
Rnd 66: 1 sc, 3 hdc, 3 dc, 3 hdc, 2 sc
Adjust if necessary, the 3 dc should be exactly in the middle of the neck, the neck should be
a bit longer now, see picture below.
Fasten off and leave a tail long enough for sewing.
Fold the metal wire a few times and insert it into the body to stiffen the neck.
HORN
In color 1432, make 2
Rnd 1: 6 sc in a mr
Rnd 2: (inc) 6 times (12)
Rnd 3: (3 sc, inc) 3 times (15)
Rnds 4-6: 1 sc in each st (15)
Stuff the horn with fiberfill as you work.
Rnd 7: (3 sc, dec) 3 times (12)
Rnd 8: (2 sc, dec) 3 times (9)
Rnds 9-13: 1 sc in each st (9)
End with a sl st.
Fasten off and leave a tail long enough for sewing.
EAR
In color 056, make 2
Rnd 1: 3 sc in a mr
Rnd 2: (inc) 3 times (6)
Rnd 3: (1 sc, inc) 3 times (9)
Rnd 4: (2 sc, inc) 3 times (12)
Rnd 5: (3 sc, inc) 3 times (15)
Rnd 6: (4 sc, inc) 3 times (18)
Rnds 7-10: 1 sc in each st (18)
Rnd 11: (4 sc, dec) 3 times (15)
Rnd 12: (3 sc, dec) 3 times (12)
Rnd 13: (2 sc, dec) 3 times (9)
Fasten off and leave a tail long enough for sewing.
Don’t stuff the ears.
LEG
Begin with color 1432, make 2
Rnd 1: 6 sc in a mr
Rnd 2: (inc) 6 times (12)
Rnd 3: (1 sc, inc) 6 times (18)
Rnds 4-6: 1 sc in each st (18)
Rnd 7: (1 sc, dec) 6 times (12)
Rnds 8-9: 1 sc in each st (12)
Switch to color 056.
Stuff the foot firmly and the rest lightly as you work.
Rnds 10-24: 1 sc in each st (12)
Rnd 25: (1 sc, inc) 6 times (18)
Rnds 26-29: 1 sc in each st (18)
Rnd 30: (1 sc, dec) 6 times (12)
Rnds 31-45: 1 sc in each st (12)
Stop stuffing the leg from here, there should not be any filling in the hip. See picture below.
Rnd 46: (1 sc, inc) 6 times (18)
Rnd 47: (2 sc, inc) 6 times (24)
Rnds 48-52: 1 sc in each st (24)
Rnd 53: (2 sc, dec) 6 times (18)
Rnd 54: (1 sc, dec) 6 times (12)
Rnd 55: (2 sc, dec) 3 times (9)
Rnd 56: (1 sc, dec) 3 times (6)
Fasten off and leave a tail long enough for closing the hole. Use a needle to gather the last 6
stitches in the front loop and tighten the yarn to close the hole nicely. Weave in ends.
SPOTS
Large spot
In color 1432, make 2
Rnd 1: 6 sc in a mr
Rnd 2: (inc) 6 times (12)
Rnd 3: (1 sc, inc) 6 times (18)
Rnd 4: 1 sc in each st (18)
Fasten off and leave a tail long enough for sewing.
Medium spot
In color 1432, make 2
Rnd 1: 6 sc in a mr
Rnd 2: (inc) 6 times (12)
Rnd 3: (1 sc, inc) 6 times (18)
Fasten off and leave a tail long enough for sewing.
Small spot
In color 1432, make 2
Rnd 1: 6 sc in a mr
Rnd 2: (inc) 6 times (12)
Rnd 3: 1 sc in each st (12)
Fasten off and leave a tail long enough for sewing.
TAIL
Begin with color 1432
Rnd 1: 5 sc in a mr
Rnd 2: inc, 4 sc (6)
Rnd 3: inc, 5 sc (7)
Rnd 4: inc, 6 sc (8)
Rnd 5: inc, 7 sc (9)
Rnd 6: inc, 8 sc (10)
Rnd 7: inc, 9 sc (11)
Rnd 8: inc, 10 sc (12)
Rnd 9: (3 sc, inc) 3 times (15)
Rnd 10: 1 sc in each st (15)
Rnd 11: (3 sc, dec) 3 times (12)
Rnd 12: (2 sc, dec) 3 times (9)
Switch to color 056.
Stuff the tip with fiberfill, don’t stuff the rest of the tail.
Rnds 13-32: 1 sc in each st (9)
Fasten off and leave a tail long enough for sewing.
GRADUATION CAP
The square piece
In black yarn, make 2
Work in rows and ch 1 to turn at the end of a row.
Rnd 1: Ch 11
Rnd 2: begin in the 2nd sc, sc in each ch, ch, turn (10)
Rnds 3-11: 1 sc in each st (10)
Crochet a border around the square and work 2 sc in one sc in the corners.
When you have made both squares, sl st the two pieces together wrong side facing wrong side.
Tassel
In dark red yarn
Cut 15 strands of yarn each measuring 15 cm (6”).
Fold them in half to create a loop at the top and tie a knot with a piece of yarn to secure the
shape.
Pull a piece of yarn through the loop, insert it through the middle of the cap at the top, and secure
the yarn.
Trim the strands, they should measure approx. 6 cm (2.4”).
The round piece
In black yarn
Rnd 1: 6 sc in a mr
Rnd 2: (inc) 6 times (12)
Rnd 3: (1 sc, inc) 6 times (18)
Rnd 4: (2 sc, inc) 6 times (24)
Rnd 5: 1 sc in each st in the bl (24)
Rnds 6-10: 1 sc in each st (24)
End with a sl st.
Fasten off and leave a tail long enough for sewing.
Stuff the round piece and sew it onto the square piece in the middle.
RUCKSACK
In color 021. Work in rows and ch 1 to turn at the end of each row.
Front
Rnd 1: Ch 12
Rnd 2: begin in the 2nd ch, 1 sc in each st, ch 1, turn (11)
Rnds 3-15: 1 sc in each st (11)
Then crochet a border around the entire piece. Don’t cut the yarn but continue from row 15.
Rnd 16: Work 13 sc along the border (1 sc at each row end), inc, 9 sc, inc, 13 sc (1 sc at each row
end), inc, 9 sc, inc, 1 sl st (52)
See pictures below.
Fasten off.
Back
Rnd 1: Ch 12
Rnd 2: begin in the 2nd ch, 1 sc in each st, ch 1, turn (11)
Rnds 3-15: 1 sc in each st (11)
Then crochet a border around the entire piece. Don’t cut the yarn but continue from row 15.
Rnd 16: Work 13 sc along the border (1 sc at each row end), inc, 9 sc, inc, 13 sc (1 sc at each row
end), inc, 9 sc, inc, sl st (52)
Continue to work in a spiral.
Rnd 17: 1 sc in each st in the bl (52)
Rnds 18-20: 1 sc in each st (52)
See picture above.
Fasten off.
Now, join the front and back pieces Count 11 sc backwards from the last worked stitch on round
20 and insert the yarn in the 12th stitch together with the front piece, work the first sc
in the same stitch. See pictures below.
Work another 11 sc and fasten off. They are to be crocheted together with 12 sc in total.
Fasten off.
Now, work in rows and ch 1 to turn at the end of a row.
Insert the yarn on the right side, in the first stitch in the left corner of the back piece.
Rnd 22: 1 sc in the bl of each st, ch 1, turn (40)
Rnd 23: 1 sc in each st, ch 1, turn (40)
Rnd 24: 1 sc in each st (40)
Fasten off and leave a tail long enough for sewing.
Stuff with a piece of kitchen roll folded in several layers to a suitable thickness and cut to size and
then sew the edges of the back piece onto the front piece.
Front pocket
Work in rows, ch 1 to turn at the end of each row.
Rnd 1: Ch 8
Rnd 2: begin the 2nd chain from the hook, 1 sc in each st, ch 1, turn (7)
Rnds 3-8: 1 sc in each st, ch 1, turn (7)
Crochet a border of sc around it, work 2 sc in one sc in the corners.
Fasten off and leave a tail long enough for sewing it onto the rucksack.
Side pockets
Make 2.
Work in rows, ch 1 to turn at the end of each row.
Rnd 1: Ch 9
Rnd 2: begin in the 2nd ch, 1 sc in each st, ch 1, turn (8)
Rnds 3-5: 1 sc in each st, ch 1, turn (8)
Fasten off and leave a tail long enough for sewing and sew them onto each side of the rucksack.
Handle
Make 2.
Rnd 1: Ch 6
Rnd 2: begin in the 2nd ch, 1 sc in each st, (5) 1 sl st in the same stitch
Fasten off and make one more, but don’t cut the yarn on number 2, ch 23 and attach it to the top
of the first one you made. See picture.
Sew the handles on on both sides of the rucksack and attach them at the top
Strap
Rnd 1: Ch 60
Rnd 2: begin in the 2nd ch, 1 sc in each st (59)
Fasten off and leave a tail long enough for sewing.
Fold it in half and position the fold at the top of the back piece of the rucksack and sew it on. Sew
them on in each corner at the bottom.
Logo
In white yarn
Rnd 1: 10 sc in a mr, 1 sl st
Fasten off and leave a tail long enough for sewing.
Embroider the star in the middle with dark red yarn and sew the logo onto the rucksack as shown
in the picture.
ASSEMBLING
● Sew the horns on on rounds 30-33 with 2 sc in between.
● Sew the ears on on round 33, 3 sc from the horns.
● Embroider eyebrows as shown in the picture below.
● Sew the head onto the body. Position the front edge of the neck on round 30 and the back
edge on round 34. Count from the bottom of the head. Sew with small stitches and stuff firmly
with fiberfill between head and neck.
● Sew one spot of each size onto the front and onto the back, respectively.
● Position the legs on rounds 7-17 on the body and sew them on.
● Sew the tail on in the middle of the back side.
● Sew the cap onto the head between rounds 35-36, sew in the front loop of the round part of
the cap, rnd 5.
Enjoy!