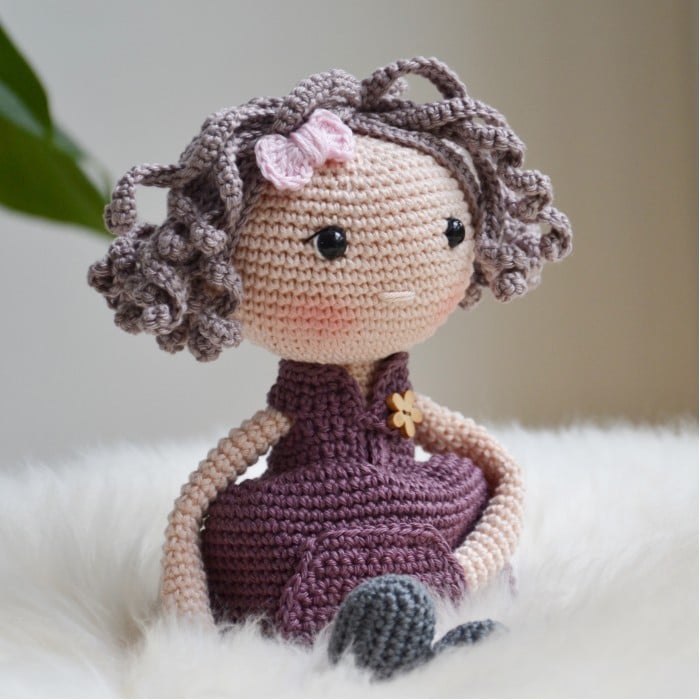
Amigurumi Doll Free Pattern
Hello amigurumi lovers and beautiful visitors, I wanted to share the free amigurumi patterns for you here. In my article I will share 1 pattern and how to make it for you. At the end of my article, I will share amigurumi patterns that can generate ideas for you.
MATERIALS
2 skeins of Rainbow Cotton 8/4, col Light Peach (048)
1 skein of Rainbow Cotton 8/4, col Aubergine (036)
1 skein of Rainbow Cotton 8/4, col Volcano Gray (012)
1 skein of Rainbow Cotton 8/4, col Light Grey (016)
1 skein of Rainbow Cotton 8/4, col Dark Grey (011)
Crochet hook 2.5 mm
Scraps of yarn – pink, black and white
Filling
Safety eyes, 7 mm
1 wooden button, 13 mm
pins
14 cm of rubber cord, 1 cm wide, for stabilising head and neck (optional)
ABBREVIATIONS
mr = magic ring
ch = chain
sc = single crochet
sl st = slip stitch
dc = double crochet
Tbl = through back loop
Tfl = through front loop
inc = increase – work 2 sts in the same st
dec = decrease – work 2 sts together
BO = bind of
(xx) = parenthesis at the end of round = total
number of sts after this round
MEASUREMENTS
Approx. 30 cm/12” tall
PATTERN INFORMATION
The sara doll has dressed nicely to be ready to meet a young boy or girl. Her best friend’s name is Sungi and they love having fun together.
TIPS AND INFO
Head and body should always be stuffed firmly.
Make sure you also stuff firmly between the head and body when joining to keep the head from
slouching.
Make sure you work all your stitches tightly to avoid any gaps between them.
All parts are worked in rounds without joining, except for the dress.
ARMS
Make 2 with Light Peach
Round 1: 6 sc in mr
Round 2: (1 sc, inc) x 3 (9)
Round 3-27: 1 sc in each st (9)
Do not stuff the arm.
BO
SOCKS AND LEGS
Make 2. Start with Light Gray
Round 1: 6 sc in mr
Round 2: (inc) x 6 (12)
Round 3: (3 sc, inc) x 3 (15)
Round 4: 1 sc tbl in each st (15)
Round 5: 1 sc in each st (15)
Round 6: dec x 2, 11 sc (13)
Round 7: dec, 11 sc (12)
Stuff the legs slightly as you go along.
Round 8: 6 sc, change color to Light Peach, 6 sc tbl (placing the color change at the back) (12)
Round 9: 6 sc tbl, 6 sc through both loops (12)
Rounds 10-31: 1 sc in each st (12)
Round 32: 3 sc bringing you to the side of the leg.
Make one more leg but DO NOT break yarn when finished with the second one.
Starting from the second leg, you will now work the body, finally you will work the head in one
piece.
Work the cuff of the stocking by inserting the yarn on the wrong side. Working only in the front
loops of rounds 8 and 9, work 1 sc in each st, sl st in first st. BO.
See picture 8 to see before the cuff is worked and picture 9 for after.
BODY AND HEAD
Continue working on the second leg, where your yarn is still attached.
Round 1: Ch 6 and join the legs making sure the toes point in the same direction. See picture 1.
You will now be working around both legs.
Round 2: 12 sc around one leg, 6 sc on one side of your ch-6, 12 sc around the other leg, 6 sc on
the other side of your ch-6 (36)
Stuff the body as you go along
Rounds 3-13: 1 sc in each st (36)
Round 14: (4 sc, dec) x 6 (30)
Round 15-18: 1 sc in each st (30)
Round 19: (3 sc, dec) x 6 (24)
Rounds 20-21: 1 sc in each st (24)
Now you will crochet the arms to the body starting at the inside of the arm.
With pins, fasten both arms to the body, one on each side.
Round 22: You will now sc until you reach the arm, number of sc may vary if work has been
staggered slightly, you will adjust the number of sc, depending on where you finished on round 21.
The doll in the picture was worked as follows:
6 sc, 3 sc through arm and body, 9 sc, 3 sc through arm and body, 3 sc (24)
You have worked 24 sc on this round. Because the next round will be worked along the outside of
the arms, you will increase the st count to 30 sc.
You will now be working the round of the shoulders.
Round 23: 5 sc, 6 sc across the shoulder, 9 sc, 6 sc across shoulder, 4 sc (30)
Round 24: 1 sc in each st (30)
Round 25: (3 sc, dec) x 6 (24)
Round 26: (2 sc, dec) x 6 (18)
Round 27: (4 sc, dec) x 3 (15)
Rounds 28-30: 1 sc in each st (15)
Prepare the cord by wrapping enough yarn around the middle of the cable to fill out the neck. This
way you don’t have to stuff with filling around the cord and the color won’t shine through.
Now, without breaking the yarn, you will start working the head.
Round 31: (inc) x 15 (30)
Round 32: 2 sc, inc, (4 sc, inc) x 5, 2 sc (36)
Round 33: (5 sc, inc) x 6 (42)
Round 34: 3 sc, inc, (6 sc, inc) x 5, 3 sc (48)
Round 35: (7 sc, inc) x 6 (54)
Round 36: 4 sc, inc, (8 sc, inc) x 5, 4 sc (60)
Round 37-47: 1 sc in each st (60)
Attach the safety eyes between rounds 41-42, 10 sc apart.
Place the 14 cm/5.5” cord inside the body making sure the middle part where the yarn is wrapped
around is placed in the neck.
See picture 6.
Round 48: (8 sc, dec) x 6 (54)
Round 49: (7 sc, dec) x 6 (48)
Round 50: (6 sc, dec) x 6 (42)
Stuff the head as you go along, especially be sure to stuff firmly around the cord.
Round 51: (5 sc, dec) x 6 (36)
Round 52: (4 sc, dec) x 6 (30)
Round 53: (3 sc, dec) x 6 (24)
Round 54: (2 sc, dec) x 6 (18)
Round 55: (1 sc, dec) x 6 (12)
Round 56: (2 sc, dec) x 3 (9)
BO, leaving a long tail for joining the remaining 9 sts.
With a tapestry needle join the 9 sts tfl and pull tight to close the gap nicely.
SHOES
Make 2 with Dark Grey
You will be working around your ch-7.
Round 1: ch 7
Round 2: starting in the 2. ch from the hook, 5 sc, 3 sc in next st continue along the other side of
your ch-7, 5 sc, 3 sc in next st (16). See picture 10.
Round 3: 5 sc, inc x 3, 5 sc, inc x 3 (22). See picture 11 and 12.
Rounds 4-7: 1 sc in each st (22)
Round 8: 5 sc, dec x 4, 9 sc (18)
Round 10: 4 sc, bringing you to the side in order to work the strap.
Round 11: ch 5 to make the strap for closing.
BO, leaving enough yarn for sewing.
HAIR
With Volcano Gray
You will work all the hair in one go, without breaking the yarn.
Round 1: 6 sc in mr
Round 2: (inc) x 6 (12)
Round 3: (1 sc, inc) x 6 (18)
Work two strands of hair in each sc, through the front loop and then through the back loop,
creating two layers of hair.
You will start by working through the front loops.
Round 4: 1 sc tfl, ch 31, turn to work back along the chain, inc x 2, 1 sc in each ch (32) Repeat all
around, until you have 18 strands of hair.
Now you will follow the same procedure working through the back loops.
Round 5: 1 sc tbl, ch 31, turn to work back along the chain, inc x 2, 1 sc in each ch (32) Repeat all
around.
BO.
DRESS
With Aubergine
The yoke is worked back and forth, each row ending with a ch-1. The shirt is worked around
without joining.
Round 1: ch 25
Rounds 2-3: 1 sc in each st, ch 1, turn(24)
Now work the armholes.
Round 4: 4 sc, ch 6, skip 5 sc, 6 sc, ch 6, skip 5 sc, 4 sc, ch 1, turn (26) See picture 15.
Round 5: 4 sc, 6 sc (sleeve), 6 sc, 6 sc (sleeve), 4 sc (26)
Round 6: 1 sc in each st (26)
Round 7: 5 sc, inc, 14 sc, inc, 5 sc (28)
Round 8: 1 sc in each st (28)
Round 9: 6 sc, inc, 14 sc, inc, 6 sc (30)
Round 10: 7 sc, inc, 14 sc, inc, 7 sc (32)
Now you will work a sc edge along both front panels and along the neck
Round 11: 9 sc along front edge, 24 sc around the neck, 9 sc along front edge.
See picture 16.
Now you will increase along the bottom edge to work the skirt.
Round 12: inc x 32 (64) See picture 17.
Sl st in first sc to join to make the skirt. See picture 18.
Rounds 13-28: 1 sc in each st (64)
Round 29: 18 sc to hide the BO on the side of the dress..
BO.
POCKET FOR THE DRESS
With Aubergine
You will work back and forth turning at the end of each row with a ch-1.
Row 1: ch 16
Row 2: Starting in the 2. ch from the hook, 15 sc, ch 1, turn (15)
Row 3: 1 sc in each st (15)
Row 4: skip 1 sc, 14 sc, ch 1, turn (14)
Row 5: skip 1 sc, 13 sc, ch 1, turn (13)
Row 6: skip 1 sc, 12 sc, ch 1, turn (12)
Row 7: skip 1 sc, 11 sc, ch 1, turn (11)
Row 8: skip 1 sc, 10 sc, ch 1, turn (10)
Row 9: skip 1 sc, 9 sc, ch 1, turn (9)
Now sc all around the edge of the pocket. See picture 19 and 20.
BO leaving a long tail for sewing.
Sew the pocket onto the dress in the middle of the front panel.
BOW
With pink scrap yarn.
Round 1: Make a mr and work as follows:
ch 3, 5 dc, ch 3, 1 sl st, ch 3, 5 dc, ch 3, 1 sl st
Pull the magic ring closed and wrap the yarn around the middle to shape the bow.
BO leaving a long tail for sewing.
See picture 27.
FINISHING
· Place the hair on the head and secure it with pins. Also pin the inner layer of hair to the head.
· With large stitches sew the hair onto the head. You can let the outer layer fall more loosely.
· Place the dress on the doll.
· Embroider the nose between rounds 37 and 38 with 3 sts across 3 sc.
· With white yarn make a stitch at the outside of the eyes.
· Embroider the eyelashes with black yarn.
· If you want, apply a little blusher to the cheeks.
· Sew the bow onto the hair as shown.
· With Aubergine ch 10 and join to the dress to make a strap for the button. Then sew the button in place.
· Put the shoes on her feet and sew the straps.
Enjoy!