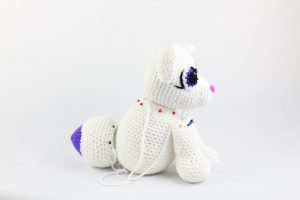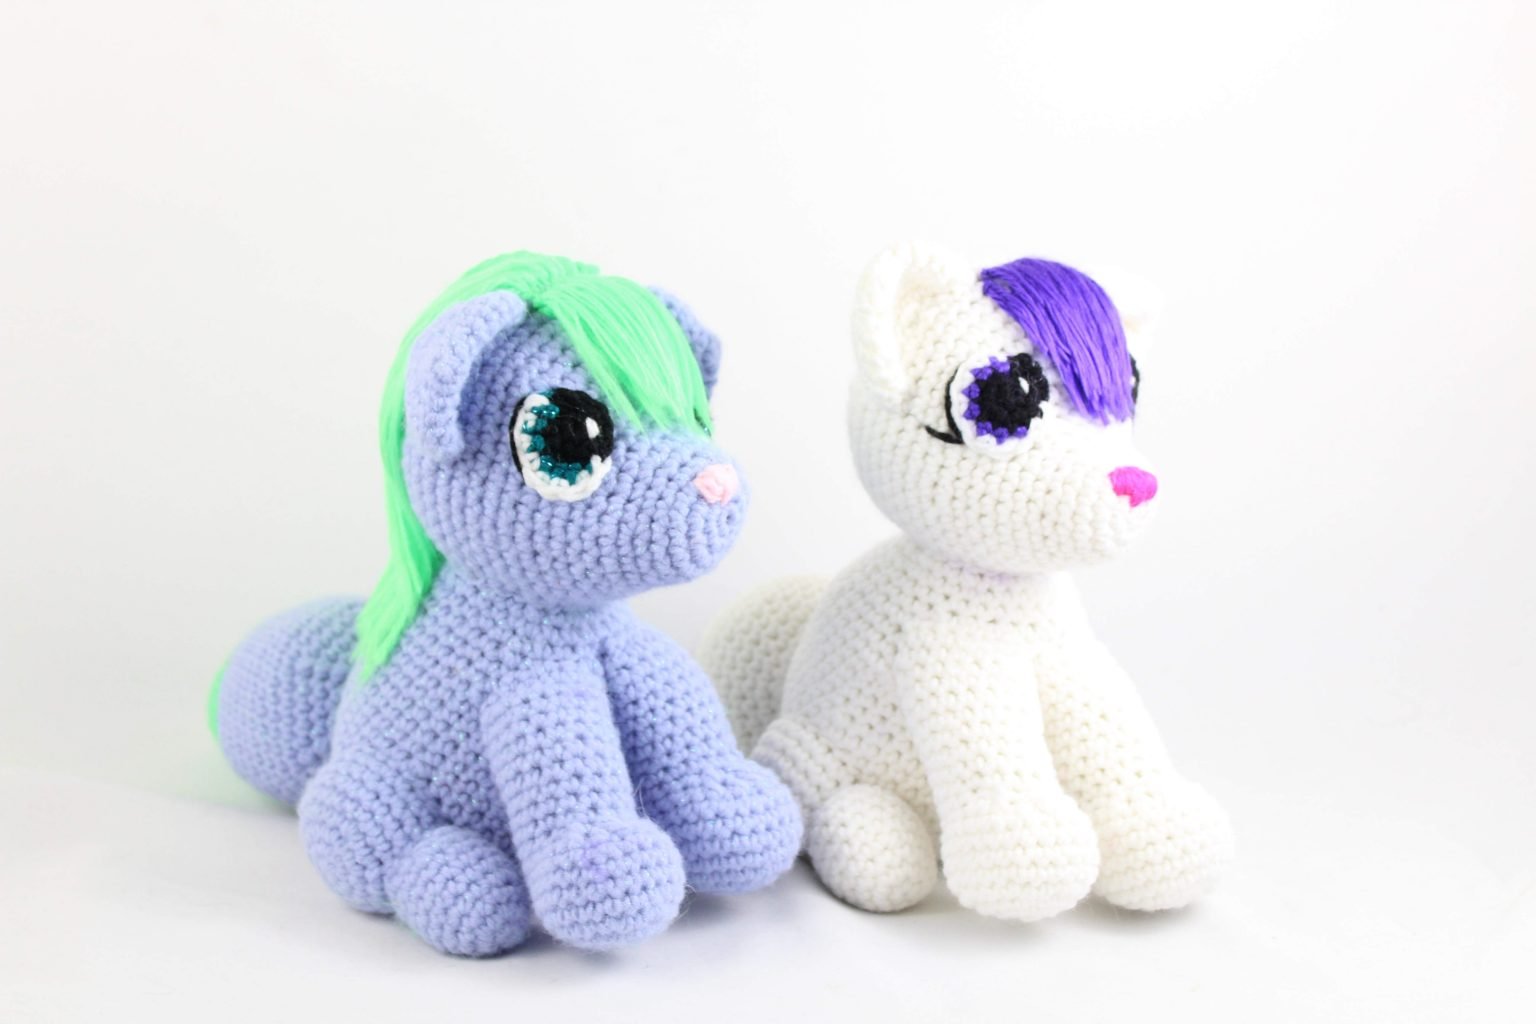
Amigurumi Anime Fox Crochet Pattern
Hello amigurumi lovers and beautiful visitors, I wanted to share the free amigurumi patterns for you here. In my article I will share 1 pattern and how to make it for you. At the end of my article, I will share amigurumi patterns that can generate ideas for you.
Supplies:
4mm crochet hook, 4/Medium weight yarn in Main Color, Contrast color, White, Pink, and Black. Tapestry needle, scissors, hair straightener (optional) and stuffing.
Additional Information:
Difficulty: Easy
This pattern refers to “Main Color”. This is the main color you will use for your fox. I used white for the example in this pattern. “Contrast Color” is the color you want the tail tip and hair to be. I used purple for the example in this pattern. We start by making the head, then the head details, then the arms, tail, legs, and finally make the hair!
Head:
In Main Color
Round 1: 6 Sc in Magic Ring (6)
Round 2: *Inc* all around (12)
Round 3: *Inc, Sc* all around (18)
Round 4-6: *Sc* all around (18)
Round 7: *Inc, Sc 2* all around (24)
Round 8-9: *Sc* all around (24)
Round 10: Sc in the next 8 st, *Inc* in the next 6 st, Sc in the last 10 st (30)
Round 11: Sc in the next 8 st, Repeat *Inc in the next st, Sc in the next st* 6 times. Sc in the next 10 st (36)
Round 12: *Sc* all around (36)
Round 13: *Inc, Sc 5* all around (42)
Round 14: *Inc, Sc 6* all around (48)
Round 15-21: *Sc* all around (48)
Round 22: *Dec, Sc 6* all around (42)
Round 23: *Dec, Sc 5* all around (36)|
Round 24: *Dec, Sc 4* all around (30)
Round 25: *Dec, Sc 3* all around (24)
Stuff here. Continue stuffing after each round.
Round 26: *Dec, Sc 2* all around (18)
Round 27: *Dec, Sc* all around (12)
Round 28: *Dec* all around (6)
Finish off and pin on as shown. Sew on.
Eyes: (Make 2)
In Black
Round 1: 6 Sc in Magic Ring (6)
Round 2: *Inc* all around (12)
Round 3: Switch to eye color (such as blue, pink, etc), Sc in the next 7 st.
Attach white yarn to beginning of the round by inserting hook into first st of Round 3 and pulling white yarn through that first st. Ch 1, Sc that same first st. Sc in the next 8 st.
Finish off and Sew an eye twinkle in white. Tie loose ends together and cut the yarn ends with exception of one white stand and one black strand. Use these strands to sew the eyes onto the face. Pin the eyes onto the head as shown then sew on.
Nose:
In Pink
Insert needle with thread where shown, and pull needle out one stitch above. Reinsert needle into the bottom area and pull needle out one stitch above. Repeat this until you meet the middle of the nose.
Once at the middle of the nose, insert needle one stitch below nose, and pull out the same area you have been. Repeat this a total of 3 times. Now go back to inserting needle as you were before in steps until you complete the nose. Insert needle to the left corner of the nose to give the top of the nose a clean look. Weave in ends.
Ears: (Make 2)
In Main Color
Round 1: 6 Sc in Magic Ring (6)
Round 2: *Sc* all around (6)
Round 3: *Inc* all around (12)
Round 4: *Inc, Sc* all around (18)
Round 5: *Inc, Sc 2* all around (24)
Round 6-8: *Sc* all around (24)
Finish off and fold the ear a bit, pin on as shown. Sew on.
Body:
In Main Color
Round 1: 6 Sc in Magic Ring (6)
Round 2: *Inc* all around (12)
Round 3: *Inc, Sc* all around (18)
Round 4: *Inc, Sc 2* all around (24)
Round 5: *Inc, Sc 3* all around (30)
Round 6: *Inc, Sc 4* all around (36)
Round 7: *Inc, Sc 5* all around (42)
Round 8: *Inc, Sc 6* all around (48)
Round 9-16: *Sc* all around (48)
Round 17: *Dec, Sc 6* all around (42)
Round 18-22: *Sc* all around (42)
Round 23: *Dec, Sc 5* all around (36)
Round 24-25: *Sc* all around (36)
Round 26: *Dec, Sc 4* all around (30)
Round 27-28: *Sc* all around (30)
Round 29: *Dec, Sc 3* all around (30)
Finish off and stuff. Pin to the head as shown and sew on.
Front Arms: (Make 2)
In Main Color
Round 1: 6 Sc in Magic Ring (6)
Round 2: *Inc* all around (12)
Round 3: *Inc, Sc* all around (18)
Round 4: *Inc, Sc 2* all around (24)
Round 5-8: *Sc* all around (24)
Round 9: Sc in the next 11 st, *Dec* 5 times, Sc in the last 3 st (19)
Round 10: Sc in the next 11 st, *Dec* 3 times, Sc in the last 2 st (17)
Round 11-20: *Sc* all around (17)
Finish off and stuff. Pin on as shown and sew on.
Tail:
In Contrast Color
Round 1: 6 Sc in Magic Ring (6)
Round 2: *Sc* all around (6)
Round 3: *Inc* all around (12)
Round 4: *Sc* all around (12)
Round 5: *Inc, Sc* all around (18)
Round 6-8: *Sc* all around (18)
Round 9: *Inc, Sc 2* all around (24)
Round 10: *Sc* all around (24)
Switch to Main color
Round 11: *Inc, Sc* all around (30)
Round 12-19: *Sc* all around (30)
Round 20: *Dec, Sc 4* all around (24)
Round 21: *Dec, Sc 3* all around (19)
Finish off, stuff, and pin on as shown. Sew on.
Legs Sides: (Make 2)
In Main Color
Round 1: 6 Sc in Magic Ring (6)
Round 2: *Inc* all around (12)
Round 3: *Inc, Sc* all around (18)
Round 4: *Inc, Sc 2* all around (24)
Round 5-8: *Sc* all around (24)
Finish off and pin on as shown. Sew on, stuffing before fully sewing shut.
Feet: (Make 2)
In Main Color
Round 1: 6 Sc in Magic Ring (6)
Round 2: *Inc* all around (12)
Round 3: *Sc* all around (12)
Round 4: *Inc, Sc* all around (18)
Round 5-8: *Sc* all around (18)
Round 9: *Dec, Sc* all around (12)
Finish off, stuff, and pin on as shown. Sew on.
Hair: (Optional)
In Contrast Color
Take a ~6″ piece of contrast color yarn. Insert hook into the top of the head and pull the yarn through the top of the head. Yarn over with both ends of yarn and pull through the loop. You have just attached a hair strand!
Repeat this for two rows, making sure the hair goes forward. Brush the yarn out. The hair will look wavy, you can keep it this way or carefully straighten the hair with a hair straightener. Cut the hair as desired.
Hair: (Optional)
In Contrast Color
Take a ~8″ piece of contrast color yarn and attach to the back head area. Follow attachment instructions as shown previously. Repeat this for four rows, making sure the hair is going back and not facing forward. Brush hair our, straighten if desired, and cut to your liking.
Feel free to tag me (@freeamigurumii) in your photos on Instagram or Facebook if you’d like!
All Finished.